Lesson 3: Preparing to launch an ad campaign
Before we begin, let’s define some key terms.
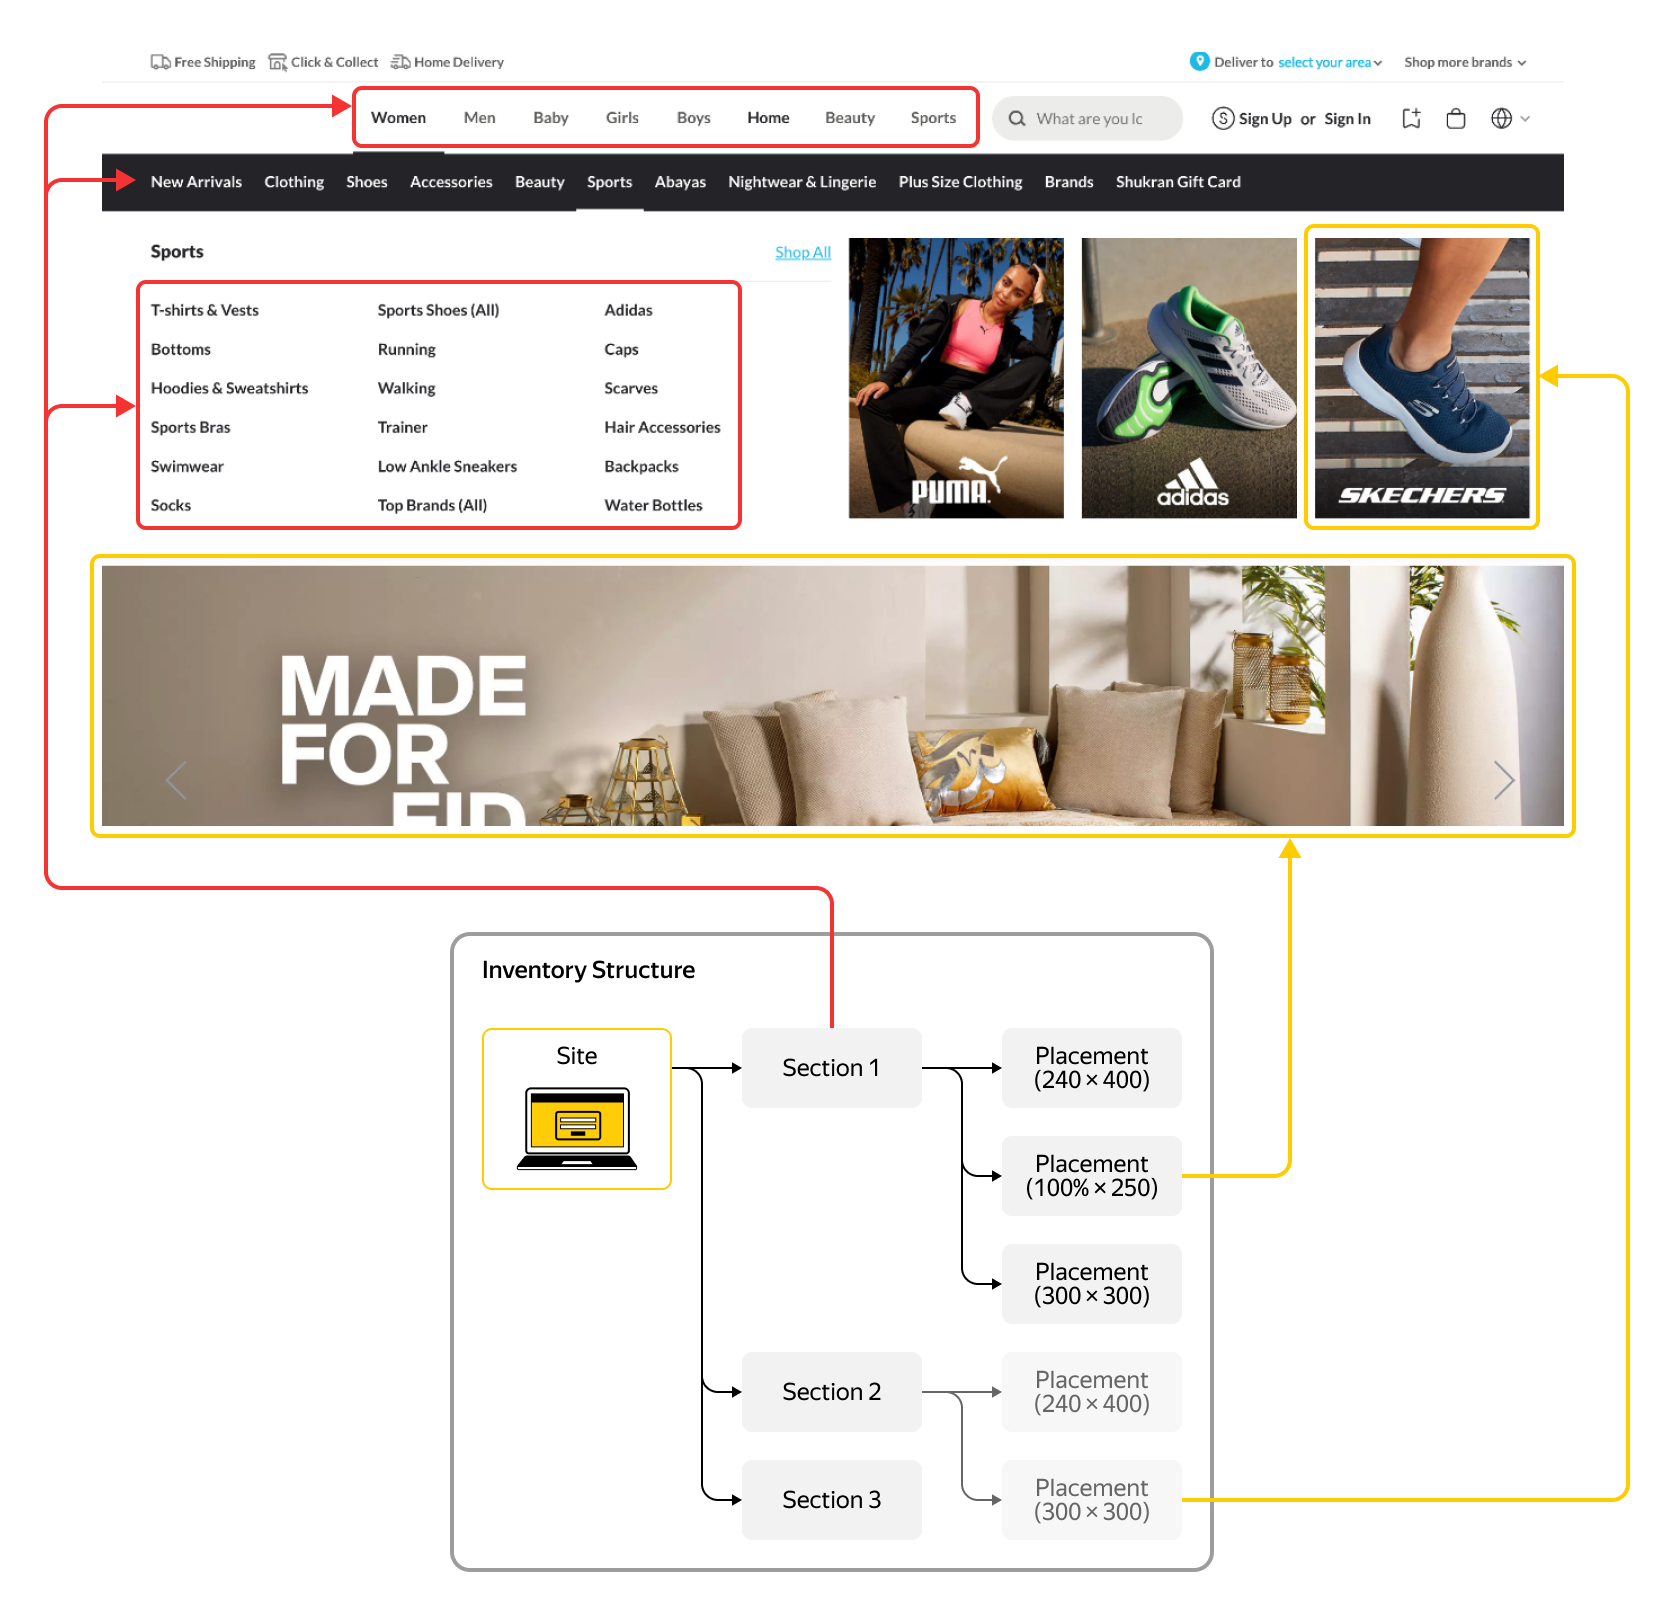
Each site can be organized into sections and placements, so you can develop your placement selling strategy and generate reports with separate statistics.
- A site is any resource where ads are placed: a website, a mobile app, a Telegram channel, or a video player.
- A section is a logical division within the site based on topic, banner space selling method, subdomains, or any other principle.
A placement is a specific ad space on the site.
- Inventory labeling is the process of defining the inventory structure in Adfox, which includes sites, sections, and placements.
Inventory refers to the available advertising space on sites.
Before you create and launch ad campaigns, make sure to label your ad inventory.
Step 1. Add a site
- Go to the Sites tab and click +Add.
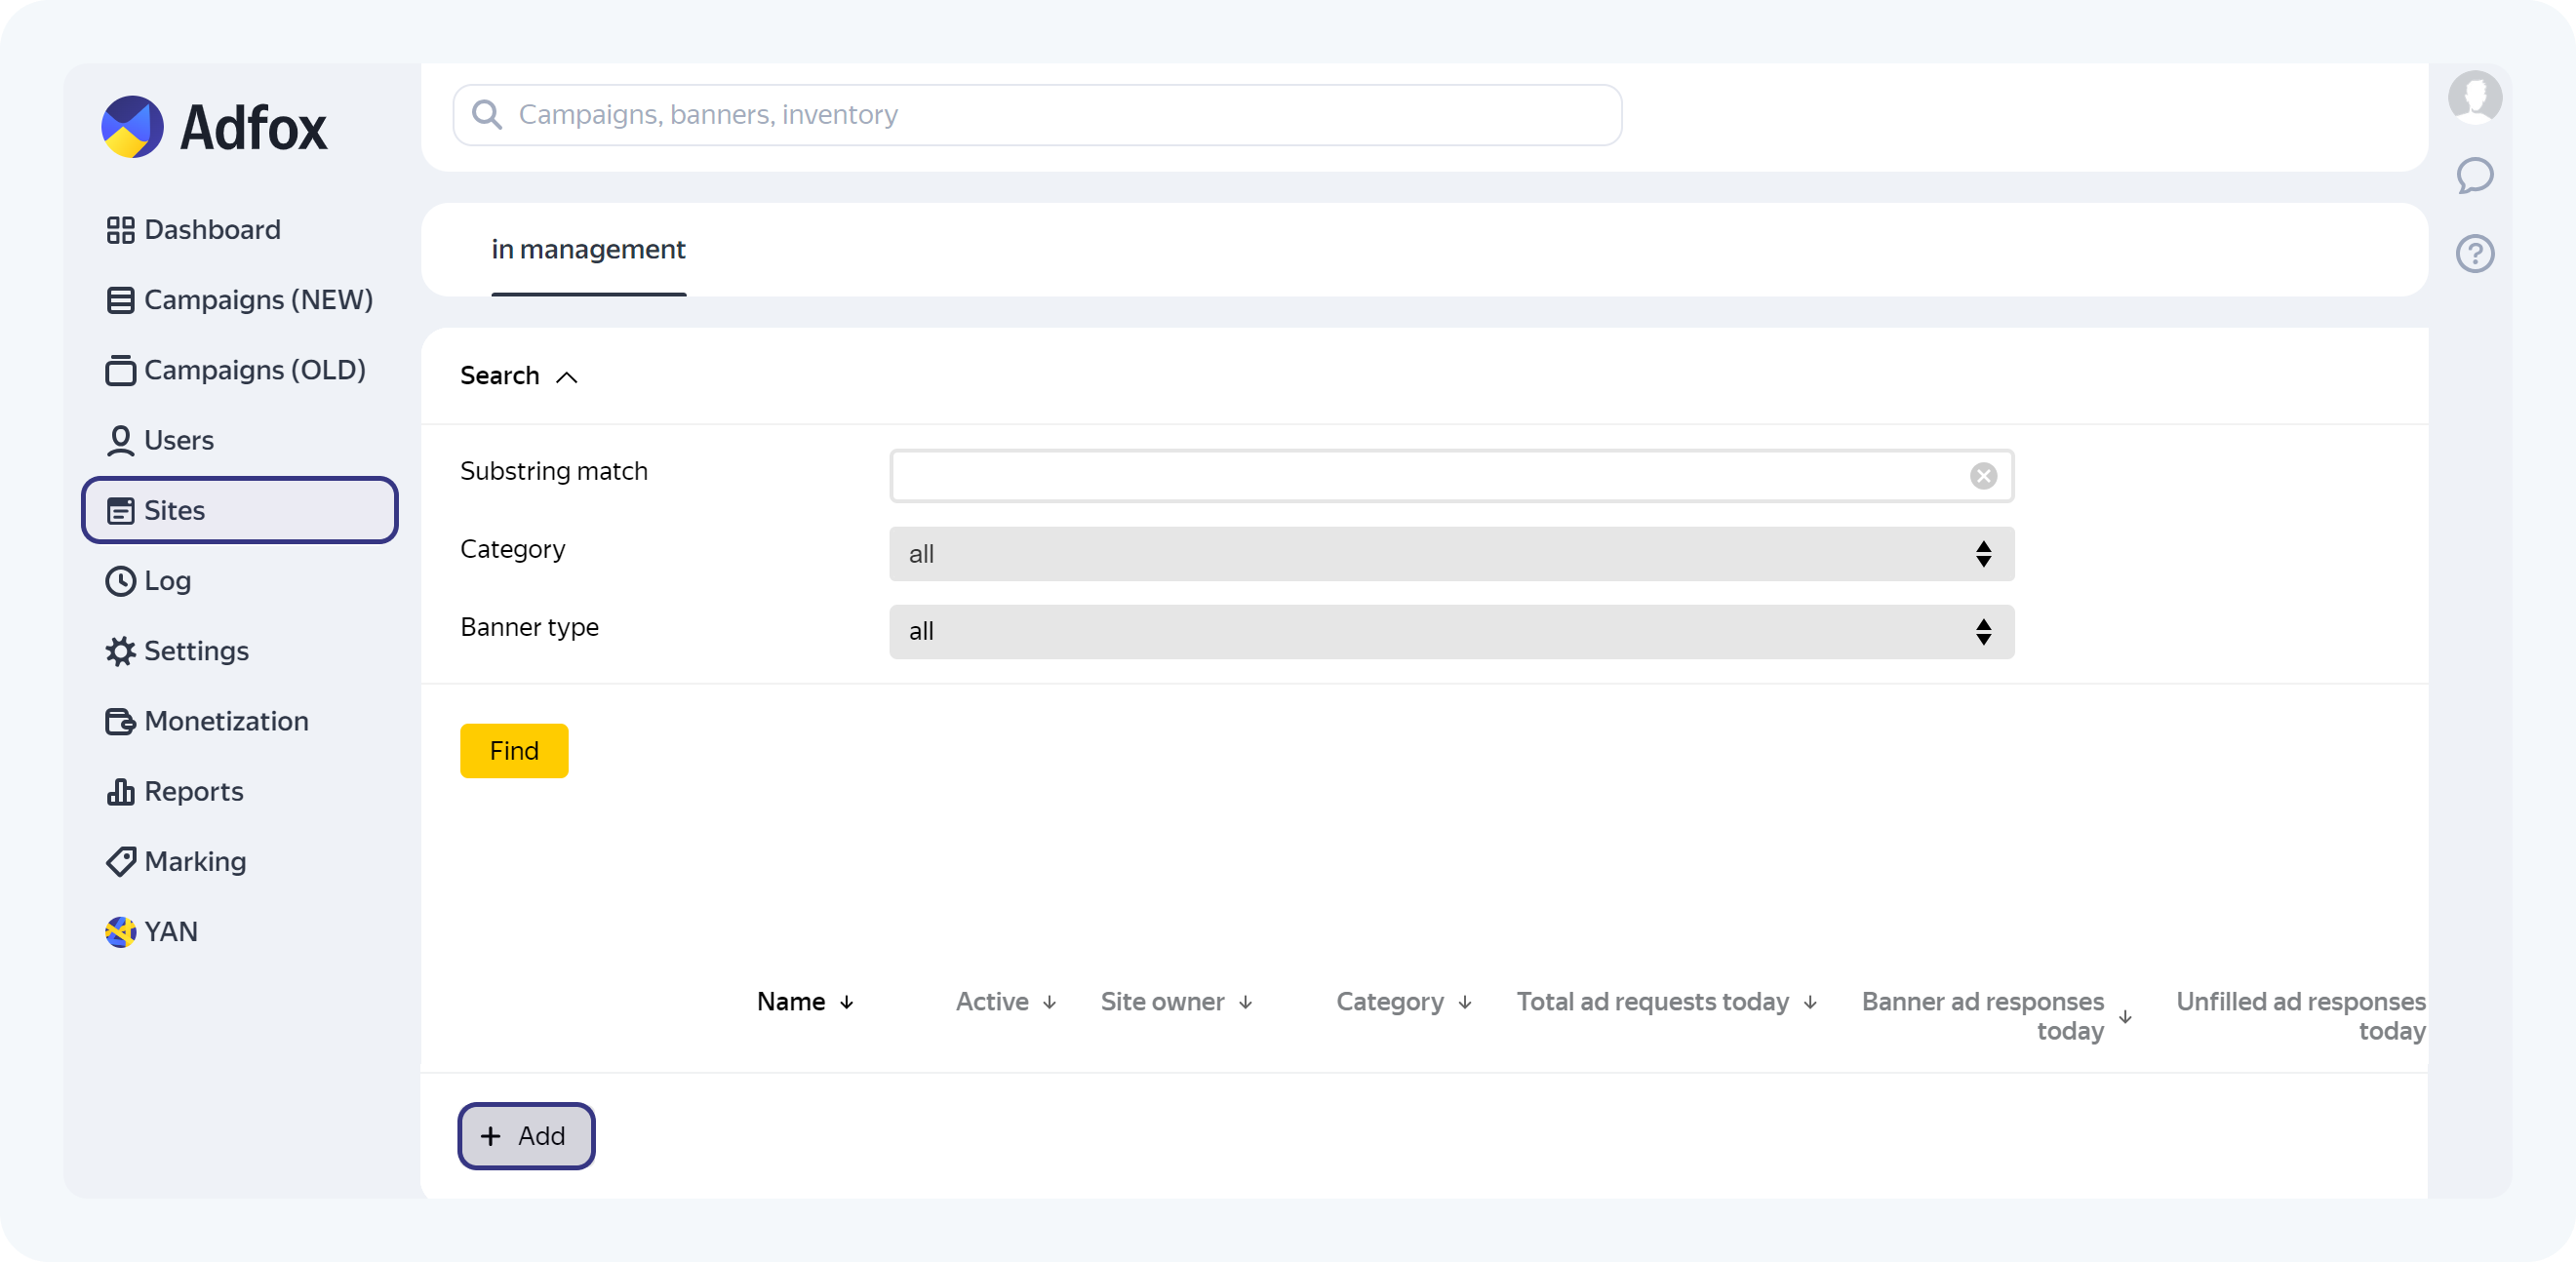
- Specify the main parameters for the site.

- Name: Enter a unique name within your account.
For convenience, you can use your site domain. - Site owner: Specify the user who will have access to the impression statistics on this site. You can add or change the site owner at any time.
Then click Add.
Step 2. Add a section
A section groups site pages by topic. For example, for a news site, you can create these sections: ‘Top Stories’, ‘Finances’, ‘Real Estate’, ‘Sports’, and ‘Culture’. Later, when creating an ad campaign, you can easily specify in which sections to display banners.
For sites with a simple structure, it is enough to create one general section, for example, ‘All Pages’. This way, the banners of your campaigns will be served in all placements.

- Dynamic definition by REFERER
The page REFERER is the URL of the site page from which the ad request is made. To ensure that page templates and ad tags work correctly, leave this option enabled.
By default, the section is created with an asterisk template (*). Each page on your site can only be in one section at a time, so * refers to any character sequence, meaning there is no limit on page templates.
Example of templates:
https://mysite.html

https://mysite.example/cart/*

*/catalog/*
If you specify the template website.com/news/* for your News section, then all URLs of your news posts will be covered by it.
- Page templates: You can use this field to create templates (or masks) for your page URLs to specify which section each page belongs to.
To define complex conditions, you can use POSIX.2 syntax.There should be no duplicate page templates across sections. With this structure in place, you can implement a single ad tag for your entire site. Adfox will then use the REFERER templates to determine which sections should display the ads. We’ll talk more about ad tags in the upcoming materials.
Add the required number of site sections according to your ad placement strategy. If you want to create multiple sections with similar sets of placements, we recommend that you create all the required sections first. Once you create a placement in one section, you can copy it to all others.
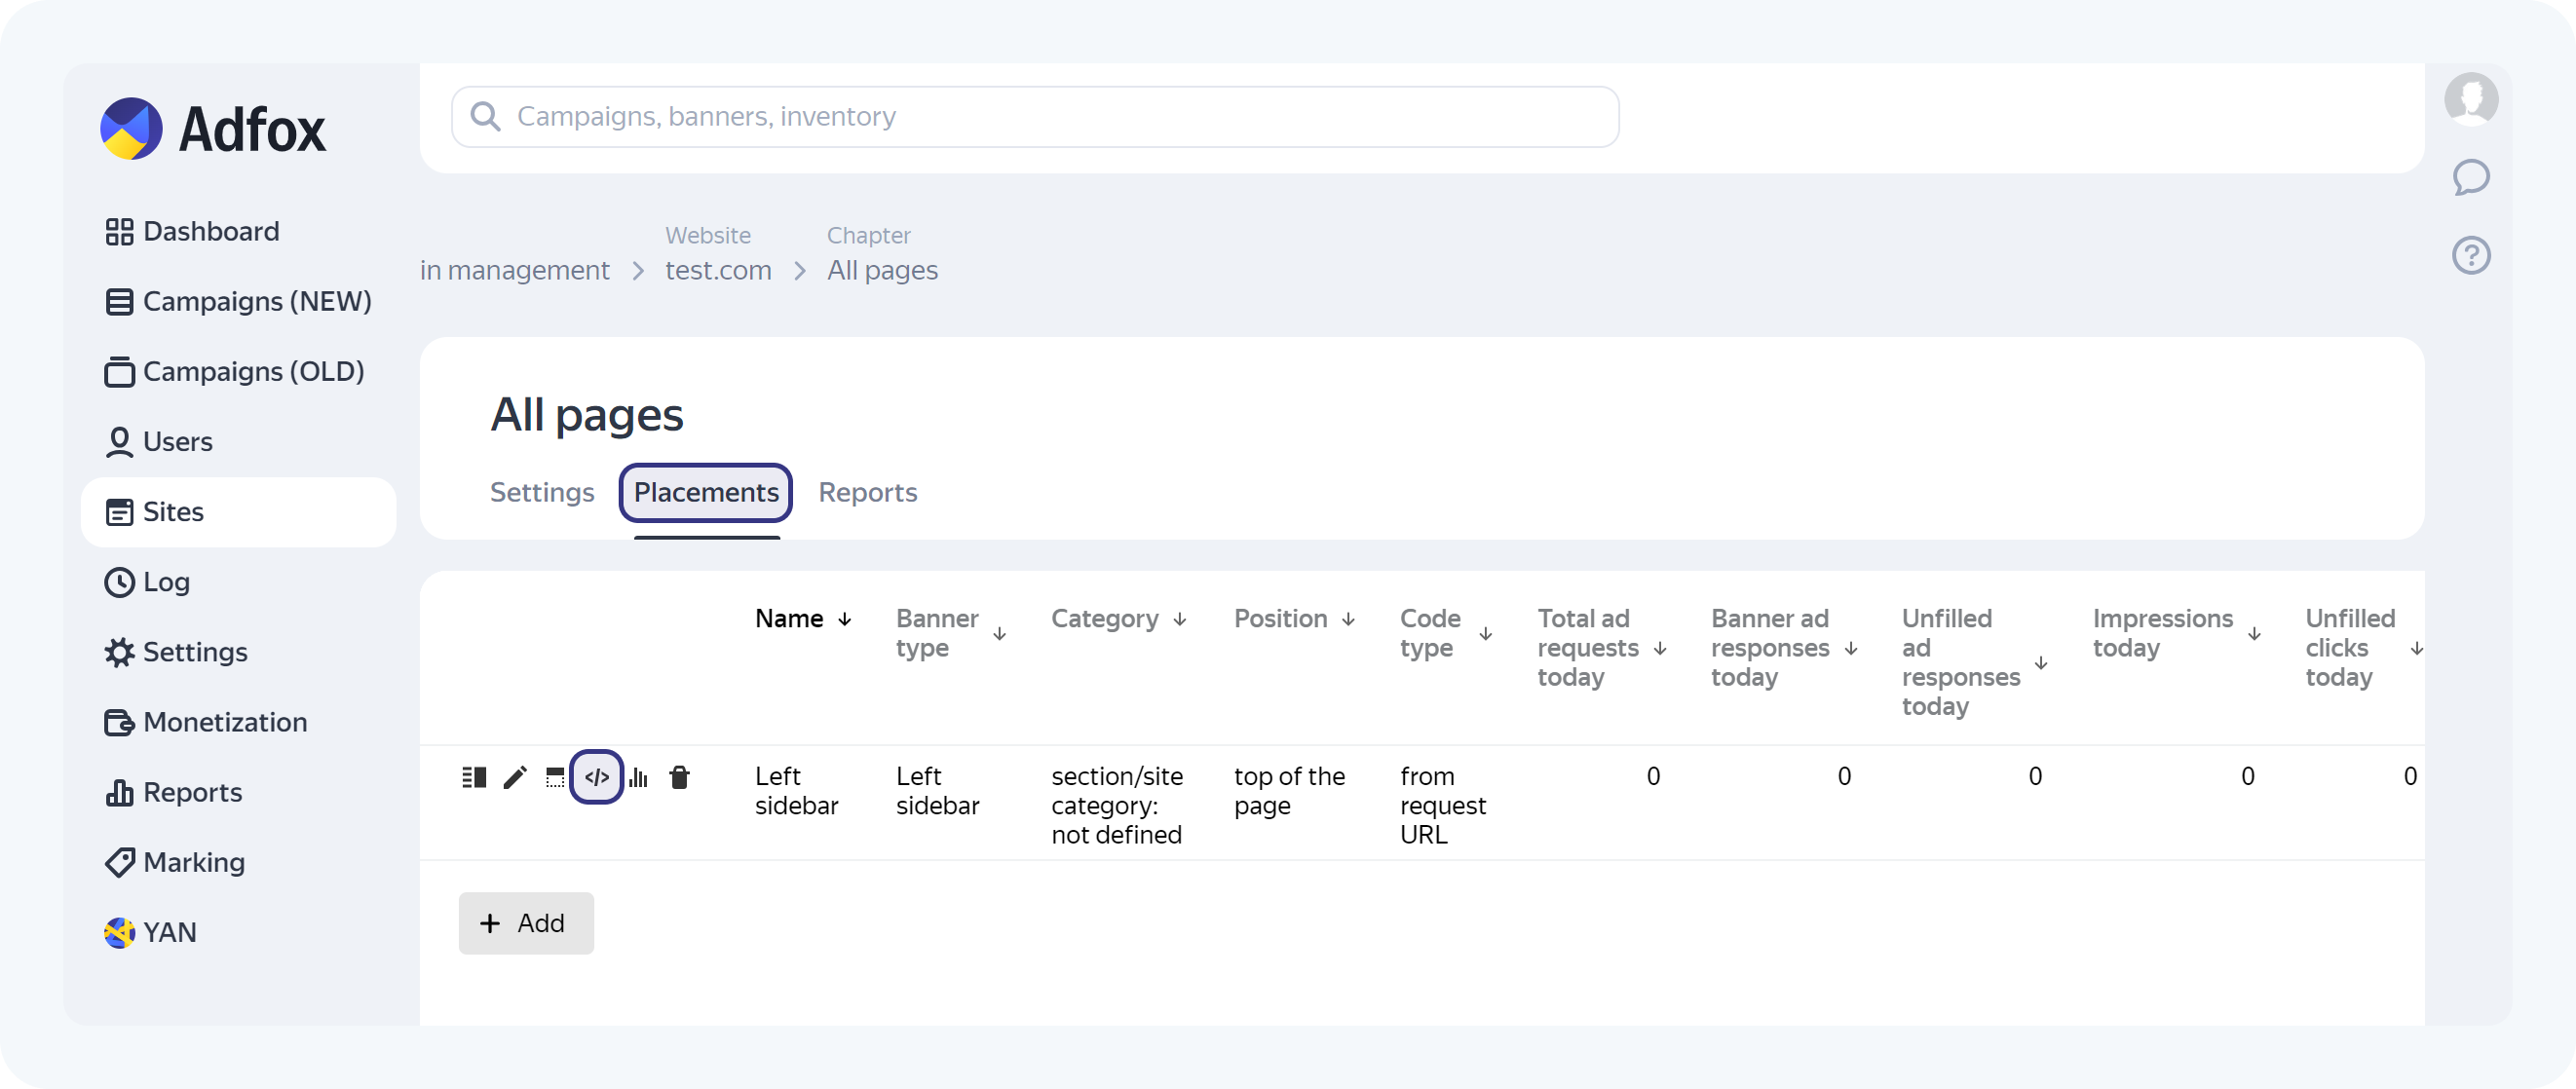
Step 3. Add a placement
When creating a placement, specify its main parameters: name, banner type, and position.

Placement name
Indicate a placement name so you can easily find it in the interface. For example:
- 240 × 400 / 300 × 600, right
- Fullscreen, mobile
- Video pre-roll
Banner type
Banner type is a tool that helps the system decide whether to place the banner in the placement.
For example, the layout of ad spaces on the home page and the News page may differ. Therefore, each of them needs its own placement with its banner type and template.
A banner can be placed in the placement if the types of the placement and banner match. For example, if you have created a placement with a banner type of 300×600, only banners of this type (300×600) can be placed in it.
Create a custom banner type. Go to Settings → Banner types → Custom, and click the tab for the type of ad you want to create (Nondimensional or XML). Click ‘+ Add’.

Specify the name of the new banner type. You may want to include the placement’s dimensions, format, and position in the name so you can quickly find it later. For example:
- Brand banner or top banner
- 300 × 600, 240 × 400 and other display formats
- Left or right sidebar
- Site footer (touch)
Note! If you are creating a banner type for video monetization, enable the Video option.

In the tab that opens, select a predefined template.

A new page will open. Click «Add» at the bottom of the screen.
The template defines the banner’s layout. You’ll need it to add banners to your ad campaign later.
Examples of templates for ads placed on sites:
- Banner Image: A banner that displays an image with a link.
- Banner HTML5: A banner that displays arbitrary HTML content or an image. The banner is placed in an iframe, with limited access to the placement content.
- Code forwarding: Allows you to set an arbitrary HTML code in the banner container.
- Banner Video: A video banner with a video file or a link to a Wrapper XML.
Examples of templates for ads shown in video players:
- Video VPAID VAST 3.0 Viewability: A video ad format for players that support the VAST 3.0 standard.
- InPage video: A video ad placed within the main site content.
For more information about serving ads in video players, see Help.
If you’re not sure which advertising templates you need exactly at this stage, you can configure the banner type later.
Position
Position is an additional parameter that allows you to create several placements with the same banner type within a single section. Adfox provides predefined positions: «Top of the page», «Bottom of the page», and «Middle of the page».
Important! The «Position» parameter has no effect on the actual ad unit’s position on the page.
You can add more positions if needed. To learn how to do this, see Help.
Once you’ve labeled your inventory, you need to obtain and place an ad tag. You only need to place the tag once, in the placement where you want to show ads. You can manage all your ad campaigns and banners through the Adfox interface.
The context.js library is a single ad loader with automatic updates. Add the loader code once to the page’s head tag:
<script>window.yaContextCb = window.yaContextCb || []</script>

<script src=’https://yandex.com/ads/system/context.js" async></script>
All Adfox ad tags run asynchronously.
You can load different sets of banners depending on how wide the user’s screen is. For this, use a responsive ad tag. It allows you to configure different sets of ad placements for different site versions without extra ad requests.
By default, an ad request occurs when the ad tag is executed. But if you want to manage the banner request (for example, so that the request occurs when the banner comes into the user’s view), add the lazyLoad parameter.
For more information about ad tags, see Help.
Ad tag for a video resource
For a video resource, you need to obtain a link to request an ad instead of an ad tag. To request an ad in the player, set parameters from this link (owner_id, p2, pp, and others). In response to the request, Adfox will return the banner’s ad tag that complies with the VAST specification.
To ensure that video banners work properly in the player, install the SDK library.
For instructions on how to install an Adfox tag in a video player, see Help.
Levels from which you can obtain ad tags
You can obtain an ad tag at the site, placement, or banner level.
Site-level ad tag
Use this ad tag if you need Adfox to consider the URL of the page that initiates the ad request.
Adfox uses the page URL to identify the appropriate site sections. The request is then directed to the correct placement within an appropriate section, based on the URL REFERER templates defined for the section.
A site-level ad tag dynamically identifies the correct site section, even when used across the entire site. This ensures that ads are displayed only on relevant site pages.

Placement-level ad tag
Use this ad tag if you don’t want Adfox to consider and verify the page URL from which the ad request is sent.
This tag has a predefined section, and the request is directed to a specific placement.
If your ad tag comes from the placement level, then the section’s REFERER templates will be ignored.
Banner-level ad tag
Use this ad tag if you want to show only a specific banner.
Place your banner, obtain the ad tag at the banner level, and embed it on the relevant pages of your site.
With the ad tag from the banner level, only the banner from which the tag was obtained can be shown. Other banners won’t participate in the rotation on the same placement. If the banner from which the ad tag was obtained can’t be displayed, Adfox will use the default stub, leaving the ad space empty.
However, the banner-level ad tag is good for 1 × 1 pixels and can be useful when testing code.
Tracking pixel (1 × 1 banner, or pixel) is a transparent 1 × 1 image that is loaded along with the tracked banner and serves to transfer banner impression data to a third-party system.
Learn how to create an Adfox tracking pixel in Help.
Learn more about obtaining an ad tag.
Use the advertising console to test and debug your ad tags.
Open the web page that contains the Adfox ad tag. In the browser’s address bar, add the parameter ?yan_console or #yan_console to the web page’s URL and press Enter.
The advertising console will open with a list of all available ad units. To view detailed information, click the relevant unit in the list. A window with the unit data will open:

The console highlights all ad units on your site so you can see in which container the banner is rendered.
Here you can also see the response parameters:
Campaign id: The ID of your campaign.
Banner id: The ID of the banner.
Banner preview: The preview for the banner.
Place id: The ID of the placement.
Block id: The ID of the ad unit in the Yandex Advertising Network interface.
The console helps you find ad units that aren’t working properly and identify errors in your ad tag. For example, if you see a 404 error, it probably means that the ad tag’s parameters are invalid. See instructions on how to use the advertising console in Help.