Creation and setup
Product campaigns aim to generate maximum conversions. Before creating a product campaign, add a Yandex Metrica tag to your site, set up goals, and make sure that your Yandex Direct account has access to this tag.
Step 1. Create a campaign
-
Click Add → Campaign.
-
In the Campaign Wizard tab, select Product campaign.
-
Enter a link to your online store page.
-
Yandex Direct will retrieve information about your organization from Yandex Business. If you haven't added your organization to Yandex Business yet, you can do it now. For more information on how this benefits your advertising, see the article Why add your organization to Yandex Business.
-
If you have an offline store that your customers can visit in the real world, enable the option Promoting a company from Yandex Business. This way you can use special formats for promotion on Yandex Maps. For more information, see the article on promotion in Yandex Maps.

Step 2. Set up ads for products
-
Choose a method for adding products to the campaign.
Products found on the siteNew feedManual product managementThis is the easiest way to generate ads. Yandex Direct algorithms will find products on your specified site. The information in the ads will update automatically. If no products are found, check that your site meets the requirements.
A feed uploaded from desktop or via a link. This method is designed for stores with a large, frequently updated product range. Yandex Direct will generate product ads based on data from the feed.
A product feed is a file that contains information about products. To promote an online store, we recommend using a YML feed.
- New feed from desktop: Select a file and name your feed. If you upload the feed as a file, you'll need to update it manually.
- New feed by link: Specify a file link and authorization details (if necessary) and name your feed. If your feed is updated by link, the information in the ads also updates automatically.
This method works well for stores with a small, rarely updated product range.
Fill in the card for each product:
- Specify the link to the product, add the name and description.
- Add up to 5 images of at least 450 × 450 pixels and up to 10 MB.
- Specify the current price, original price, product category, manufacturer, model, and availability.
All descriptions and images must meet the requirements.
All the added products will be consolidated into a single feed per username. You can add up to 1000 products from different categories.

-
Apply filters to select the products that you want to promote.
Each source has its own set of filters. The criteria are joined using the AND operator. Products will be advertised if they meet all of the selected criteria.
As you generate ads based on a feed and set up product filters, the system checks in real time how many products meet the criteria. Pay close attention to this number to avoid situations where your ads stop running because no product matches the filter condition.
When you generate ads based on a site, the Converting pages filter is available to you. When you use it, Yandex Direct only creates ads for products that already had conversions for the campaign's goals. Only conversions that came from click-throughs on the product page are counted.
The filter works automatically: if you change the campaign's goals, or new catalog pages with conversions appear on the site, the filter will update the set of links in the ad.
Watch video
-
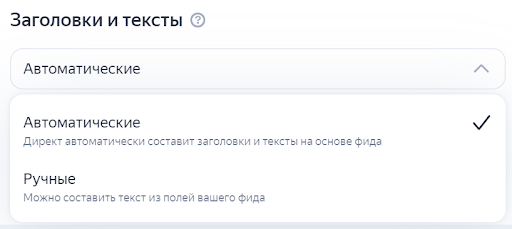
If you're using a feed as the source, choose a method for generating ad titles and text.
-
Automatic: The recommended generation method. The system will generate several title and text options based on the information provided in the feed. Then, the algorithm checks if they're grammatically correct, assesses how well they convey the intended meaning, and chooses the best option for each product.
-
Manual: If manual control is selected, the ad titles and texts will be based on your specified feed elements.
Open Advanced settings, go to Manual text management, and select the recommended feed elements that best suit your ad title or text:
-
Title: The texts from the specified elements will be used as ad titles. You can specify up to 5 elements. Their data will be added step-by-step until the title length reaches 56 characters. If there are more characters, the title may be cut off.
-
Text: The texts from the specified elements will be used in the ad. You can specify up to 5 elements. Their data will be added step-by-step until the text length reaches 81 characters. If there are more characters, the text may be cut off.
-
-
List of supported elements for each feed type
- Yandex Market feed:
name,typePrefix,model,vendor,description,sales_notes. - Feed in Google Shopping format:
title,g:title,description,g:description,brand,g:brand,color,g:color,material,g:material. - Google Ads' Custom feed (CSV):
Item title,Item description. - Universal feed (CSV):
Title,Description. - Auto.ru feed:
mark_id,folder_id,modification_id,body_type,year. - Yandex Realty feed (XML):
description; - Google Ads' Hotels and Rentals feed (CSV):
Property name,Destination name,Facilities. - Google Ads' Flights feed (CSV):
Destination name,Destination address,Origin name. - Google Ads' Travel feed (CSV):
Destination name,Destination address,Origin name,Title.
Step 3. Configure ads for catalog pages
-
Specify the source for creating ads. By default, when you create a new campaign, Yandex Direct generates ads for any catalog pages that the robot detects on the site. You can upload catalog data as a YML feed (from your computer or via a link) or as a CSV file (from your computer only).
Catalog pages found on the siteFeed uploaded via a link or from desktopThe product campaign will automatically create ads for all catalog pages on the site. You can view the examples of found pages.
To ensure that the Yandex Direct robot can correctly identify catalog pages, use Schema.org microdata on your site.
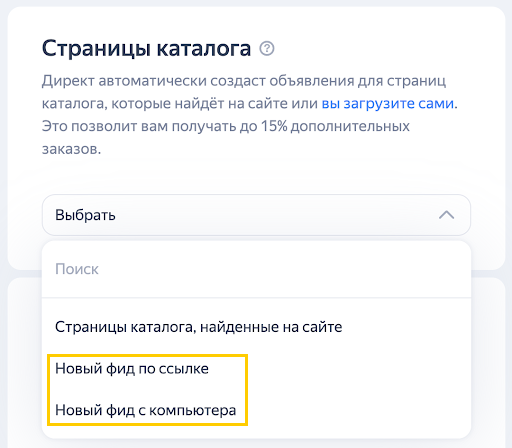
Using a link, you can only upload a YML feed. From a computer, you can upload both a YML feed and a CSV file.
YML feedCSV fileYandex Direct will generate catalog ads based on data from the feed. To provide catalog page data, upload a YML feed from your computer or via a link.
- New feed from desktop: Select a file and name your feed. If you upload the feed as a file, you'll need to update it manually.
- New feed by link: Specify a file link and authorization details (if necessary) and name your feed. If your feed is updated by link, the information in the ads also updates automatically.
Use a feed with a special
<collections>tag to provide information about catalogs, including catalog ID, link, image, title, and text. Learn more about catalogs.1C-Bitrix users can quickly generate a feed with catalog pages by following the instructions.
If you work with the InSales platform and have set up automatic feed updates, catalog info will be automatically added to it, with no additional actions required on your part. You can also create a feed with catalogs using a custom export to Yandex Market by following the instructions.
The product campaign will automatically create ads only for those catalog pages that you specified. The file is easy to create — remember to specify the name of the catalog and its link. You should additionally pass a description, image, and minimum price.
Choose this method if you want to promote only specific catalogs or don't use Schema.org microdata in your site code.
You can only upload one file per campaign.
File requirements
-
CSV format with UTF-8 encoding.
-
Use commas “,” or semicolons “;” as the separator. If you choose to use commas as the separator, check if any field contains commas in its text. If it does, the entire text of that field must be enclosed in quotes. For example:
"Dairy, plant-based drinks". -
The file header must include the full list of columns:
Url,Title,Description,Offer minimal price,Currency,Image url 1,Image url 2,Image url 3,Image url 4,Image url 5. -
The maximum number of rows is 1000.
Name and description of fields
Name
Description
URL
Link to the catalog page. Each link must be unique.
Required field.
Title
Catalog name.
Up to 56 characters including spaces and punctuation.
Required field.
Description
Description. Up to 81 characters including spaces, and up to 15 punctuation marks.
Recommended field.
Offer minimal price
Minimum product price in the category. Integer without separators. If the number is a fraction, round it to a whole number. For example: 150000.
Currency
Alphabetic currency code. For example: RUB, USD, EUR. Required if you provide "Offer minimal price".
Image url 1, Image url 2, Image url 3, Image url 4, Image url 5
Links to images on the site.
These must be direct links to an image, rather than links to a page where the image can be downloaded.
For example, you can't use Yandex Disk links.
Recommended field.
How to create a CSV file
Populate the file in any spreadsheet editor, like Excel or Numbers. Save the file in CSV format with comma delimiters.
In Excel (Windows)In Numbers (iOS)- In the top menu, select File → Save as.
- Name the file using the File name field.
- Under Save as type, select “CSV (Comma delimited) (*.csv)”
- Click Save.
- In the top menu, select File → Export to→ CSV...
- In the Export Your Spreadsheet window, go to the CSV tab and open the Advanced Options.
- In the Text Encoding field, select “Unicode (UTF-8)”.
- Click Next...
Possible errors when uploading a file
- Invalid encoding: Make sure that your file has UTF-8 encoding.
- File can't be empty: Make sure that your file contains rows with catalogs.
- List can't include more than 1000 rows: Make sure that your file contains less than 1000 rows.
- Field can't be empty: Make sure that all required fields are filled in.
- Title can only include characters supported in banners: Make sure that the file doesn't contain invalid characters.
- Word length can’t exceed: Make sure that there are no words longer than 56 characters in the file header and 81 characters in the file body.
- Loose comma: Make sure that all commas and quotes adhere to the CSV schema.
- Enter different values: Make sure that all links in the URL field are unique.
To update ads for catalog pages that were generated from a file, upload a new file containing the updated data. The ads will be generated again.
-
In the Filter section, select which catalogs you want to promote. For each ad generation source, you can use these filters:
-
Based on pages found on site: Filter by
name(from your site's structured data) andURL.You can select the following filters:
-
Catalog pages matching the products: Yandex Direct will create ads only for catalogs that include the products already promoted in the campaign.
-
Converting pages: Yandex Direct will create ads only for catalogs featuring products that already generated conversions for the campaign's goals. Only conversions that came from click-throughs on the catalog page are counted. If a campaign's conversion action (for example, clicking a phone number) can also be completed on the catalog page, such conversions are counted as well.
The filter works automatically: if you change the campaign's goals, or new catalog pages with conversions appear on the site, the filter will update the set of links in the ad.
-
-
Based on a YML feed: Filter by catalog (
collection ID), catalogname, or catalog pageURL. -
Based on a CSV file: Filter by
titleorURL.
Filtering conditions are joined using the “AND” operator, so only those catalogs that match all the conditions will generate impressions.
-
If needed, you can replace the feed. To do this, select the desired feed from the sources or upload a new one. Yandex Direct will reuse filters from your previous campaign setup, if possible. If the information about categories and products in the feed has changed, check and adjust the filter. If there are no items in the feed that match the filter's criteria, the filter is reset.
Step 4. Set up an ad about your store
Yandex Direct will analyze the information on the specified page and suggest several title and text options. You can edit or replace them as necessary. To do this, add up to five titles (56 characters max) and up to three texts (81 characters max). These ad elements are combined when your ads are served. Make sure all the elements work well together and don't contradict each other. Read our recommendations for writing ad texts.
You can use templates in your ad texts:
- Set the default keyword and put a hash sign “
#” before and after it. - At Step 2, select Manual audience setup. As related terms, specify the keywords that you want to insert into the template.
Yandex Direct will suggest images found on your site. You can also upload your own images, choose images from the image stock, or use AI-generated images.
Upload up to two videos about the store. They'll grab user attention, provide a clear showcase of your offer's advantages, and evoke the desired emotions among potential customers. For more information, see the article on video ad formats in performance campaigns.
Technical requirements for videos
|
Format |
MP4, WebM, MOV, QT, FLV, AVI |
|
Size |
no larger than 100 MB |
|
Duration |
between 5 and 60 sec |
|
Recommended aspect ratio |
16 : 9; 1 : 1; 9 : 16 |
|
Minimum resolution |
360p |
|
Recommended resolution |
1080p |
|
Video frame rate |
from 20 fps |
|
Video codecs |
H.264, VP6F, VP8, Theora |
|
Number of video tracks |
1 |
|
Minimum quality |
44 kHz, 16 Kbit/s, stereo |
|
Audio codecs |
AAC, MP3, Vorbis |
|
Number of audio tracks |
no more than 1 |
|
File codec |
avc1, F4V, isom, M4A, M4V, mmp4, mp41, mp42, qt |
|
Cover |
No |
You can also submit videos about your products in the feed, and the system will display them on Yandex Advertising Network sites. For more information, see the article on product videos.
Add sitelinks to your ads so that users can quickly open the site section they want to visit. Specify the URL, title, and description for each of the eight sitelinks. You can reorder them by dragging the rows up or down. To edit, replace, or delete sitelinks, click  .
.
Pursuant to the Federal Law "On Advertising", advertisers must submit descriptions of their ads to the Unified Register of Online Advertising (ERIR). Yandex algorithms create these descriptions automatically. They appear only in the ERIR and aren't shown in your ads. The descriptions might not be complete or contain accurate information, so make sure to review and update them as necessary.
Step 5. Ads created by the neural network
These are additional ads for your store. They're generated based on the promoted page and your organization's details. Additional options are created using Yandex Neuro Ads, a cutting-edge neural technology solution.
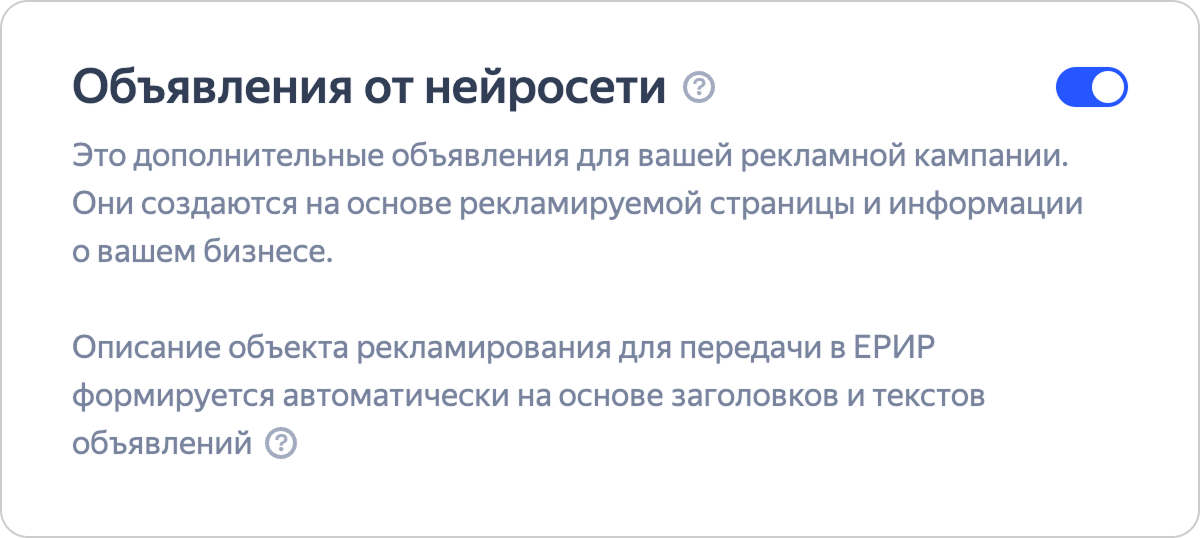
How it works
An additional ad group will be created in the campaign: this is where your automatically generated ads will be added. On average, Yandex Direct creates up to 20 neural network ads.
Before they are approved, such ads are automatically filtered by a range of parameters, including relevance and appeal. Then they are checked by humans and sent for moderation.
You can only check what neural network ads look like after they've started generating impressions. In the menu on the left, select Statistics and go to the Report Wizard. Select the Ad type dimension and add the metrics you need. AI-generated ads appear in the report as "Neuro ads". If needed, you can use a filter to view data for only this ad type in your reports.
On the campaign page, under Summary statistics for ads, AI-generated ads will show up with the "Store" type.
Step 6. Define your audience
Display region
You can select regions or cities from the list, choose them on the map, or specify a radius between 0.5 and 10 kilometers from the desired location.
In Yandex Direct, you can target small towns or regions with populations starting at 1000 people. To set up targeting for such an area, enter its name or select it from the region tree. This helps you fine‑tune your campaign and reach the right audience.
If your site has a Yandex Metrica tag with E-commerce tracking enabled, Yandex Direct suggests regions where you can generate more sales. You can adjust the regions later revert to the recommended ones if needed. To do this, click:  → Restore recommended regions
Ads will be served for extended geotargeting:
- In search results: based on search queries or the user's regular region.
- In ad networks: based on the user's frequent location, regardless of current location.
You can't disable extended geotargeting in the Campaign Wizard. It's best to revise your related queries so that they account for extended geotargeting. For more information, see How does geotargeting work?
Time targeting
Choose when your ads should be served. In most cases, selecting daily round-the-clock impressions is the optimal approach. Alternatively, you can choose to display ads on weekdays between 08:00 and 20:00 or adjust the display period manually.
Audience
Yandex Direct can target the optimal audience automatically. Alternatively, you can configure the settings manually: specify keywords that match potential search queries of your target audience or their interests and habits. You can add negative keywords to filter out irrelevant search queries from your impressions.
Ads are served in search results and in ad networks using autotargeting.
Offer retargeting is enabled by default in product campaigns. It's applied to ads for products and catalog pages. The users who viewed products or catalogs on your site will see this information in your ads placed in the Yandex Advertising Network.
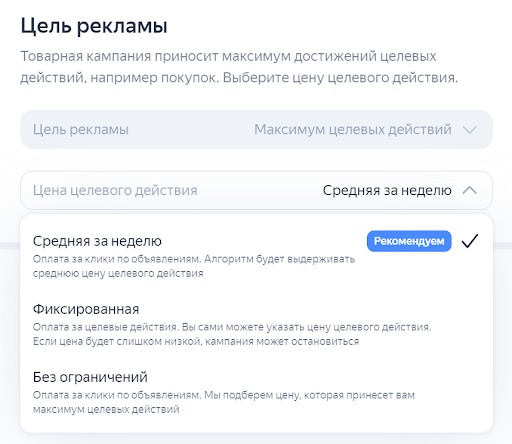
Step 7. Define your campaign budget and goals
Promotion goal
Choose the optimal conversion cost setting:
-
Weekly average. Pay per ad click. Individual conversions may be cheaper or more expensive, but the average weekly cost won't exceed the specified value.
-
Fixed. Pay per conversion. All conversions cost exactly the specified amount. Use it if your campaign has strict KPIs. However, if you set a too low value, the system may not find conversions at the desired cost and will stop the campaign.
-
No limit. Pay per ad click. The system brings maximum conversions within your set budget. Choose this model if you don't know how much you're willing to pay for one conversion but know your total available budget.
Yandex Direct automatically finds the Yandex Metrica tags installed on your site. Request access to the tags if necessary: for example, if you need to limit the cost revenue ratio.
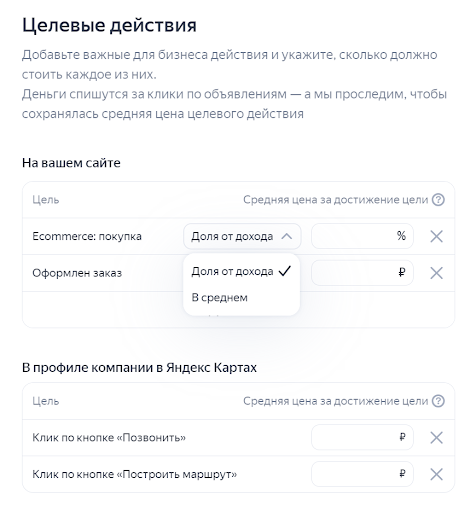
Conversions
Add valuable actions that you want users to take on your site or on your company profile in Yandex Maps. Yandex Direct's algorithms will show ads to those users who are most likely to perform the desired actions.
If you selected an average or fixed CPA, you can specify a custom value for either.
For the "Ecommerce: Purchase" goal, you can set not only an average or fixed CPA, but also the cost revenue ratio. In the drop-down menu next to the goal, select Share of revenue and specify the percentage of revenue that you're willing to pay for each successful conversion.
Note
You'll see recommended goals and optimal CPA values. The recommendations will appear if your site has a Yandex Metrica tag with E-commerce tracking enabled and Yandex Direct has data on successful campaigns in your business category with a similar average order value.
To optimize the campaign, it's best to specify all the goals that are important for your business. This will provide the system with additional data and help it generate more conversions.
Weekly budget
Specify a weekly spend limit. You can choose the minimum, optimal, or effective budget suggested by the service or specify a custom value. Make sure that it's enough to cover at least 10 conversions a week. If you selected multiple optimization goals, base your minimum budget on the most costly goal.
Note
You'll see recommendations for the optimal weekly budget value. The recommendation will appear if your site has a Yandex Metrica tag with E-commerce tracking enabled and Yandex Direct has data on successful campaigns in your business category with a similar average order value.
Yandex Direct helps
In this section, you can configure settings that will help optimize Yandex Direct.
For more information, see Automatic application of recommendations.
Once you're done with the settings, tap Create campaign.
Have questions?
Alert
Our customer support can only assist you with campaigns linked to the username you are contacting us from. You can check your username by opening ya.ru in another browser tab. Our team can access your data only when processing your request.
Scan the QR code or tap it to follow the link.


If you select Telegram or WhatsApp, keep in mind that Yandex does not control and is not liable for how third-party messengers store your data and chat history.