Set up content
Header and description
-
Headlines and ad copy are generated by Yandex Ads AI. To edit them, click
 and make your changes to the title or text. Click Save.
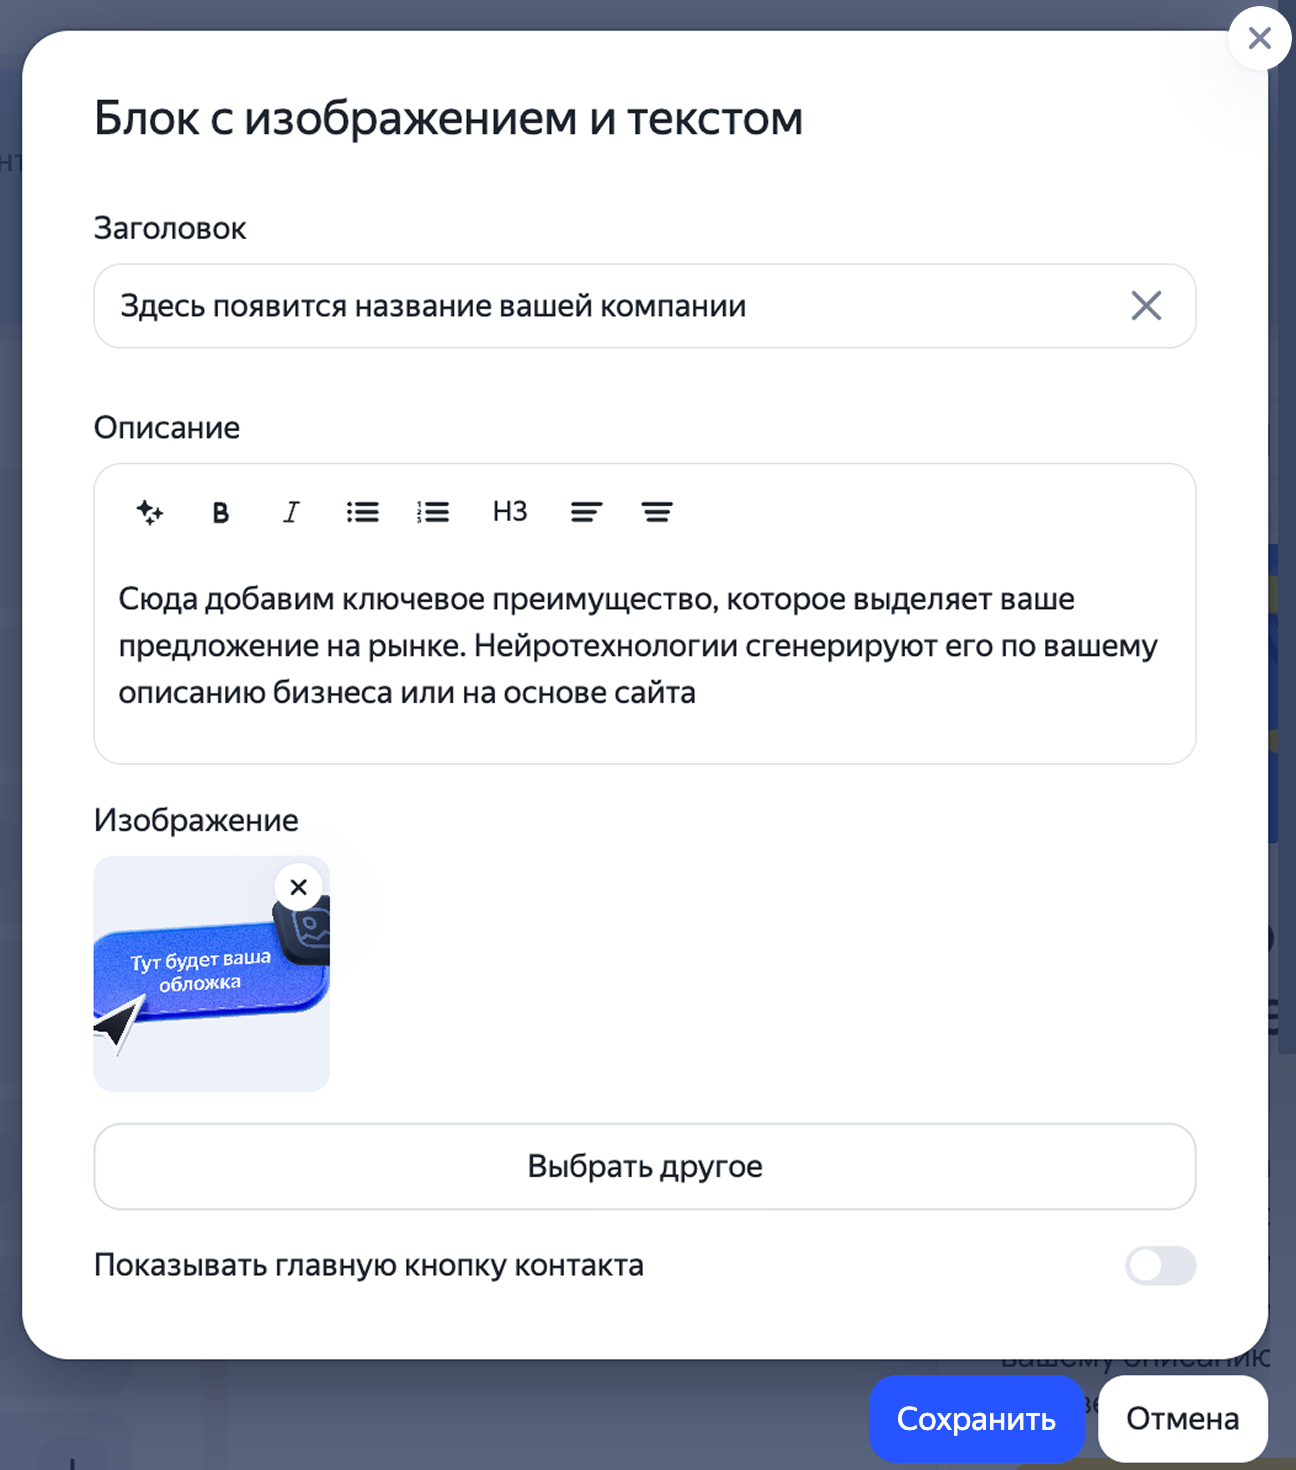
Format the description, for example, by highlighting parts of the text in bold or italics, or by adding a list or a headline. You can rephrase text using Neuro Editor. To do this, select the text, click
 , and choose how your want to rewrite it.
 -
To add an image for the landing page header, click Select, then upload an image or select one:
- From an existing campaign.
- Generated by AI.
- From your site.
- From stock images.
Image requirements
-
Minimum image size: 300 × 300 pixels.
-
Horizontal images: aspect ratio between 1:1 and 2:1.
-
Vertical images: aspect ratio between 1:2 and 1:1.
-
Maximum file size: 5 MB.
-
Format: JPG, PNG or GIF (only the first frame will be used).
Crop the image and click Save.
To replace the image, click Select another.
-
To add a contact button to the block, enable the Show the main contact button option.
Contact buttons
-
If you haven't linked an organization from Yandex Business, you can manually enter contact details for your buttons or link an organization to sync them automatically. You can also set up an landing page without adding an organization.
-
If you've already linked an organization from Yandex Business, click
and make sure the buttons show correct contacts.
In the Main button section, select the first button to appear, then click Save.
Warning
The landing page won't save if you don't add the contact details.
Additional sections
To add more information to the landing page:
- Click Add unit.
- Select a design and edit the content: headline, description, and image.
- To add a contact button to the block, enable the Show the main contact button option.
To change a block's position on the page, simply move it up or down.
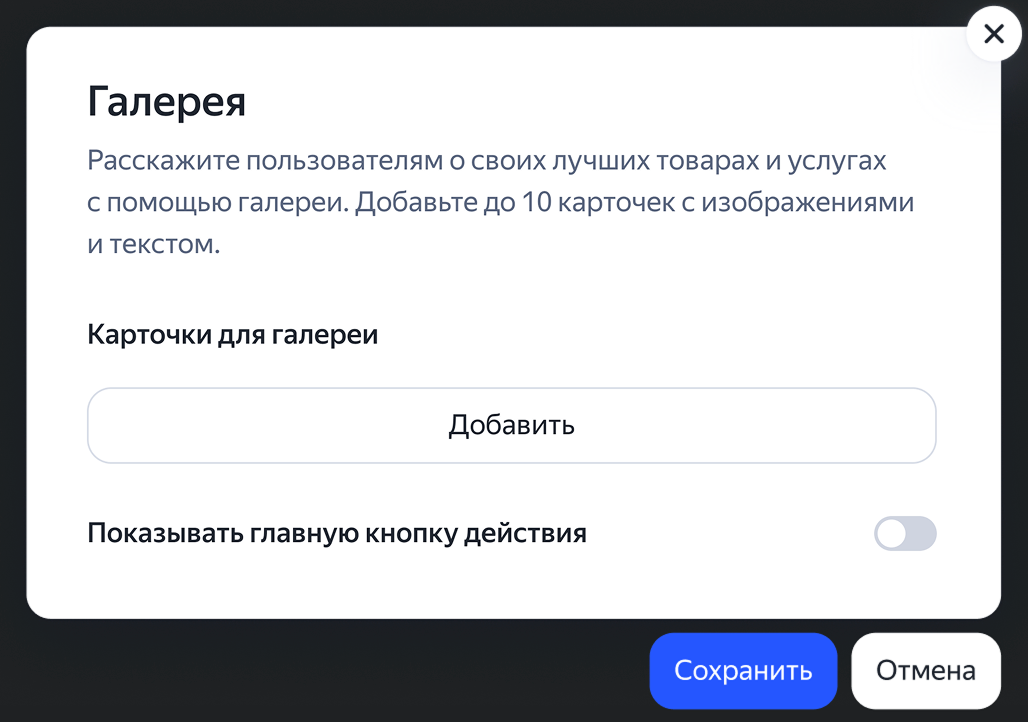
Gallery
The gallery can display multiple product or service cards, featuring your top offers, promotions, and benefits. You can add up to 10 cards, each with its own image and text:
-
In the Gallery field, click
 .
. -
In the Gallery cards field, click Add.
-
Add an image, title, and description to the card.
-
Save your changes and add another card.
To edit or delete a card, click  in the name field and select the action.
To add an action button to the gallery, enable the Show the main action button option.
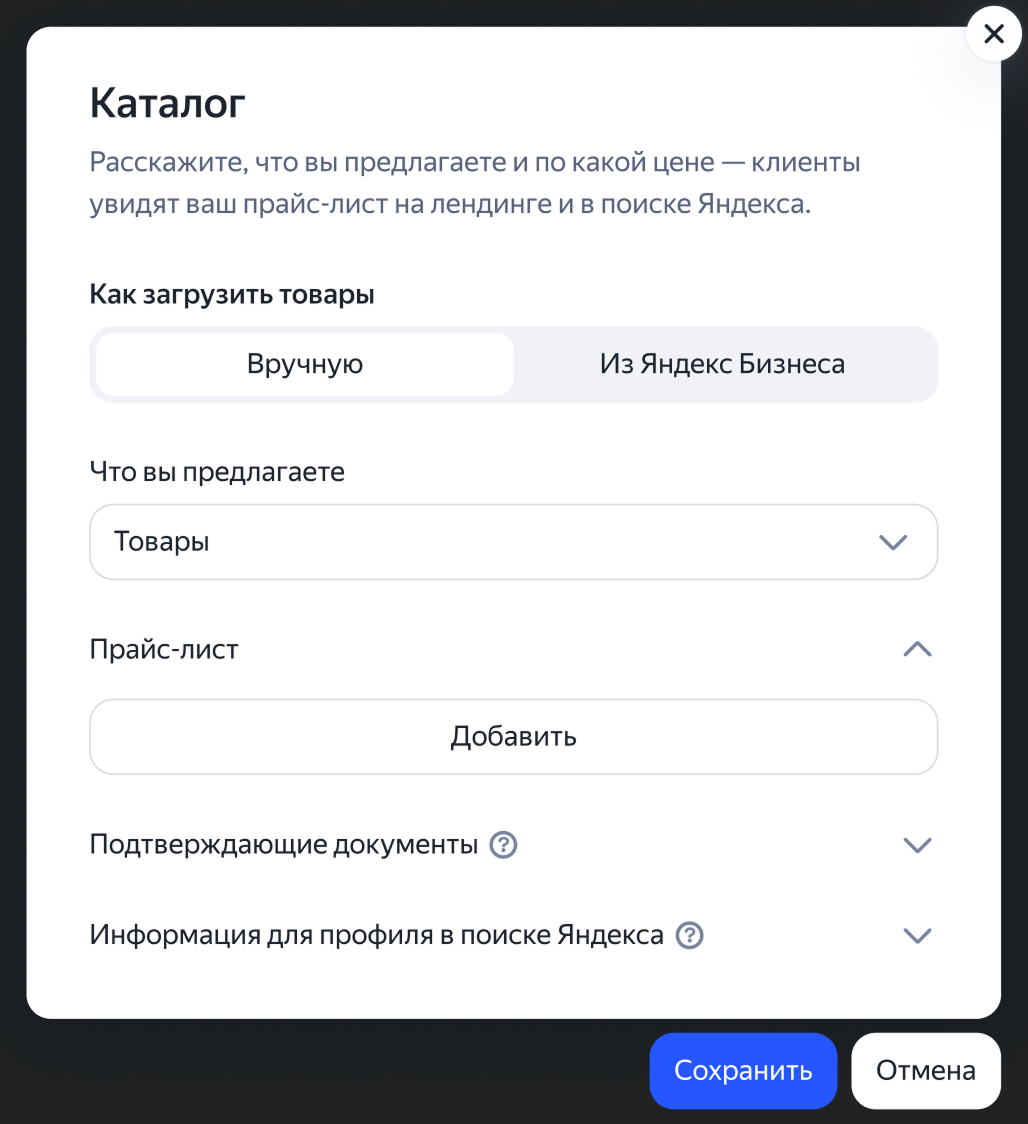
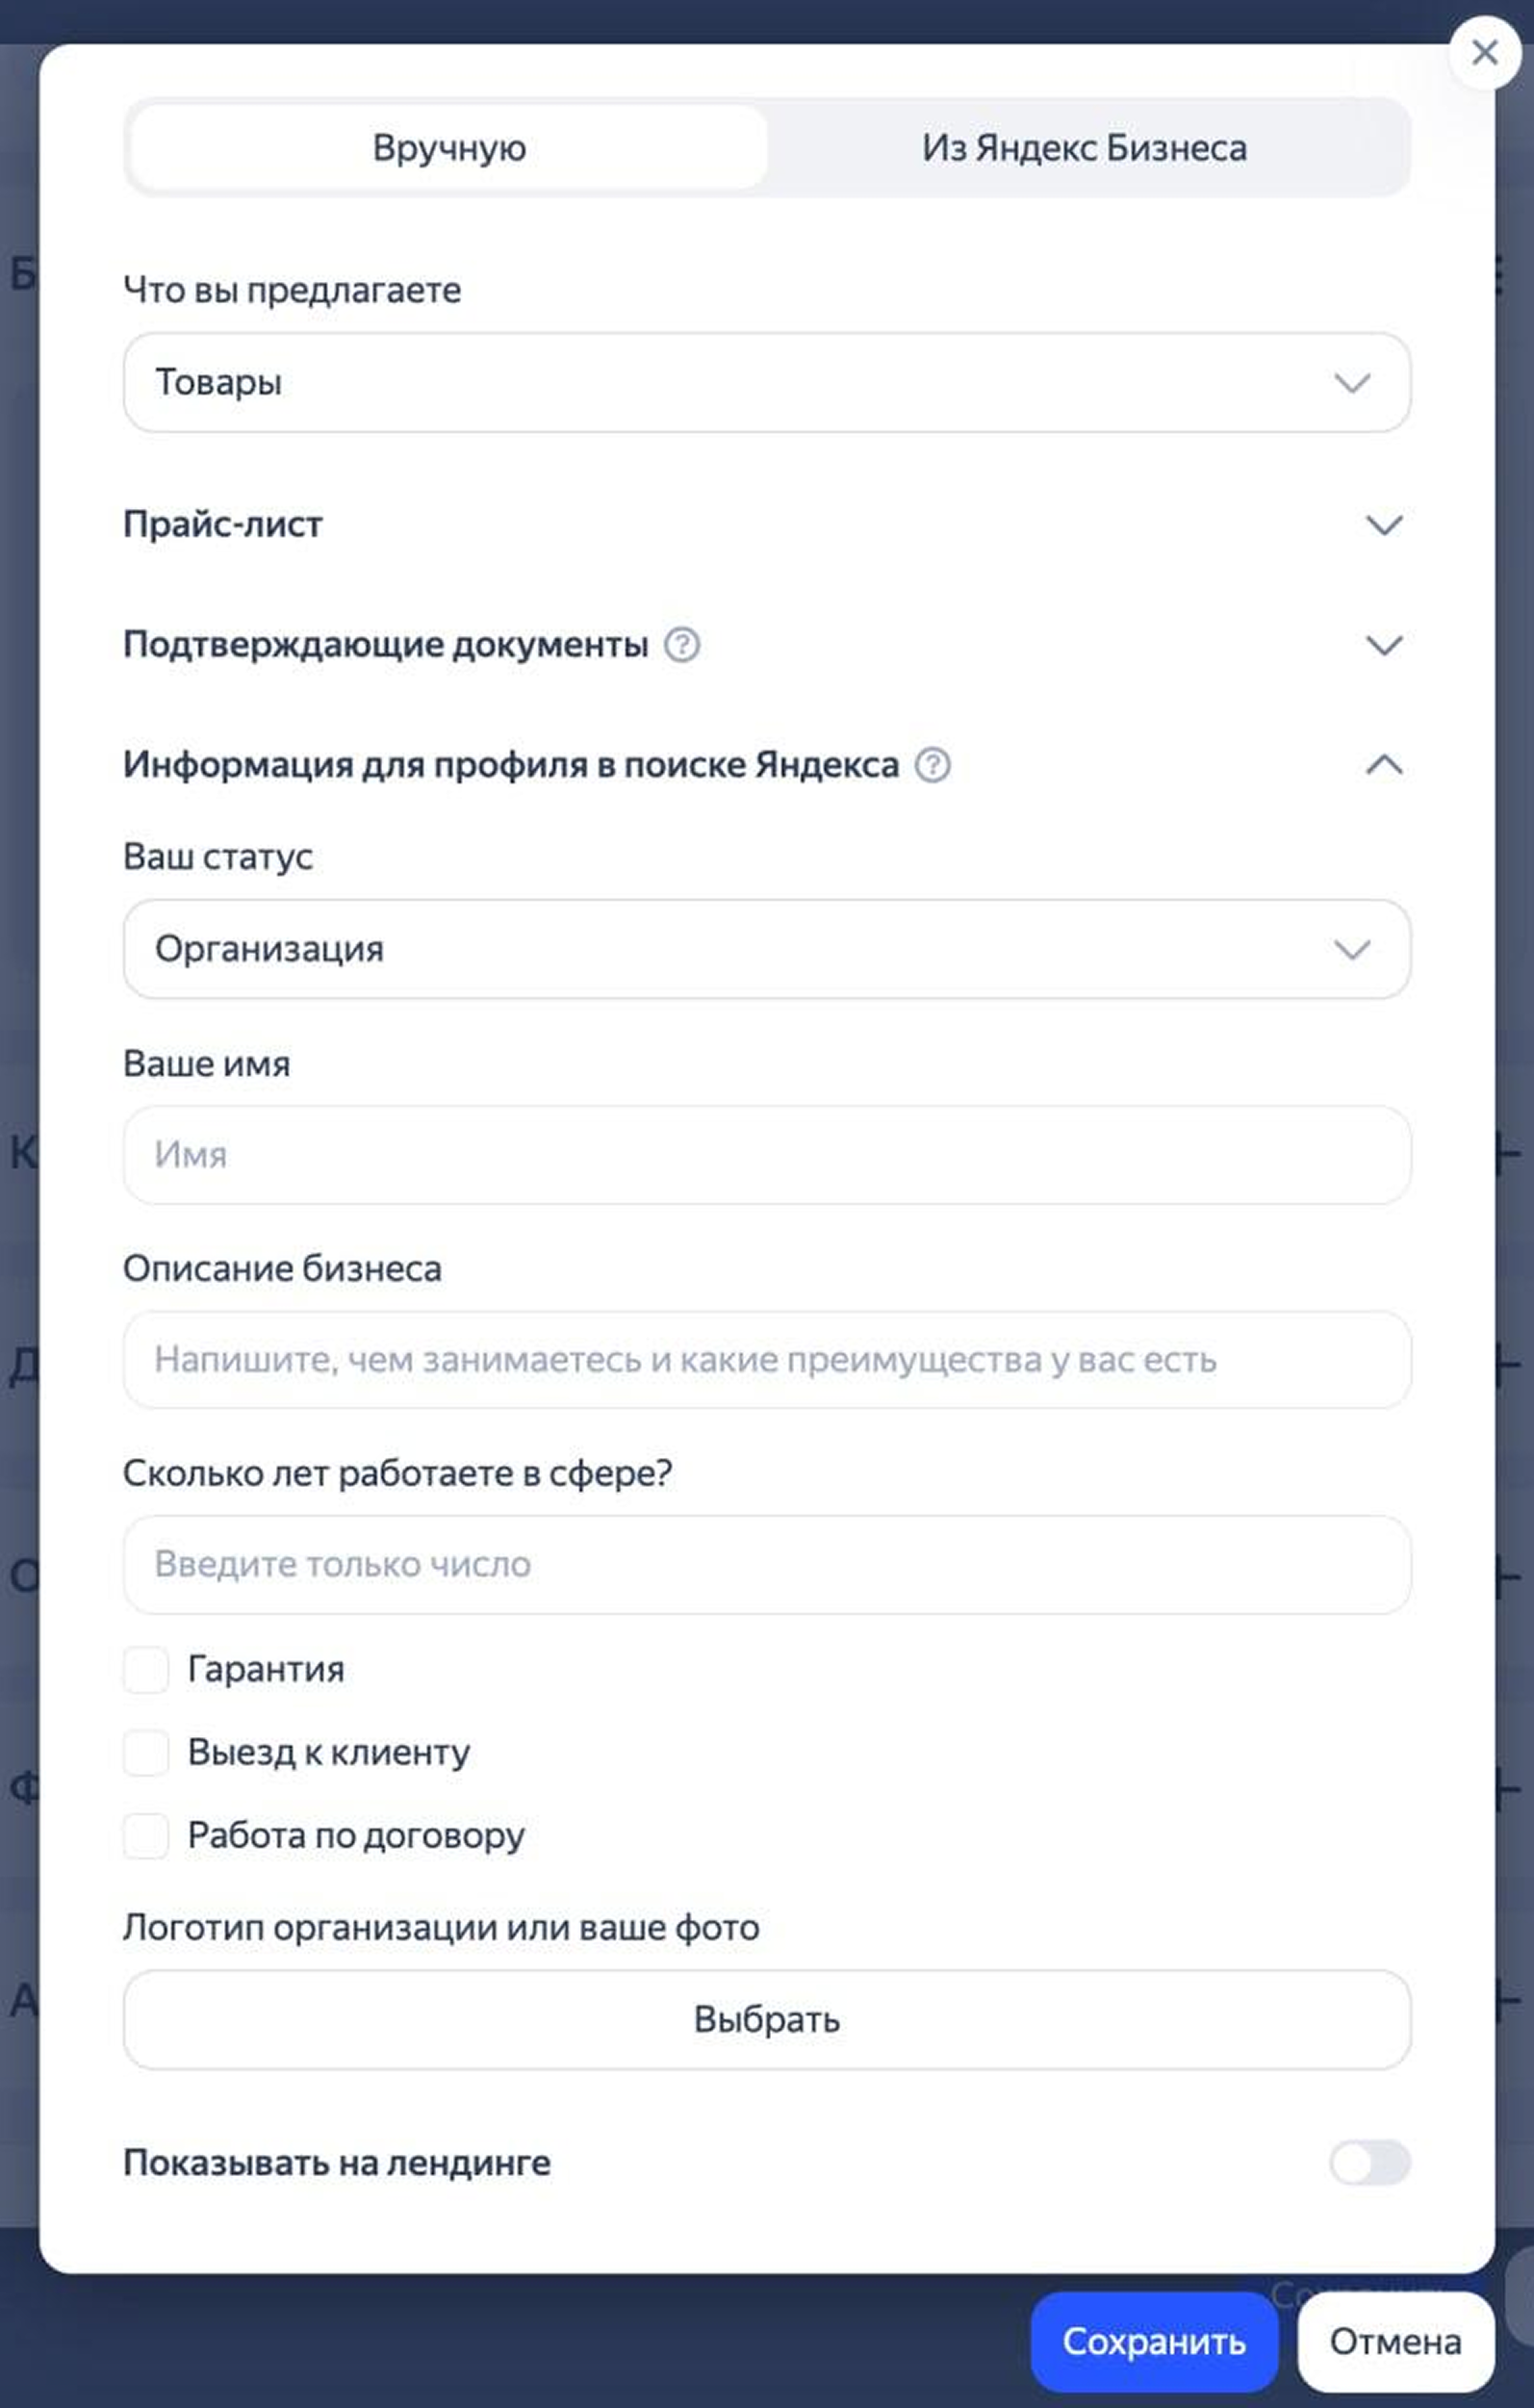
Catalog
A catalog on your landing page introduces users to your products or services and displays their prices.
Each catalog card includes an image, description, and price.
If you add a catalog with services and fill out all the fields under Profile details for Yandex Search, your ads will automatically appear in the service gallery above the search results after you launch your campaign.
If you leave any fields empty, the ads won't appear in the service gallery.
To add a catalog:
-
In the Catalog field, click
. -
Select whether you want to add your price list manually or import it from Yandex Business.
 ManuallyFrom Yandex Business
-
Select the type of catalog: Products or Services.
-
In the Price list field, click Add. This opens a window where you can configure your product or service card.
Alert
You can add up to 20 services to the price list.
Specify your product or service's parameters: name, description, category, price type and amount, and image.
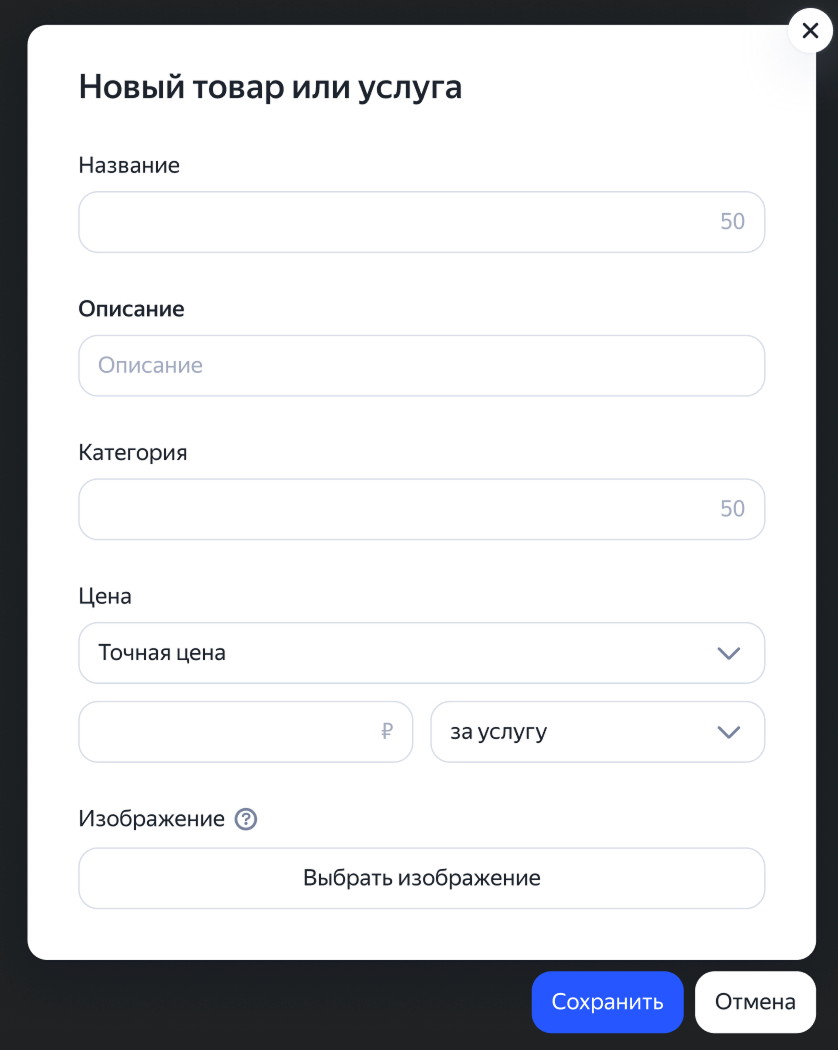
Save your changes and add more cards if needed.
The Price list field displays the product or service cards organized by category. The number of added products or services appears next to the category names.
To change the name of the entire category, click
and select Edit.To edit, duplicate, or delete a catalog card, click
in the field with its name and select the action.
Under Organization from Yandex Business, add your organization. The price list will be imported automatically.
You can set up your price list under About the business → Products and services in Yandex Business.
-
-
If applicable, add photos or scans of documents confirming your qualifications.
-
For your ads to appear in the service gallery above the search results, fill out your Yandex Search profile by specifying your status, name, and work experience and adding your photo or company logo.
-
Click Save.
Request form
Select how you want to receive customer requests from your landing page: by email or in Yandex Business.
-
Add your email address.
-
You'll receive a confirmation code at this email. Enter the code from the email and click Done.
Alert
You won't receive form submissions from the landing page by email unless you confirm your email address.
-
Set up the request form by adding fields like phone number, email, and date.
To rearrange fields, hold
 next to any field and drag it.
To delete a field, click
 next to it.
 -
Click Save.
In addition, you can view user requests in your Yandex Direct account. In the left panel, click Library → Landing page, select a landing page, and open the Requests tab.
-
Under Organization from Yandex Business, add your organization.
-
Customize your request form as needed by adding fields like phone number, email address, and date.
To rearrange fields, hold
next to any field and drag it.To delete a field, click
next to it. -
Click Save.
You can also set up a request form under Request form in Yandex Business.
Customer requests appear in your Yandex Business account under Request form → Requests. If you're the organization owner, you can set up forwarding to receive requests by email, Telegram, or SMS. For more information about setting up a request form, see this article.
Data exports via the API
If you're using a CRM, you can export customer requests from your landing page via the API. To export data from the landing page forms, use the get method within the Leads service. To learn more about the Leads service, see Help for the Yandex Direct API .
Address and reviews
Warning
To add a map with your address and reviews to the landing page, link your organization from Yandex Business. Reviews can be displayed only for offline organizations that appear on Yandex Maps.
If you haven't added a Yandex Business organization in the previous setup steps, click ![]() next to the desired section and link your organization. Enable the Show on landing page option and click Save.
next to the desired section and link your organization. Enable the Show on landing page option and click Save.
You can manually edit your address on the map.
To remove addresses or reviews from your landing page, click ![]() next to the corresponding field, disable the Show on landing page option, and click Save.
next to the corresponding field, disable the Show on landing page option, and click Save.
Appearance
Background and logo
To add a background or logo to the landing page, click ![]() and add some images. Click Save.
and add some images. Click Save.
Background requirements
-
Image size: 1200 × 420 pixels.
-
Aspect ratio: From 1:1 to 3:1.
-
Maximum file size: 5 MB.
-
Acceptable formats: JPG, PNG.
Logo requirements
-
Image size: 100 × 100 pixels.
-
Maximum file size: 5 MB.
-
Acceptable formats: JPG, PNG.
To replace or delete your background or logo, click ![]() .
.
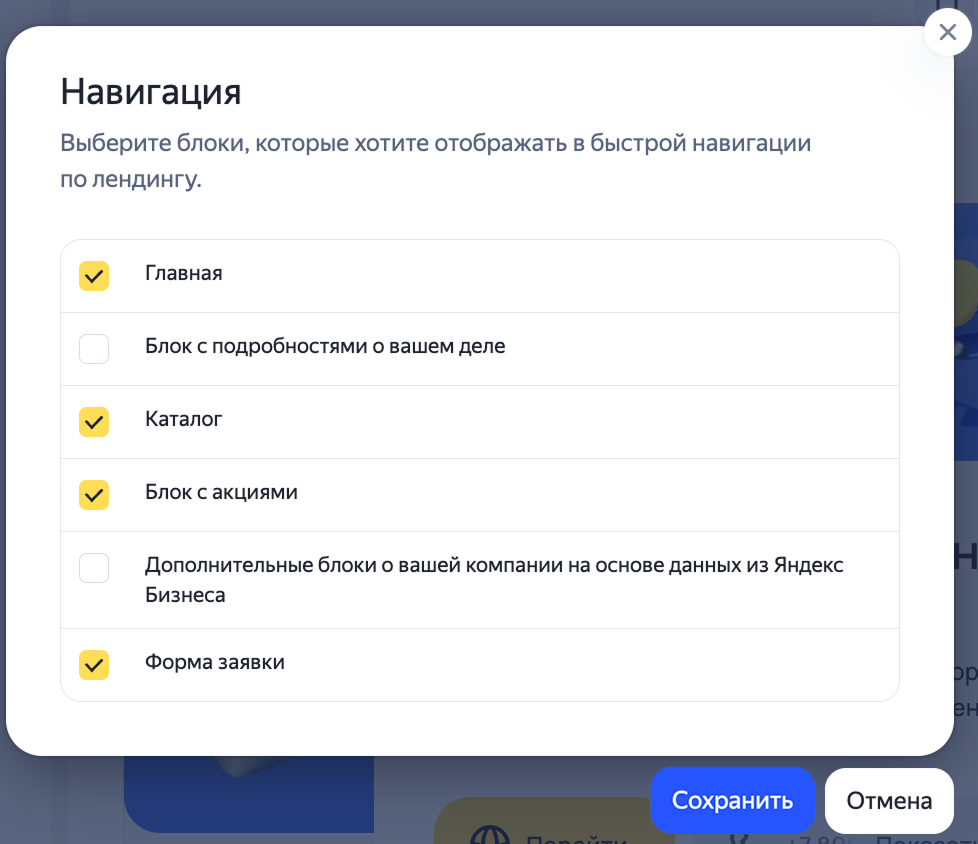
Menu
For faster navigation, you can add a menu to the page header with links to specific blocks on your landing page. This way, users can jump directly to the sections they need and find key information quickly.
To set up the menu, in the Navigation field, click ![]() and select the sections you'd like to add there. Click Save.
and select the sections you'd like to add there. Click Save.
Landing page style
You can customize the landing page to match your brand by changing parameters like the text, button, and background colors:
- In the Landing page style field, click .
- Choose how you want to customize it:
- Select style: Choose from suggestions.
- Configure manually: Configure any parameters manually.
- Click Save.
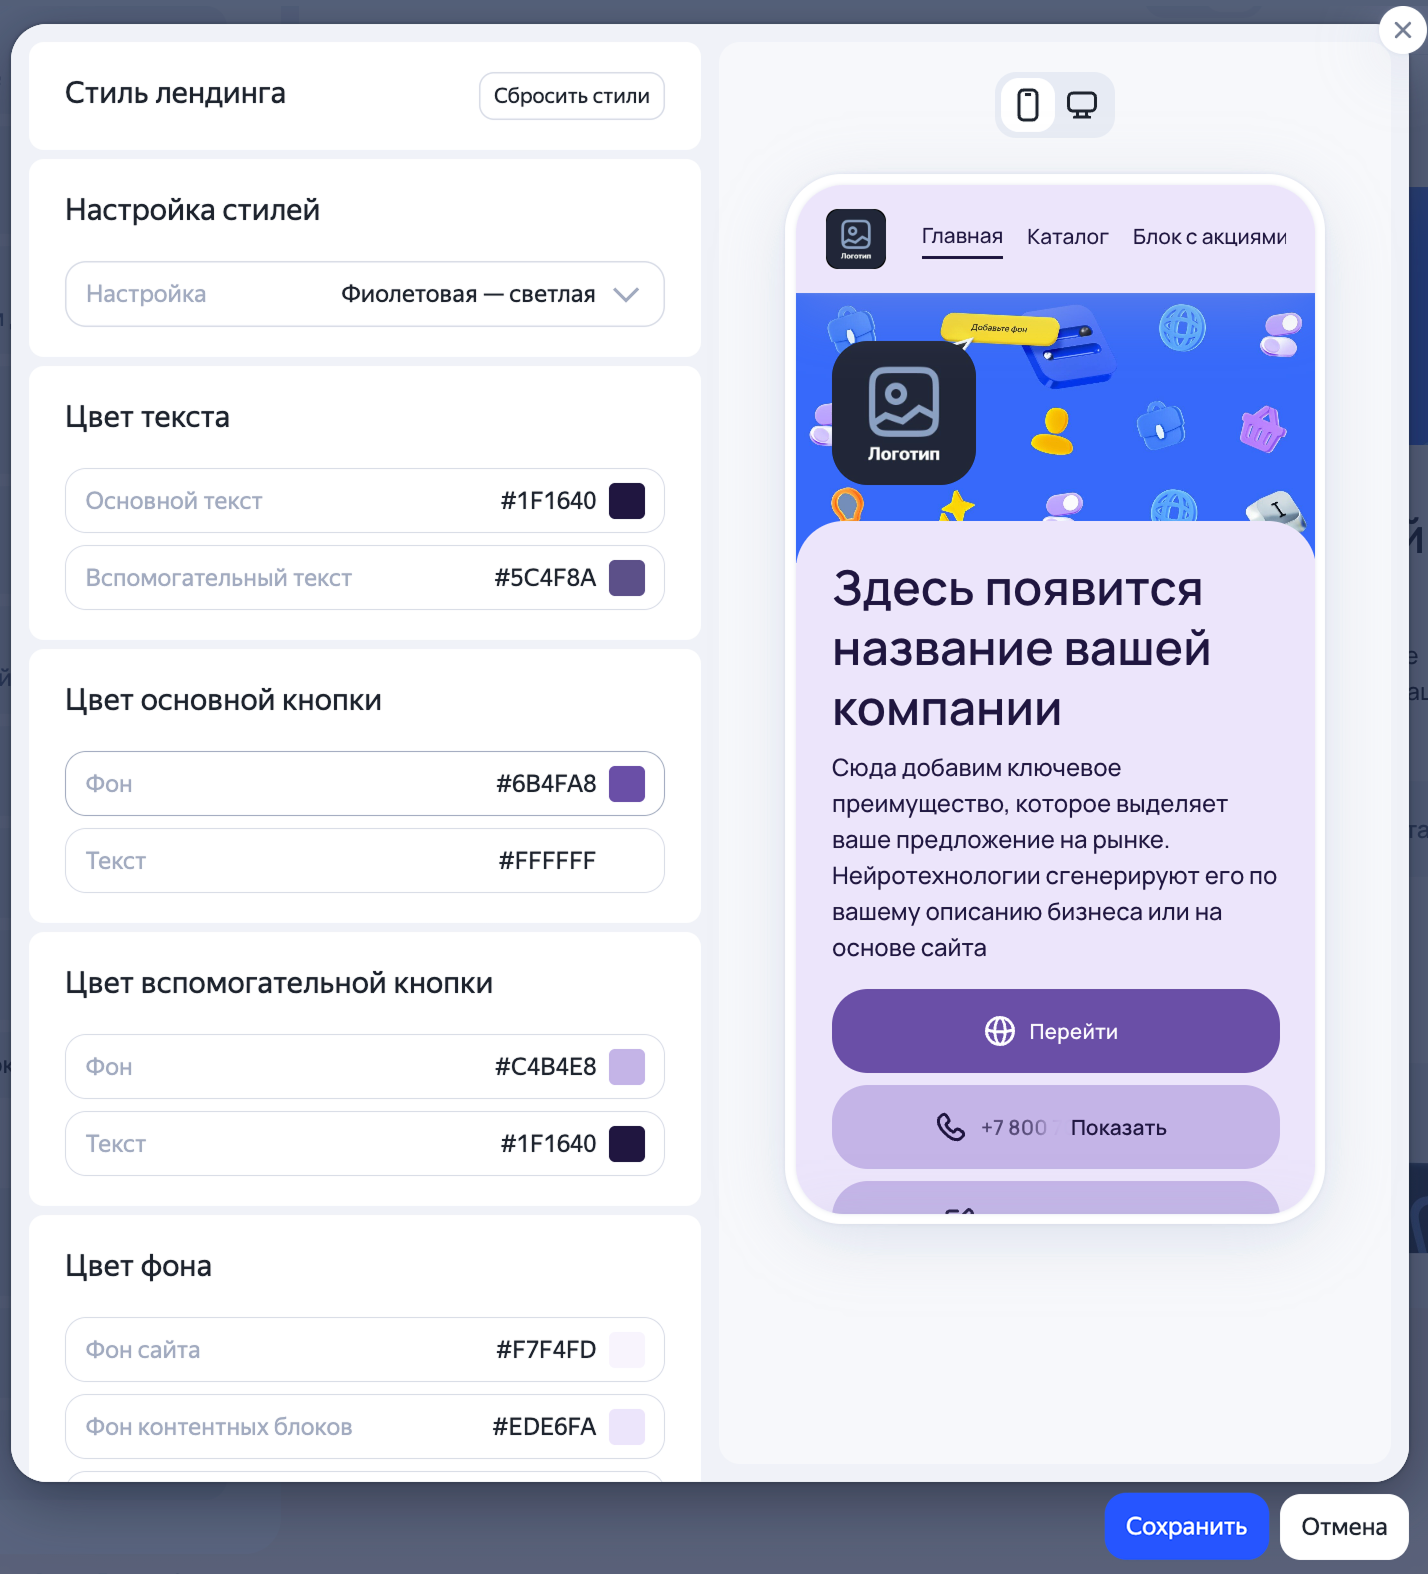
To restore the default settings, click Reset styles.
Moderation
Landing page content is reviewed for compliance with our requirements.
If one or more elements fail moderation, the page will be published without them. You can view the moderation status and related comments in the settings. You can delete or edit elements that failed moderation. Edited elements will be resubmitted for moderation. If they pass, they'll be added to the landing page.
Have questions?
Alert
Our customer support can only assist you with campaigns linked to the username you are contacting us from. You can check your username by opening ya.ru in another browser tab. Our team can access your data only when processing your request.
Scan the QR code or tap it to follow the link.


If you select Telegram or WhatsApp, keep in mind that Yandex does not control and is not liable for how third-party messengers store your data and chat history.