Configuring the map
Move the map
By default, the service displays the map of your city or region.
To view a different area, left-click and drag the map in the appropriate direction.
Change the map type
In the top-right corner of the page, click  and select a display mode:
-
Select Map to see roads, buildings, and other map items.
-
Select Satellite to see photographs of an area taken from space.
-
Select Hybrid to see satellite images with additional details from the map (street names, addresses, and other related information).
The display mode doesn't affect the other map functions like search, route planning, or map dragging.
Enable the day and night map
In the upper-right corner of the page, click and select Day and night map. In this mode, the map displays five layers:
- Day
- Civil twilight
- Nautical twilight
- Astronomical twilight
- Night
The position of the layers on the map is updated in real time.
You can view the position of the layers for any date and time by moving the sliders at the bottom of the page. To return to updates in real time, click Reset.
Rotate or tilt the map
You can rotate and tilt the map only in Map mode.
Alert
This feature is not supported on outdated and low-power devices.
You can control the tilt and rotation of the map using:
-
The compass button
 .
.To tilt the map, click 3D. To reset the map tilt, click 2D.
To rotate the map, hold down the left mouse button and turn the outer ring of the compass.
The red arrow on the compass points north.
-
Mice and keyboards.
Click and hold Ctrl and the left mouse button. Move the mouse to rotate or tilt the map.
To return the map to its original position, click the outer compass ring once.
At small scale, the tilt resets automatically.
Change the map scale
To change the map scale, you can use:
-
The
 and
and  buttons.
 -
The mouse wheel: scroll backward to zoom out and forward to zoom in.
-
Mouse buttons: zoom in with a double left-click on the map, zoom out with a double right-click.
-
The right mouse button:
-
Click on the map.
-
Without releasing the button, move the mouse in the appropriate direction.
You will highlight a region as you move the mouse.
-
Release the button.
The highlighted area will shift to the center of the map, and the map will zoom in.
-
Measure distance
You can measure the distance on the map along straight and curved lines, for example, to trace a street.
To do this, follow these steps:
-
In the top-right corner of the page, click
 . Make sure that the toggle that appeared on the left is set to Measure distance.
To disable this feature, click this button again.
-
Select the starting point for the measurement.
-
Select the next points. The length of the entire line will display next to the last point.
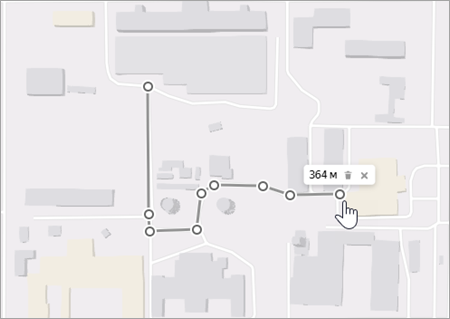
You can adjust the resulting line. To do this, drag any point to another place.
If you click anywhere on the line, a new point appears. You can also drag it around the map.
-
Click on any point. You'll see the distance from the starting point to the selected point displayed next to it.
-
To delete a point, double click on it.
To delete an entire line, click
 next to the end point.
 -
To disable the ruler and delete the entire line, click
 next to the end point.
Measure area
You can measure the area of an arbitrary polygon.
To do this, follow these steps:
-
In the top-right corner of the page, click
. In the toggle that appeared on the left, select Planimeter. -
Select a starting point for measurement on the map.
-
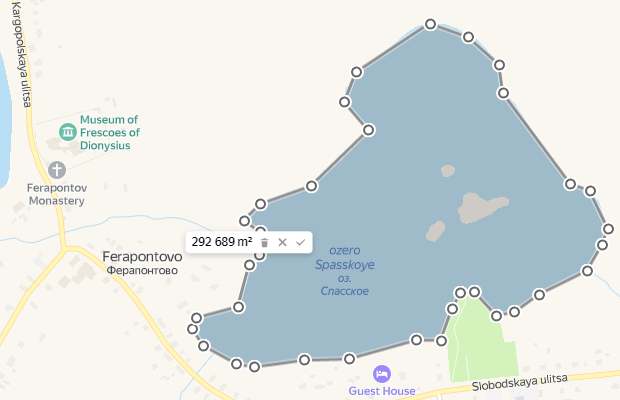
Select other points to form a polygon.
-
You can edit the resulting polygon by dragging any of its points.
Clicking anywhere on the line creates a new point that you can move around on the map.
To delete a point, double click on it.
-
You can drag the polygon to another location on the map.
-
To delete the entire polygon, click
near its end point.To delete the polygon and quit the planimeter, click
near the end point.
Print a map
-
Click
 , then select Print. A preview window opens.
 -
Zoom in and out on the map and drag it around if you need to.
-
Select:
-
Page format:
-
A3 (420 × 297 mm).
-
A4 (210 × 297 mm).
-
B4 (250 × 353 mm).
-
B5 (176 × 250 mm).
-
Letter (216 × 279 mm).
-
Legal (216 × 356 mm).
-
-
Page orientation:
-
Portrait: the longer side of the sheet is vertical
-
Landscape: the horizontal side of the sheet is longer.
-
-
-
Write a comment if you need to. This text will be printed below the map.
-
Click Print.
-
Select the printer and printing options.
Click Print.
You can also print a custom map with the items that you've plotted on it. For more information, see Map Constructor.