Campaign and banner placement
Campaign placement
When creating a new campaign, scroll down to Placement and select a site, section, or placement from the list where you want to run your advertising campaign.
To change the placement of an existing campaign, find it in the campaign list and open the Placement tab.
Alert
If placement on the entire section or site is selected, the campaign will not be placed automatically the next time a new placement is added to it. You will need to place the campaign on the new placement yourself.
If there are a lot of sites and placements, search them by name or use filters:
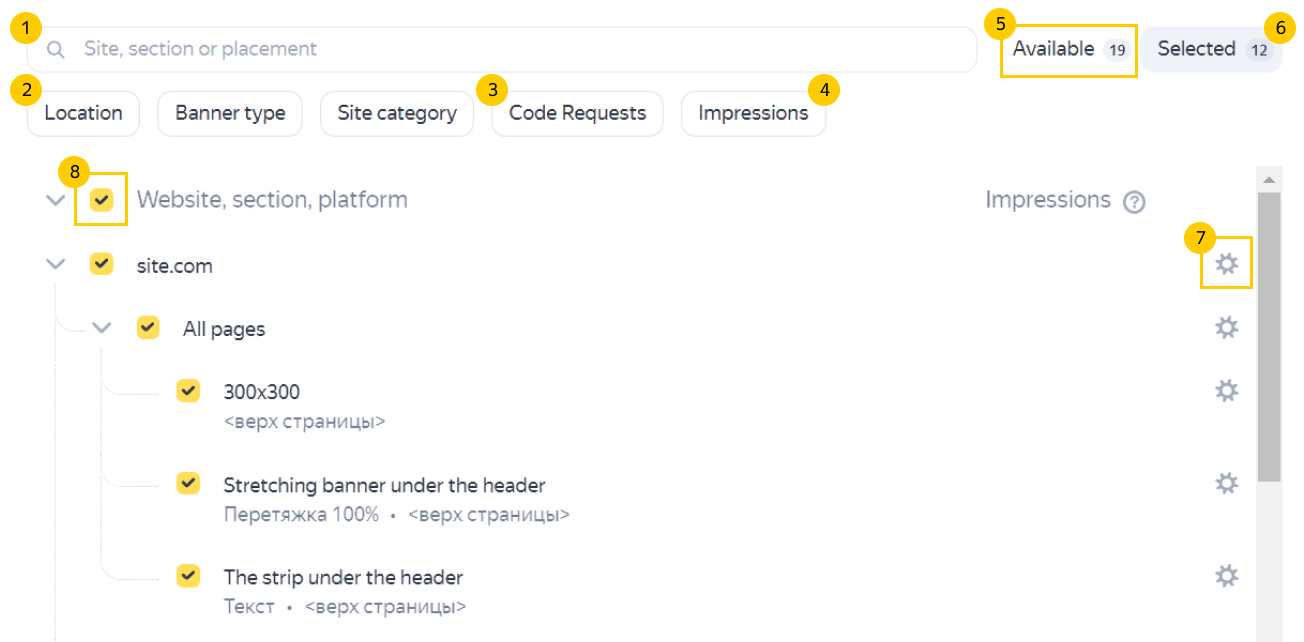
1. Search by site, section, or placement name
Start typing the name of a site, section, or placement in the search bar, and the list will only display items matching your query.
For example, to find the appropriate placement faster:
- First, enter the site name in the search bar.
- Select the site you're looking for from the list of available placements.
- Switch to the list of selected placements. It will only contain sections and placements inside the selected site.
- Find the placement using filters or search by name.
2. Filters by location, banner type, or site category
Use them to find placements by location, banner type, or site category.
3. Filter by code requests
Use it to only select the placements with code requests. When this filter is enabled, statistics on code requests for today will be available for each site, section, and placement. You can use them to place the campaign on the site more effectively.
4. Filter by impressions
Only available when editing a created campaign.
The filter lets you narrow the list of placements to sites where the campaign was served. When this filter is enabled, impression statistics will be available for each site hosting the campaign. They give you an idea of which sites had the most impressions and which didn't have any at all.
5. List of available placements
Lets you see the placements available with all the filters applied.
The list has a Site — Section — Placement hierarchy. Nested items inherit the settings of the parent item: if you select the entire site or section, a campaign will be placed on all nested placements. These sites or sections will be marked with  .
.
If your campaign is only placed on some placements inside a site or section, this site or section will be marked with  .
.
6. List of selected placements
The list displays the placements selected from the list of available placements. You can also apply filters, options, or search by name to this list.
7. Placement settings for a site, section, or placement
The icon is displayed when you hover over a list item.
The following settings are available for all levels (site, section, or placement):
-
Rotation method: By priority or by percentage of traffic. For more information, see Redefine rotation method at the placement level.
-
Targeting profile: Apply a targeting profile to impressions on the selected site, section, or placement.
Note
When selecting the Custom targeting profile, also specify targeting settings for the profile:
1. Select the Custom targeting profile.
2. Without closing the placement settings window, click next to the Targeting profile field.
3. A new tab opens with targeting settings at the campaign placement level. Enter and save the settings.
4. Go back to the targeting profile selection tab and click Save.
At the site level, you can also set limits on the number of campaign impressions: total, per day, or per hour. For more information, see Limits on impressions at the site level.
8. Selecting and deselecting all elements
Use the checkbox next to Website, section, platform to select or deselect all elements.
Banner placement
You can redefine an individual banner's placement within a campaign: disable impressions on previously selected placements or place your banner on other sites, sections, and placements where the campaign is not placed.
How to place a banner in another section or on another placement
- In the campaign settings, go to Banners.
- Find the desired banner and select Placement to the left of its name.
- In the banner placement settings, switch to the list of available placements: other placements whose type corresponds to the banner type will appear.
- Select the platforms where you want to serve this banner.
A new placement set at the banner level will automatically enable the placement of the entire campaign on the selected placements. With that approach:
- Already created banners with the appropriate type of banner will not be placed on new placements automatically.
- New banners will inherit the updated campaign placement.
Limits on impressions at the site level
You can set a limit on campaign impressions for a site. To do this, click Open to full screen to expand the tab, find the site in the list, and use the Limits total, day, hour fields to limit the number of impressions.
Warning
Limits are set at the flight level, rather than for individual banners. All banners included in the flight are counted toward the overall impression limit.
How limits on impressions at the site level work
- Once the number of impressions reaches the Limits, total value, the campaign stops running on this site. Campaign impressions will continue on other sites where the campaign was placed.
- If the number of the day's impressions reaches the daily limit, serving the campaign on this site is paused until the next day. Campaign impressions will continue on other sites where the campaign was placed.
- If the number of the hour's impressions reaches the hourly limit, serving the campaign on this site is paused until the next hour. Campaign impressions will continue on other sites where the campaign was placed.
Note
You can't limit the number of impressions at the section or placement level.
Contact support
All ad requests that received a response from the Adfox server.
You can use categories to:
- Group sites, sections, or placements by topic and get statistics on impressions and clicks for the entire category.
- Mark up the audience for targeting by behavior.