Banner HTML5
Description
Banner HTML5 is a banner that displays arbitrary HTML content or an image. The HTML code can be a regular HTML page with styles and scripts. It's placed in an iframe and has limited access to the site content.
There are two ways to add a banner to a site using a Banner HTML5 [context] template:
- By preparing only the image. A click-through link in the banner parameters determines image clickability.
- By preparing an HTML creative. When using Adobe Animate CC or Google Web Designer, follow the instructions from the Develop an HTML creative section below.
If you add both HTML code and an image to the banner, the HTML code is displayed.
Parameters for adding a banner to Adfox:
- Banner width and height.
- Custom CSS styles for the banner container.
Sample ready-made project with one button in Adobe Animate CC, source file.
Sample ready-made project with multiple buttons in Adobe Animate CC, source file.
Sample ready-made project in Google Web Designer, source file.
Develop an HTML creative
Study the HTML code requirements
-
The maximum allowed size of an HTML file is 65,000 bytes.
-
It's best to place JavaScript and CSS inside the HTML code of the banner. If the final HTML code exceeds the maximum acceptable size, reduce it by splitting JavaScript and CSS code into separate files:
- Save the JS and CSS code in separate files with the .js or .css extension.
- File size can't exceed 10 MB.
- Upload the files to the ad campaign's Files tab and add the resulting file links to the HTML code:
-
If the project includes absolute links (
src="js/script.js",src="css/style.css"), Adfox will recognize the paths to the files and automatically add them to the Files tab, replacing all links to these files in the project during the upload. -
If the project includes relative links (
src="../js/script.js"), use one of the following methods:- Replace
.jsand.cssfile links with absolute paths: Adfox parsing will trigger, and all links will be replaced automatically. - Manually upload
.jsand.cssfiles to the Files tab and replace relative links in your HTML code with the ones you'll get from Adfox.
Example of connecting JS and CSS files:
<script type="text/javascript" src="LINK_TO_FILE"></script><link rel="stylesheet" type="text/css" href="LINK_TO_FILE" /> - Replace
-
The project can contain only one file with the .html extension.
-
The maximum allowed number of files in a project is 50.
-
File types allowed in the project: CSS, JS, HTML, GIF, PNG, JPG, JPEG, SVG, JSON, MP4, OGV, OGG, WEBM, AVI, and SWF.
-
Maximum size of each file (this applies to archived files as well): 10 MB; 1 MB for video files.
-
If the banner is clickable, make sure there are no functions or methods in the HTML code that block clicks or taps. For example, the
createjs.Touch.enable(stage)method enables multi-touch mode in CreateJS, blocking taps on the banner. -
File names must only contain numbers or Latin letters and an underscore character. You can't use spaces, quotation marks, and special characters in the file name.
-
Scripts must contain the additional parameter:
<script nonce="%request.eid1%">. -
The completed project is a ZIP archive.
Image requirements
- Use high-resolution images. This substantially improves banner quality on mobile devices, though it reduces banner loading speed.
- We recommend reducing the size of image files using services like TinyPng. This service works with both PNG and JPEG.
- You can use SVG images. These are vector images, which means they will look better on both mobile and desktop devices. They also have a small file size and can be animated.
- Allowed image formats: PNG, GIF, JPG, and SVG.
- Maximum file size: 10 MB.
Select the editor where you'll develop the HTML creative and click its link. Prepare an archive with an HTML creative following the instructions:
Adobe Animate CC editor: One-button banner
-
Download a banner template with a single clickable area (a button).
Adobe Animate CC version 16.0 and higher
-
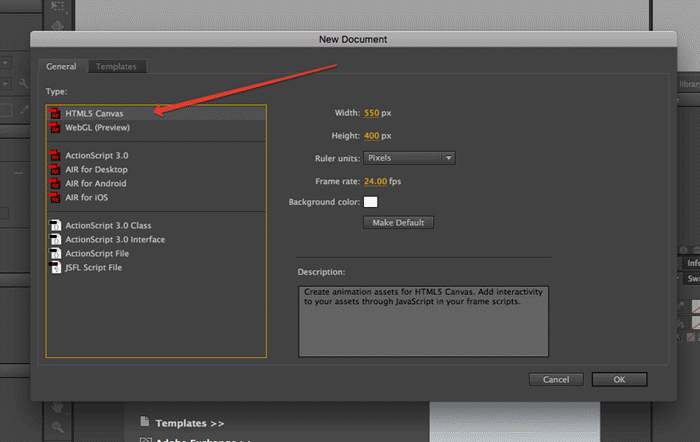
Create an HTML5 Canvas project in Adobe Animate (or open an existing one).
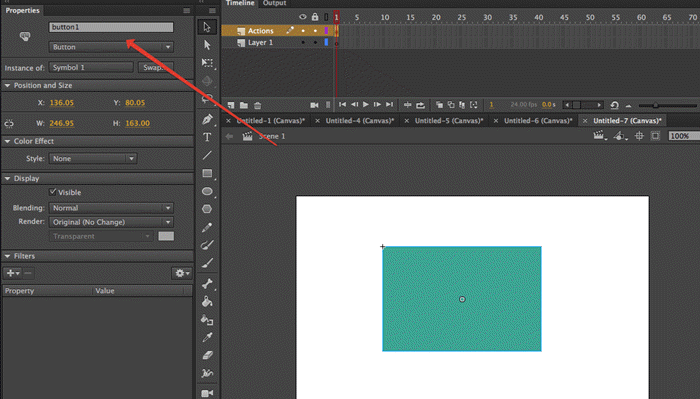
-
Open the publication settings in File → Publish Settings and use the template from step 1.
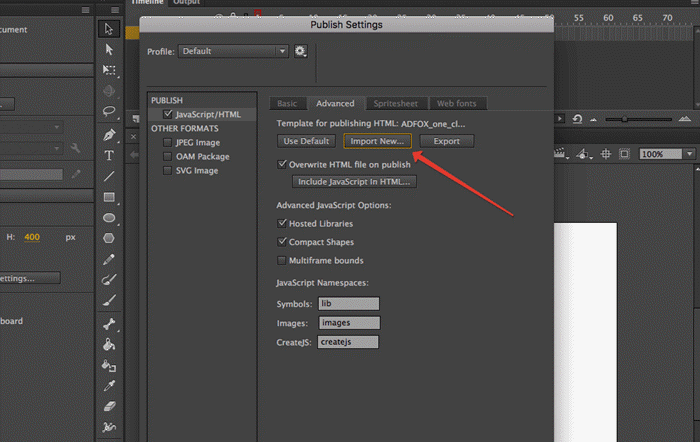
-
Select the directory and publish the project.
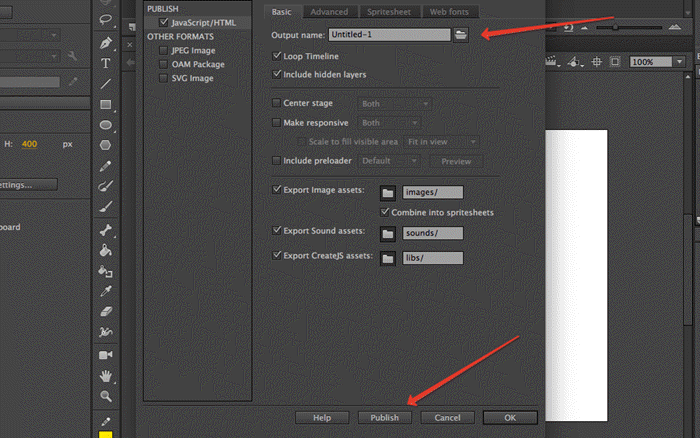
-
The entire banner area is clickable: it's a button that leads to the advertiser's site. The click link is pulled into the creative from the banner settings in Adfox.
-
After publishing the project, archive it with the .zip extension. Your creative is ready to be uploaded to the Adfox banner.
Adobe Animate CC editor: Multiple-button banner
-
Download a banner template with multiple buttons.
Adobe Animate CC version 16.0 and higher
-
Create an HTML5 Canvas project in Adobe Animate (or open an existing one).
-
When you add buttons or movie clips, it's important to set an instance name for them so that you can make the desired buttons clickable later. We recommend using names like “button1 − button9”.
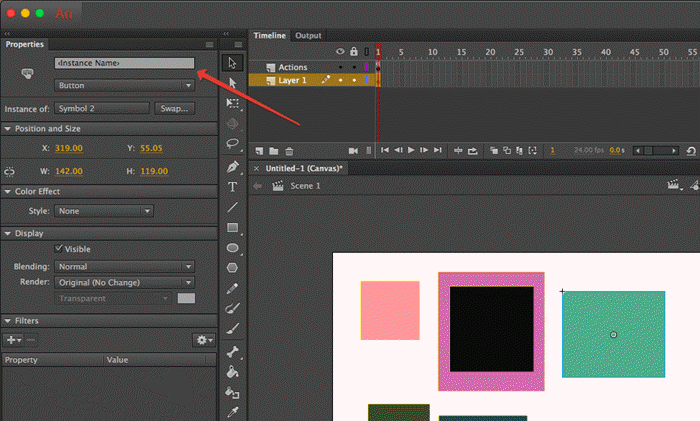
See also:
Instructions for adding a button and assigning an instance name
Button on the main scene
-
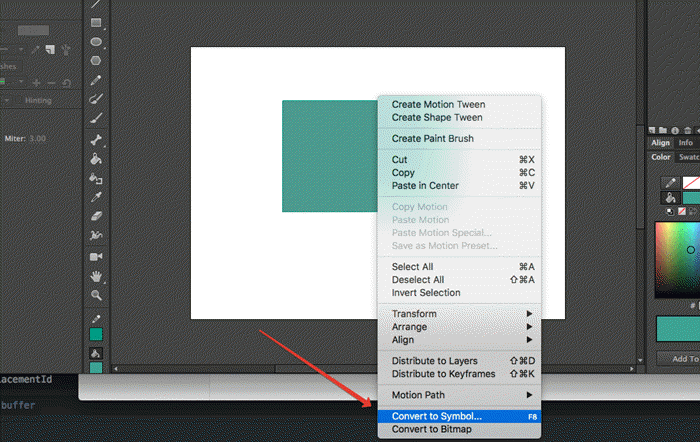
Create an object on the scene, for example, using Rectangle Tool. Then select the object and select Convert to Symbol... in the context menu.
-
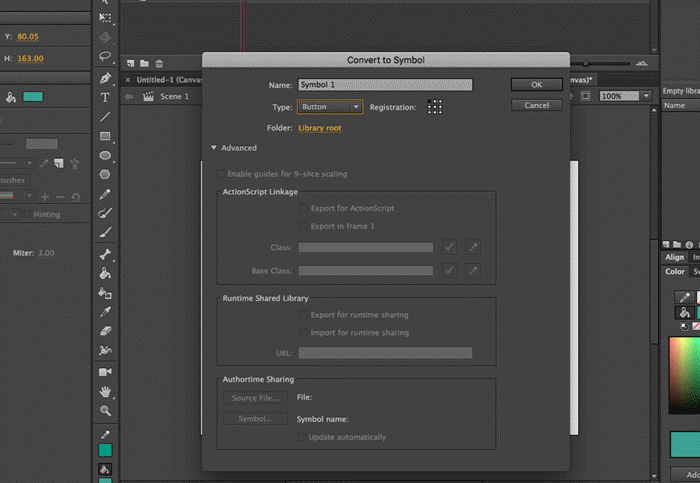
In the window that appears, select Type: Button. You can leave Name unchanged. Then click Ok.
-
For the click to work, assign an Instance Name to this button.
-
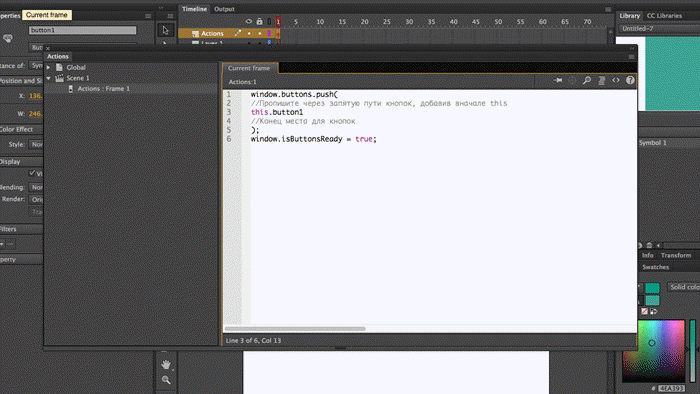
Write the code for this button in Actions:
window.buttons.push(
//List button paths separated by commas and add “this” at the beginning
this.button1
//End of button space
);
Nested button
-
Let's say that the button is inside another symbol, for example, Movie Clip. In this example, this Movie Clip has the Instance Name “name”.
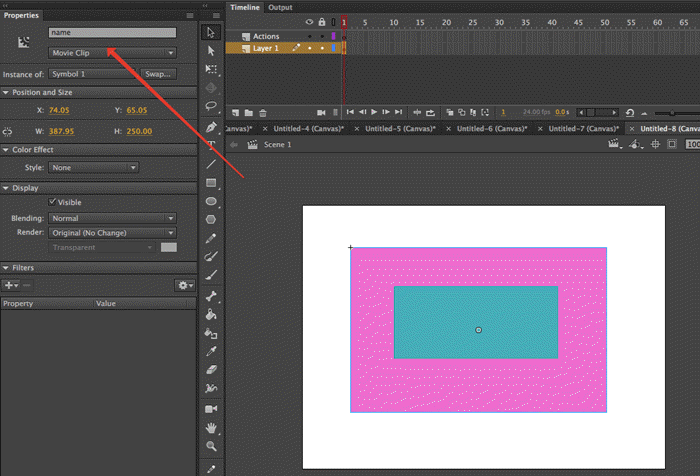
-
Double-click to go inside name. The nested button is there.
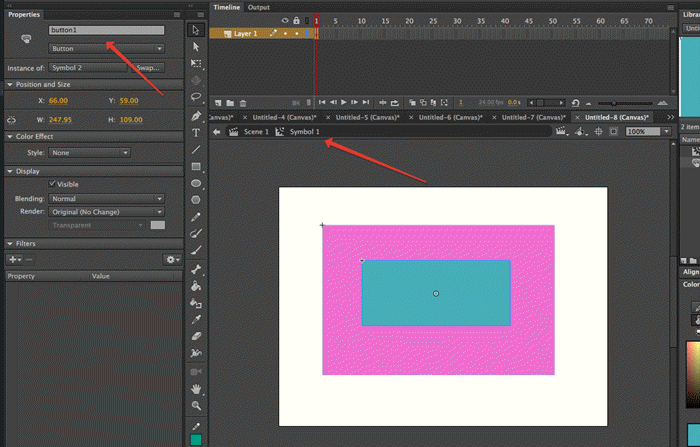
-
When you specify the path to this button in Actions, you need to add the object's Instance Name after this where it's nested:
window.buttons.push(
//List button paths separated by commas and add “this” at the beginning
**this**.name.button1
//End of button space
);
Instructions for creating transparent buttons
-
Select the necessary element and convert it to a symbol.
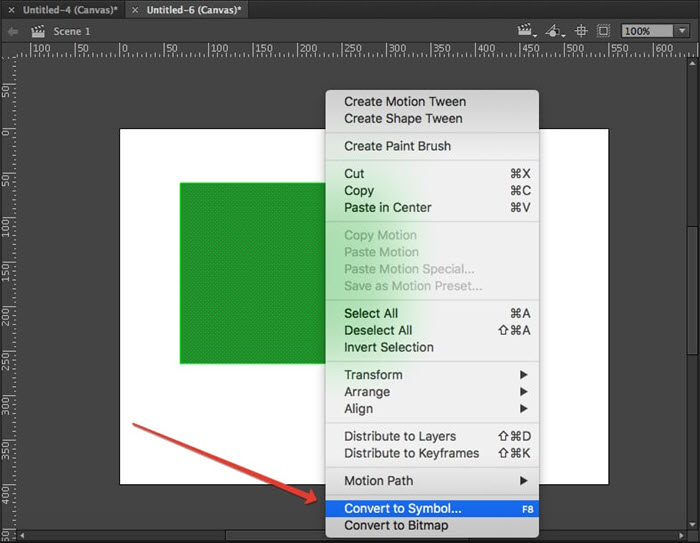
-
Enter a name and select Type: Button.
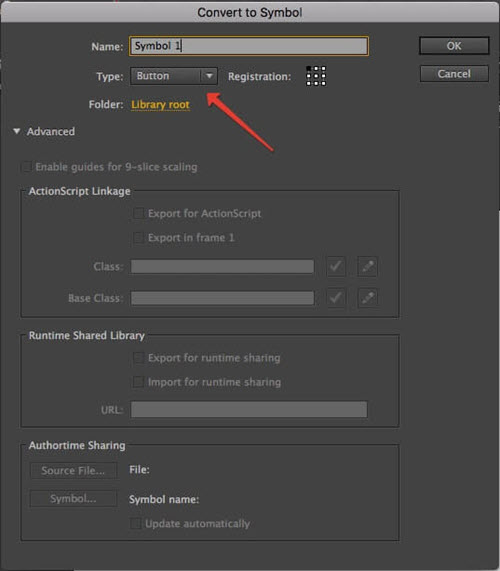
-
Double-click the symbol to open it:
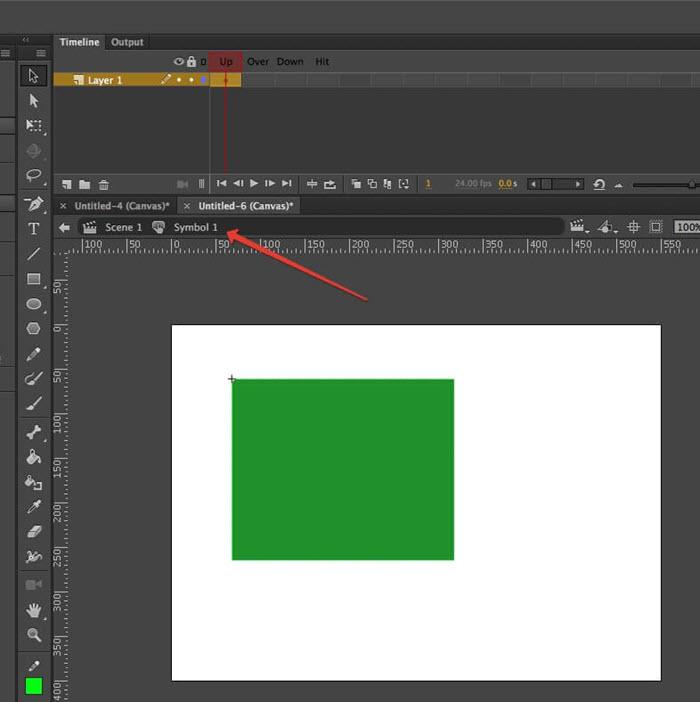
-
Insert keyframe in the hit frame.
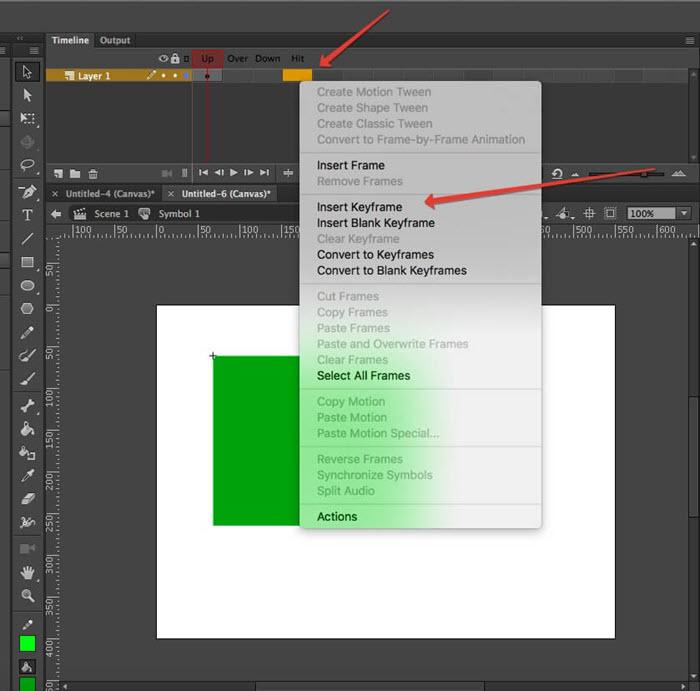
-
Delete the contents of the up, over, and down frames:
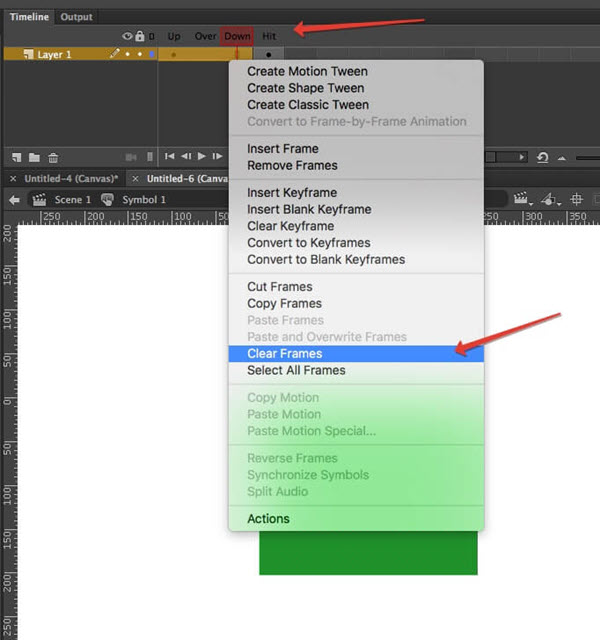
-
The transparent button is ready:
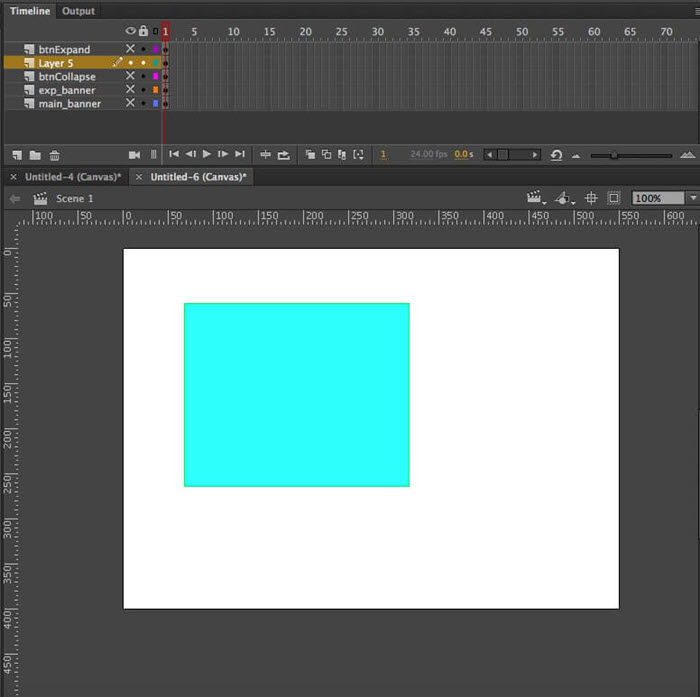
-
-
Add an Actions layer to the project (this is where you add the code for the buttons).
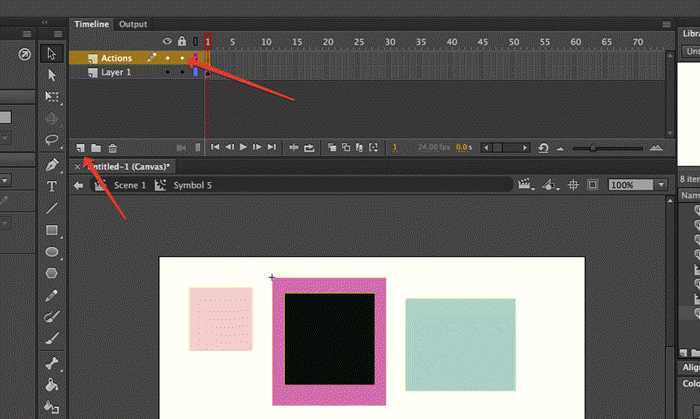
-
Open the window for writing code.
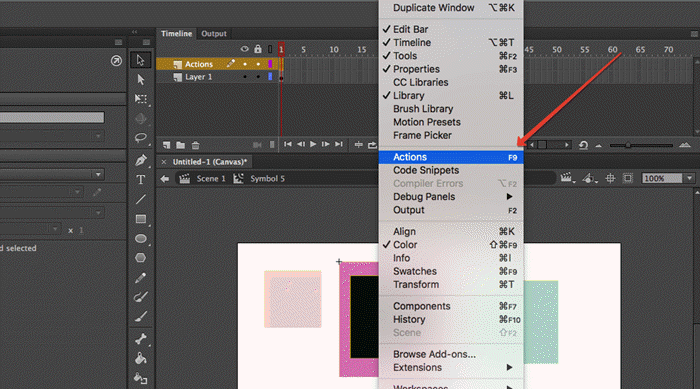
-
Modify the code and write it in the Actions layer.
window.buttons.push(
 //List button paths separated by commas and add "this" at the beginning
 this.button1,this.scene_instance_name.button2
 //End of space for buttons
 ); setAdfox();
If the button is in the main scene, enter its instance name right after
this, for example:this.button1If the button is inside a nested scene, after
this, write the instance name of the scene and the instance name of the button:this.scene_instance_name.button2Sample ready-made code in the Actions layer:
window.buttons.push(
  //List button paths separated by commas and add "this" at the beginning
  this.button1, this.scene_instance_name.button2
  //End of space for buttons
  ); setAdfox();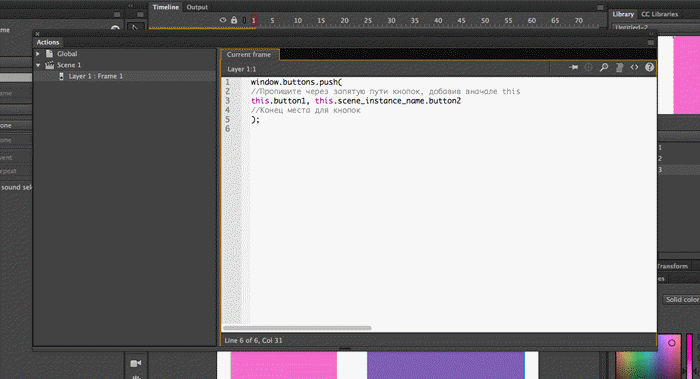
-
The first button in the code line calls the first link from Adfox, the second button calls the second link, and so on.
Note
Together with the HTML creative, pass the information about the button and link number correspondence to the manager who adds the banner to Adfox.
-
Open the publication settings and use the template from step 1. Select the directory and publish the project.
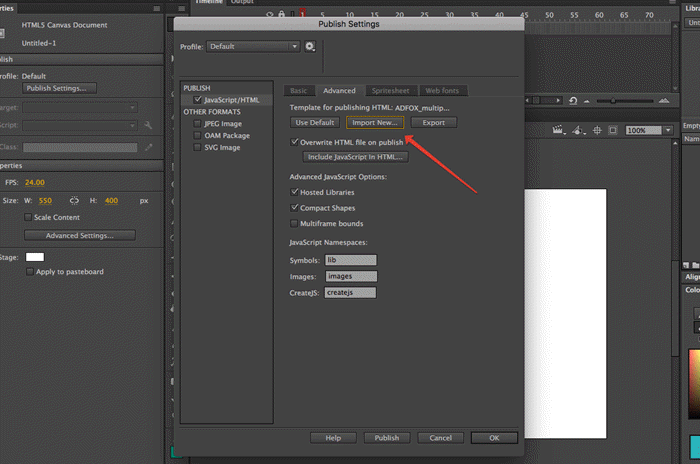
-
After publishing the project, archive it with the .zip extension. Your creative is ready to be uploaded to the Adfox banner.
Google Web Designer editor
-
Download the banner template for Google Web Designer.
You can use this banner code as a basis for making creatives in the editor. Place the archive contents into the folder with the program templates, for example:
/Users/[USER_NAME]/Documents/Google Web Designer/templates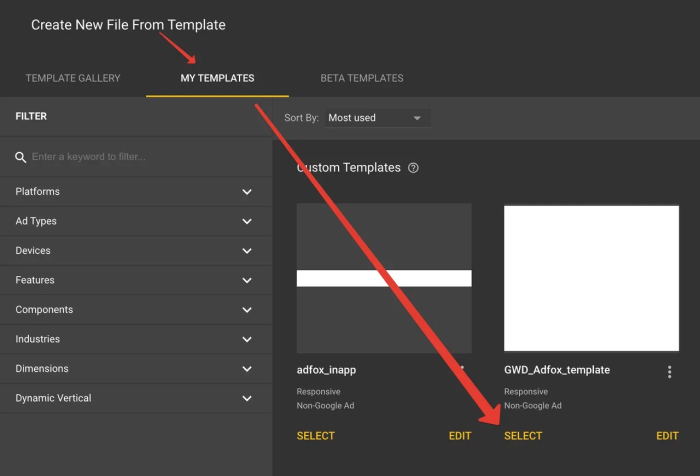
The template contains an
adfox_HTML5.jsscript and a set of parameters for click-throughs and event counters to work correctly:%request.reference_mrc%, %user1%, %eventN%, whereNis the event number from 1 to 30. -
Click processing.
All events are assigned to animation elements on the Events tab.
Actions are called using the Interactive area component.
Add it and select the Tap Area → Touch/Click event.
On the Custom code tab, select the click call function.
-
If a single button is used:
callClick(); -
If multiple buttons are used:
callClick(n);where
nis the number of the event to be called. -
If you need to call an event from an animation without a click-through, use the following code:
callEvent(n);where
nis the number of the event to be called.
How to use a stretching (adaptive) banner
To make the banner stretch across the width of the container on the site, specify percentages instead of pixels for the banner location and dimensions on the Properties panel.
Use the Align by container and Adaptive layout options on the top toolbar.
If you enable Adaptive layout before using any alignment tools, when you change the parent container size, all elements are aligned relative to each other and relative to the container size.
You can use the relative element sizes in percentages and absolute sizes in pixels at the same time.
Sample ready-made project in Google Web Designer, source file.
-
-
Publish the project.
The project has to be published with the following settings:
- Collect files enabled.
- Create ZIP archive enabled.
- Groups unpacking enabled.
- CSS prefix enabled for WebKit and Mozilla.
Note
When adding a banner to Adfox, the manager needs to know the correspondence between the button and event number. For each event, the manager adds its own click-through link, which is then passed to the banner code using a variable.
After publishing the project, archive it with the .zip extension. Your creative is ready to be uploaded to the Adfox banner.
Other editors
-
Counting clicks on banners.
To count click statistics for a banner in Adfox, you need to include the following variable in the
аtag for thehrefattribute in the HTML code:%banner.reference_mrc_user1%.For links, use the
targetattribute with the%banner.target%variable as an attribute. If the attribute is missing, the link will open inside the iframe: that is, the advertised site will open in the location of the banner.Example of HTML code that counts banner clicks:
<a href="%banner.reference_mrc_user1%" target="%banner.target%">Advertiser site</a> -
Counting clicks for multiple links on the banner.
Let's say the banner has several links leading to different pages of the advertised site, and you need to count the number of clicks for each of them.
<a href="http://site.ru" target="_blank">First link</a>
<a href="http://site.ru/about/" target="_blank">Second link</a>
Replace the
hrefattribute value with the%request.reference_mrc%&pf=%banner.eventN:urlenc%variables, whereNis the event number from 1 to 28.For example:
<a href="%request.reference_mrc%&pf=%banner.event1:urlenc%" target="%banner.target%">First link</a>
<a href="%request.reference_mrc%&pf=%banner.event2:urlenc%" target="%banner.target%">Second link</a>
You need to inform the manager who adds the banner to Adfox about which links correspond to which variables. When adding a banner, you'll need to specify the first link for Event 1, and the second link for Event 2 on the Events tab.
The first link:
http://site.ru — %banner.event1:urlenc%(Event 1).The Second link:
http://site.ru/about/ — %banner.event2:urlenc%(Event 2).
Add a banner to Adfox
Note
You can add a Banner HTML5 as a separate banner or as part of a carousel.
To add a Banner HTML5 to a carousel:
- Create a master campaign with the Carousel profile.
- Select the Banner HTML5 Slide [context] template for your Banner HTML5.
- Place the Banner HTML5 and the carousel on the same placement.
To add a banner to Adfox, select the desired banner type and the Banner HTML5 [context] template.
Set the banner parameters:
|
Parameter |
Description |
|
Archive with HTML5 creative |
Upload a ZIP archive with the project. Leave the HTML5 code of the creative field empty: it's filled with the contents of your project's HTML file after you add the banner. |
|
HTML5 code of the creative |
Upload a ZIP archive with the project prepared in HTML editors or paste the HTML code. |
|
Transition URL |
Link to the advertiser's website. For the click-through to work correctly, make sure that the link includes the protocol ( Note If the banner contains several links, add them on the Events tab in the click-through URL fields. Check the correspondence between link numbers and events with the developers of the HTML creative. |
|
Link TARGET |
Determines the window where the link opens:
|
|
Tracking pixel link |
Adfox pixel is used by default |
|
Creative width (px or %) |
Banner width. |
|
Creative height (px or %) |
Banner height. |
|
Image |
Upload an image. Conditions for displaying creatives:
|
|
Name of the banner container class attribute |
Name (or multiple names separated by a space) for the |
|
Use SafeFrame (yes|no) |
SafeFrame is a technology that wraps ads in a special iframe that has a strict API. SafeFrame prevents the ads that are rendered in it from collecting data and interacting with the rest of the page outside of the SafeFrame.
The banner code has access to the web page. |
|
Styles for banner block |
Custom styles for the banner container in a single string. Except for the display style. For example, |
|
Advertising label settings:
|
In the Ad label list, select Note Adding the “Social ad” label doesn't automatically define the creative as social advertising. To label a creative as a social ad (PSA) in the state register, select Social advertising contract with payment or Social advertising contract by quota for the corresponding contract with the end advertiser. In the Domain field, specify the advertiser domain, and it will be added to the label: “Ad | example.com” or “Social ad | example.com” (only if the |
|
Show banner menu |
To add a token to a non-clickable banner, enable the Show banner menu option in the banner settings. When the banner is served, the The banner menu contains a link to the rules for using recommendation technologies. It's required for compliance with Clause 3 of Section 1 of Article 10.2-2 of the Federal Law No. 149-FZ “On information, information technologies, and information protection”, dated July 27, 2006. Note If the banner is non-clickable (the Transition URL field is empty) and has not been added to the ad register, you can enable the banner menu to make the token available when serving the banner. |
|
Advertising labeling |
Advertising labeling: This section is only available if you've selected Submit data to state register as a labeling procedure in the campaign settings. Fill in the fields in this section to register the creative in the Yandex advertising data operator. The creative is assigned a token automatically. Note If the banner isn't to be added to the ad register, select Do not submit data to state register. |
 menu icon will be displayed in its upper-right corner. When a user clicks the icon, the advertiser's details and the copy token button appear (if ad register is enabled for the banner or a third-party token is specified).