Background HTML5
Description
Background HTML5 is a banner you can use to replace the site background with an HTML creative or image.
Using the Banner Background HTML5 template, you can add a background to a site in two ways:
- Only prepare the background image and the click-through link. It's important that the size of the background image doesn't exceed the allowable size limit in the account.
- Prepare an HTML creative. When using Adobe Animate CC and Google Web Designer, we recommend following these instructions.
You can use the following banner features in Adfox:
- Show the background image on the edges of the site, and with the shift of the site content.
- Add several buttons leading to different pages of the advertiser's site (only for HTML creatives).
- Flexibly configure additional elements on the site that overlap the background image.
- Set the position of the background image when scrolling through the site content.
- You can specify the banner width and height both in pixels and as a percentage (100%).
- The HTML creative code can be adaptive. For that, you need to specify the banner size as a percentage.
- The availability of the click-through URL in the banner parameters determines the clickability of the banner with the image.
Format features:
- A Background HTML5 banner will pass the viewability check only if at least one of its pixels remain in the active browser window for at least two seconds.
- We don't recommend using this format on mobile devices, because a part with the background image often remains outside the mobile device screen.
Image requirements
Create a background image: its width must be equal to the width of the site + the width of the background side margins.
The size of the background image must not exceed the limit permitted for your account (10 MB by default).
The background image can serve as a standalone banner (eliminating the need to build an HTML creative) or act as a placeholder that appears if the user's browser doesn't support the HTML5 code of the creative.
HTML creative requirements (for code developers)
Prepare your project with an HTML creative complying with the following requirements:
-
The maximum allowed number of characters in the HTML code is 65,000.
-
It's best to place JavaScript and CSS inside the HTML code of the banner. If the final HTML code exceeds the maximum acceptable size, reduce it by splitting JavaScript and CSS code into separate files:
-
Save the JS and CSS code in separate files with the .js or .css extension.
-
File size can't exceed 10 MB.
-
Upload the files to the ad campaign's Files tab and add the resulting file links to the HTML code:
-
If the project includes absolute links (
src="js/script.js",src="css/style.css"), Adfox will recognize the paths to the files and automatically add them to the Files tab, replacing all links to these files in the project during the upload. -
If the project includes relative links (
src="../js/script.js"), use one of the following methods:- Replace
.jsand.cssfile links with absolute paths: Adfox parsing will trigger, and all links will be replaced automatically. - Manually upload
.jsand.cssfiles to the Files tab and replace relative links in your HTML code with the ones you'll get from Adfox.
- Replace
Example of connecting JS and CSS files:
<script type="text/javascript" src="LINK_TO_FILE"></script><link rel="stylesheet" type="text/css" href="LINK_TO_FILE" /> -
-
-
The project can contain only one file with the .html extension.
-
The maximum allowed number of files in a project is 50.
-
File types allowed in the project: CSS, JS, HTML, GIF, PNG, JPG, JPEG, SVG, JSON, MP4, OGV, OGG, WEBM, AVI, and SWF.
-
The maximum size of each file (this applies to archived files as well):
- 10 MB.
- 1 MB for video files.
-
File names must only contain numbers or Latin letters and an underscore character. You can't use spaces, quotation marks, and special characters in the file name.
-
The completed project is a ZIP archive.
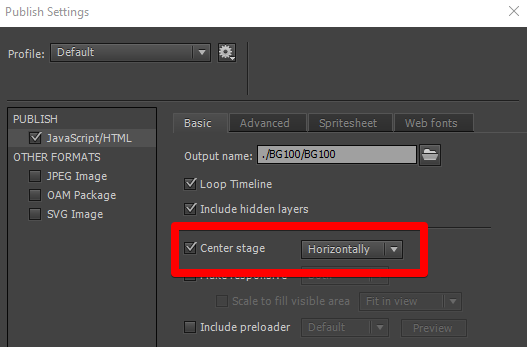
To place the creative in the center, you need to set the central location in the editor settings. For example, in Adobe Animate CC, go to Publish Settings → Center Stage:
Note
When preparing an HTML creative for the background on the edges of the site, we recommend using two images: one for the left edge and the other one for the right edge.
The background area that will underlie the site content should be the same width as the site content. Make this area transparent with background-color=alpha 0.
Add a banner to Adfox
To add a banner to Adfox, select the desired banner type and the Background HTML5 [context] template.
Set the banner parameters:
|
Parameter |
Description |
|
Archive with HTML5 creative |
Upload a ZIP archive with the project. Leave the HTML5 code of the creative field empty: it's filled with the contents of your project's HTML file after you add the banner. |
|
Tracking pixel link |
Adfox pixel is used by default |
|
Transition URL |
Link to the advertiser's site that will be applied to the background image. For the click-through to work correctly, make sure that the link includes the protocol ( |
|
HTML5 code of the creative |
Leave the field empty because the HTML code contents will be automatically uploaded here from the project archive. |
|
Banner width (px or 100%) |
Banner width, which includes the width of the site content and the width of the two side images. You can specify a width of 100%, which is equal to the width of the browser window. If you specify the width in % for an HTML creative, it should be made stretchable (rubber). |
|
Banner height (px or 100%) |
Banner height. You can specify a height of 100%, which is equal to the height of the browser window. If you specify the height in % for an HTML creative, it should be made stretchable (rubber). |
|
General background color (rgb in hex: for example, fff) |
Background color of the page if the banner is placed in the BODY (that is, the Banner container selector parameter isn't specified). |
|
Selector of additional clickable elements (for example, #content) |
Specify the selectors of elements that are located in the content area of the site but are transparent (you can see the creative through them) and also trigger click-throughs. The selectors are separated by commas. The description of selectors must correspond to the CSS syntax. For example:
|
|
Banner container selector (for example, .ya-ad-container) |
A special container for the background block. If you don't specify this parameter, BODY will be used as the container. The description of selectors must correspond to the CSS syntax. |
|
Banner top edge shift (px or %) |
Shift of the top edge of the banner. Positive values shift the banner down, negative values shift it up. |
|
Background position (absolute or fixed) |
Background position option:
|
|
Container selector for content shift (for example, .header) |
Specify the container of a selector that will be followed by a transparent block for shifting the content. If no container is specified, the block will be added to BODY as the second element, right after the ad block. The description of selectors must correspond to the CSS syntax. This parameter requires a positive value in the Number of content shift pixels (px) parameter. |
|
Number of content shift pixels (px) |
The number of pixels to shift the content by. The number must be positive. |
|
Banner block z-index |
The z-index of the block with the banner. Not specified by default. |
|
Target for background image link |
Select the window where the background image link opens:
|
|
ContainerBackgroundColor |
Background color for the special container (if a value is set for the Banner container selector parameter), in which the block with the background will be embedded. Format: rgb in hex, for example, fff. |
|
Background position |
The |
|
Background image |
Upload a background image that will be displayed as an independent banner (if the HTML5 creative is not specified). |
|
Additional styles for body tag |
CSS styles to be added to the |
|
Align banner by the edge (left or right) |
This parameter only works if the banner width isn't specified as a percentage. It can take the following values: |
|
Advertising label settings:
|
In the Ad label list, select Note Adding the “Social ad” label doesn't automatically define the creative as social advertising. To label a creative as a social ad (PSA) in the state register, select Social advertising contract with payment or Social advertising contract by quota for the corresponding contract with the end advertiser. In the Domain field, specify the advertiser domain, and it will be added to the label: “Ad | example.com” or “Social ad | example.com” (only if the |
|
Show banner menu |
To add a token to a non-clickable banner, enable the Show banner menu option in the banner settings. When the banner is served, the The banner menu contains a link to the rules for using recommendation technologies. It's required for compliance with Clause 3 of Section 1 of Article 10.2-2 of the Federal Law No. 149-FZ “On information, information technologies, and information protection”, dated July 27, 2006. Note If the banner is non-clickable (the Transition URL field is empty) and has not been added to the ad register, you can enable the banner menu to make the token available when serving the banner. |
|
Advertising labeling |
Advertising labeling: This section is only available if you've selected Submit data to state register as a labeling procedure in the campaign settings. Fill in the fields in this section to register the creative in the Yandex advertising data operator. The creative is assigned a token automatically. Note If the banner isn't to be added to the ad register, select Do not submit data to state register. |
 menu icon will be displayed in its upper-right corner. When a user clicks the icon, the advertiser's details and the copy token button appear (if ad register is enabled for the banner or a third-party token is specified).