Personalization
Personalization allows you to tailor your website or its individual pages to a specific audience: change your text, HTML, and CSS, as well as the rendering of ad units and their formats. You can also use personalization for all site users, for example, to change the design for a particular event.
Difference between personalization and experiments:
-
No time limit — any applied changes can last indefinitely.
-
No variations or audience share — updated parameters apply to all users specified in the conditions.
-
You don't need to set metrics when creating a personalization, because there's only a single variant.
-
For the same reason, personalization doesn't require the sample size calculator.
Enabling personalization
If you haven't connected Varioqub yet, connect it. If you have already connected it to run experiments, enabling personalization won't require any additional setup.
Creating personalization
-
In Yandex Metrica, go to Varioqub → Personalizations.
-
Click Create personalization.
-
On the New personalization page, give your new personalization a name and add a description.
-
Set the conditions:
Duration
Choose a limited or unlimited duration.
You can stop personalization on the Personalizations page: click the three dots next to one of the options and select Stop.
Pages included in experiment
Specify the domain of the website and URL path without the protocol (
http/https) andhash(the#character in the URL and the value after it). For example, to set up personalization just for the main page of your site, specifyexample.com. Use special operators to set flexible conditions. The period (.) isn't considered an operator.To have multiple conditions in one string, use the “AND”/“OR” operators.
Examples of operator use What is included in the experiment example.com*All pages of the domain. example.*All pages of all the domains starting with example.example.com/*search*All site pages that include searchin their URLs.example.com/search?Page URLs with either no characters or a single character at the end of the string. For example: example.com/search, example.com/search/, example.com/search2.example.com/search+Page URLs with one or more characters at the end of the string. For example: example.com/search/, example.com/search2, example.com/search_goods.You can also negate conditions using the
!operator.More information about the URL structure
https://<host>/<path>?<params>#<fragment>-
<host>: Site domain. -
<path>: Path that can have a hierarchical structure. The structure is organized using slashes ("/"). -
<params>: Block of parameters separated from the path by a question mark “?”. These parameters are also called GET parameters. -
<fragment>: A string with arbitrary content. Separated from GET parameters by “#” (the hash symbol). Not used in the Pages included in personalization conditions.
GET parameters
If you want to create a personalization only for some of the site's pages, specify the GET parameters that are used or not used in their URLs. Use special operators to set flexible conditions. The period (
.) isn't considered an operator.To apply multiple conditions in Varioqub, separate them with commas:
aparam=avalue,bparam=bvalue(the conditions are joined by a logical AND). Condition blocks are combined by the OR operator.Here are the characters you can use with parameters and their values:
=— Placed between the parameter name and its value. If absent, only the parameter's presence is taken into account. Example:param=value?— Means any character that occurs zero or one time. Example:pa?am=va?ue*— Means any characters that occur zero or several times. Example:p*m=v*e+— Means any characters that occur one or several times. Example:p+m=v+e!— Means negation of a condition or exclusion of a parameter from influencing the experiment. Example:!param=val
Warning
Negation
!must be placed as the first character in a key.- Correct example:
!param=value. - Incorrect examples:
param!=valueorparam=!value.
Examples
Usage example
What is included in the experiment
paramOnly the presence of the parameter, regardless of its value.
param=valuePresence of the exact parameter name and its exact value.
!paramAbsence of a given parameter with any value.
*param*=valueAll parameters containing the
paramfragment with the givenvalue.!*param*=valueThe value of any parameter with the
paramfragment mustn't equalvalue.!*param*=*value*The value of any parameter with the
paramfragment shouldn't containvalue.!*param*Absence of a parameter containing the
paramfragment.Region
The region is determined by the IP address of the site user. For Russia, you can narrow down the selection by part of the country. With the CIS and continents, you can only select the entire country. You can add regions or exclude them using the option Exclude selected regions.
Platform
Smartphones, tablets, desktop devices (PCs), TVs. The device type of a site user is identified by their User-Agent. To find out from which devices people are most likely to visit your site, see the Devices report in Yandex Metrica.
Custom parameters
Note
Only available in the Varioqub extended version.
To apply this condition, implement parameter transmission on your site. For example, to send parameters that help profile your users. For example, by indicating that they're an important customer, have registered on your site, and so on.
Then specify these parameters and their values in the Custom values field so that Varioqub can recognize and use them for personalization.
To apply multiple conditions in Varioqub, separate them with commas:
aparam=avalue,bparam=bvalue(the conditions are joined by a logical AND). Condition blocks are combined by the OR operator.Here are the characters you can use with parameters and their values:
=— Placed between the parameter name and its value. If absent, only the parameter's presence is taken into account. Example:param=value?— Means any character that occurs zero or one time. Example:pa?am=va?ue*— Means any characters that occur zero or several times. Example:p*m=v*e+— Means any characters that occur one or several times. Example:p+m=v+e!— Means negation of a condition or exclusion of a parameter from influencing the experiment. Example:!param=val
Warning
Negation
!must be placed as the first character in a key.- Correct example:
!param=value. - Incorrect examples:
param!=valueorparam=!value.
Examples
Usage example
What is included in the experiment
paramOnly the presence of the parameter, regardless of its value.
param=valuePresence of the exact parameter name and its exact value.
!paramAbsence of a given parameter with any value.
*param*=valueAll parameters containing the
paramfragment with the givenvalue.!*param*=valueThe value of any parameter with the
paramfragment mustn't equalvalue.!*param*=*value*The value of any parameter with the
paramfragment shouldn't containvalue.!*param*Absence of a parameter containing the
paramfragment.Without web crawlers
Specify this condition if you don't want personalization to apply to search robots that have identified themselves (their User-agent is known).
-
Personalization parameters
There are several personalization parameters:
- Visual editor. Visually alter site elements, such as titles, texts, buttons, or images.
- Redirect links. Compare several existing variants of a single page and test different landing pages or multiple designs.
- Flags in code. Test hypotheses of any level of complexity, with deeper integration into the functionality of the product or website.
- Ad units. Compare the effectiveness of placements of different ad unit formats on a page.
- Widgets. Place info blocks with personalized offers and discounts or tell users about new features (available only in the extended version of Varioqub).
Visual editor
With the visual editor, you can modify the following page content:
- Page text.
- Images.
- Links.
- Names of elements, such as buttons.
- Element or text color, including background color.
- CSS styles.
- HTML.
- JavaScript.
Specify the URL of the page where you want to change elements.
If the same element is used on several pages of your site, you can edit the element from any of the pages. Varioqub applies your changes to the element on all pages that satisfy the URL filter, provided that the element uses the same selector on all the pages.
If you don't want to apply your changes to all pages, specify the pages you want to modify in the URL filters field. In the Checking changes window, you can see if the entered page URL meets the conditions specified in URL filters. If it does, you'll see the icon.
To learn more, see Working in the visual editor.
Redirect links
Use this type if you already have a page or a version of your site with the needed changes. Specify the redirect link without the domain. For example: /catalog/page/.
Make sure this URL belongs to the domain where you installed the Yandex Metrica tag. Don't include URLs that belong to your site's subdomain or another site.
To avoid multiple redirects, don't use a target page that meets the conditions of the URL filter. Personalization testing doesn't check for multiple redirects.
Flags in code
To define experimental changes in your site code, you can use special flags. You can use them for any element on your site. Each flag is a key-value pair. For example, as part of personalization, you can set the color of a button: color=red.
Ad units
On this tab, you can create a personalization with the placement and format of ad units If you connect Varioqub (exp.js), you can do this without adding the ad unit code (context.js).
For more details, see Ad units.
Widgets
Note
Only available in the Varioqub extended version.
In this tab, you can create a personalization with a widget. Tell users about discounts and new features on your site or create a personalized offer. You can choose from a variety of easily customizable info block formats.
Add a link to redirect users to the desired page.
You can set up the following widget types:
- Баннер в углу (Corner banner): A small window in the corner of the page. It doesn't obstruct the main content and is suitable for any website layout.
- Баннер в углу (ограниченная настройка) (Corner banner with limited options): A small window in the corner of the page, available in the basic version of Varioqub. It doesn't obstruct the main content and is suitable for any website layout. Unlike corner banners, which are only available in the extended version, it doesn't allow changing the style, distance from the edge of the page, and the
z-indexproperty value. - Баннер на ширину экрана (Full-width banner): An animated pop-up window. You can place it either at the top or bottom of the screen. To draw the user's attention to the link, add the Привлечение внимания (Attract attention) button effect.
- Баннер на всю странцу (Fullscreen banner): The most prominent widget, covering the entire site page. Users will definitely notice this banner and have to either click on the link or close the window.
The way changes are made to the experimental variant depends on the type of your personalization:
-
If you select Visual editor, Redirect links, Ad units, or Widgets, Varioqub applies the changes using the
exp.jsfile you added to your site when connecting Varioqub. -
If you choose Flags in code, the data is processed as follows. The point at which you need to get flag data depends on how your site processes information:
Client-side rendering
In this case, the flags can be retrieved after processing the page code but before rendering the UI. You can also make an asynchronous request for the flags and change the button color after retrieving the value. In this case, the site user may briefly see the page source code when the flag value is applied.
Server-side rendering
In this case, the flags can be obtained during response generation. Varioqub is fast enough to not slow down your site. In this case, you need to:
-
Explicitly pass the user ID and, when you get a new ID (along with flags), set it in the HTTP response.
-
Pass the technical data for the Yandex Metrica tag to the frontend and set it in the corresponding tag field. To learn more, see Usersplit API.
-
Working in the visual editor
The editor is embedded in your site and enables you to change the appearance of its elements. All changes are applied in real time. Once you save the changes and run the personalization, the edits you made in the editor become visible to all the website users specified in the personalization conditions.
More information about the visual editor and restrictions
All changes made to an element are linked to its selector on the page. If you update your site layout after saving changes in the editor, the saved selector might correspond to a different element and the changes are applied to it instead.
The changes are applied in the site user's browser. If the client-side code re-renders a part of the page that was changed in the visual editor, the page reverts backs the changes and the user doesn't see them.
In this case, we recommend using flags in code instead of the visual editor. Varioqub supports the most popular libraries.
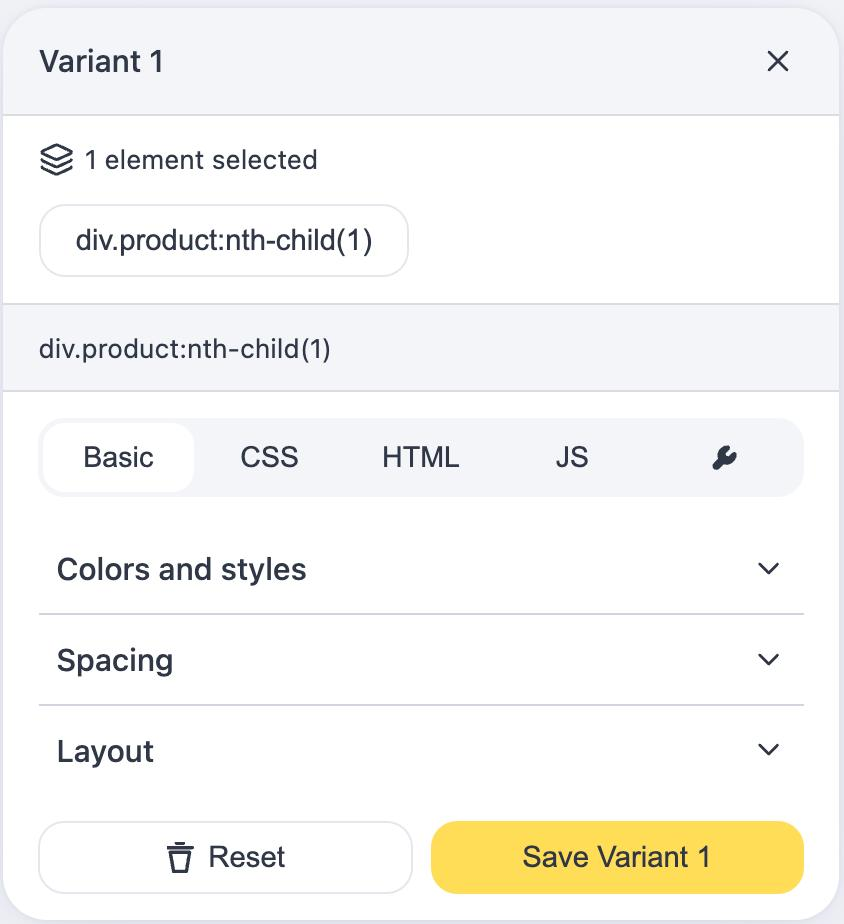
There are several editing modes available:
Basic
Use this mode to change an element's set of properties:
-
Element's CSS properties (
background-color,color,font-size,display). -
Link URL.
-
Image URL.
-
Text within text elements that have no nested elements.
CSS
Use this mode to set any CSS property of an element. You can enter up to 2000 characters.
HTML
Use this mode to add HTML code to an element or change the existing HTML code. You can enter up to 2000 characters.
JS
Use this mode to apply JavaScript code to a site page. Your code can contain up to 2000 characters.
To make the mode appear in the visual editor:
-
Connect experiments using JavaScript and the setConfig method.
-
In the
setConfigmethod, passenableVisual: trueandenableJS: true.
When you edit a page, your code is wrapped in a function as follows:
function (element) {
    // your code
}
When you apply such an experiment, JavaScript code with this function is added to your page. If the site uses a Content Security Policy that prohibits execution of JavaScript code without a nonce, pass a nonce value that can be used to sign the script in the setConfig method.
Visual editor settings β
Click to access the settings.
You can configure:
Edit by click
With this option enabled, you can edit elements on the page by selecting them with a mouse click. In this mode, elements become inactive. To interact with the page, disable this option.
ID of the element in the selector
ID is a unique identifier of an element on the page. You need it to get the path to the element. If the ID on your site changes each time the page is opened, or if the ID isn't unique, we recommend disabling this option.
To edit a page:
-
Click Edit. The page that you specified under Visual editor opens.
-
Select an editing mode.
-
Select the element you want to change, such as a button, text, or background.
Navigate between the blocks to change the parent element of the visible part of a block when setting up personalization.
Checking changes
To make sure your changes are applied, under Checking changes, click Check. A link generated by Varioqub will open a site version with personalization settings. You can share this link within 24 hours of its generation. Clicking Test again generates a new link.
Checking multiple personalizations
You can apply changes from multiple personalizations at once and preview how they will appear on your page.
To do this:
-
Go to the list of personalizations: Varioqub → Personalizations.
-
Click next to the Create personalization button.
-
Click Check personalizations.

In the window that opens:
-
In the drop-down list, select the personalizations you want to apply.
-
Enter the URL of the page where you want to apply personalizations.
-
Click Copy to copy the resulting link along with the parameters, or Open to open the link in a new browser tab.
The examples for connecting Varioqub and creating experiments are available on GitHub.