Flags in code
To define experimental changes, add special flags to your site code. You can use them for any element on your site. Each flag is a “key-value” pair. For example, you can set a button color for an experiment: color=red.
Flags are great for adding and testing changes, no matter how complex they are. You can use flags to change not only visible elements of your site or app (such as button colors), but backend logic as well. This means flags can be applied on both the client side and the server side.
To use this method, developers write code for the new feature and then assign the corresponding “key-value” pair during experiment setup to trigger it.
For example, if you're introducing a new feature to your product, a developer implements it on the server side and adds the required flags. You then configure a rule in your A/B test settings: when the flag is on, the new logic executes; when it's off, the old logic applies.
Here's how data processing works for this type of experiment. When flag data can be fetched depends on how your site processes information:
Client-side rendering
You can fetch flag data after the page code executes, but before the UI is rendered. You can also make an asynchronous request for the flags and change the button color after retrieving the value. In this case, the site user may briefly see the page source code when the flag value is applied.
Server-side rendering
You can fetch flag data during response generation on the server. Varioqub is fast enough to not slow down your site. In this case, you need to:
-
Explicitly pass the user ID and, when you get a new ID (along with flags), set it in the HTTP response.
-
Pass the technical data for the Yandex Metrica tag to the frontend and set it in the corresponding tag field. To learn more, see Usersplit API.
Usage examples
-
Let's say you want to introduce a new product line, such as credit cards at a bank.
You can use flags to implement changes gradually: adding one feature, testing it, and — if this feature proves effective — rolling it out across the entire product.
-
A flower shop chain recently opened a new location. You want to see how a personalized offer for first-time buyers affects conversion rates.
To test this, you can assign an attribute to the target audience that grants them a personal discount.
Experiment example
Let's look at how to use feature flags to run an image swap experiment, such as replacing a banner to display a special offer.
-
In the page's HTML code, assign an ID to the banner image you want to swap during the experiment, for example:
<img class="img" src="images/action.png" id="testImage"/>, here —testImage. -
Then, add a script to the page code that will replace the image based on the experiment's flag value. For example:
<script type="text/javascript">
    const imageID = "testImage";
    //ID of the target element to swap
        ymab(
        // Function used to pass data
            'metrika.XXXXXXXXXXX',
            // XXXXXXXXXXX is your Yandex Metrica tag ID
            'getFlags',
            //Function method that initializes the experiment
            // and returns flags
            function (flags) {
            // Function that replaces the banner image
                const values = flags.test_image;
                //test_image is the key from your experiment settings
                if (values) {
                    if ("new_banner" === values[values.length - 1]) {
                        //new_banner is the key value from the experiment,
                        //compared against the last value
                        //in the recent experiment
                        document.getElementById(imageID).src = "static/src/new_action.png";
                        //Swap the image if the flag value
                        //from the experiment is received
                        }
                    }
                }
            );
</script>
-
Create a new experiment.
- Fill in the settings fields for the experiment. Learn more about setup: Creating an experiment.
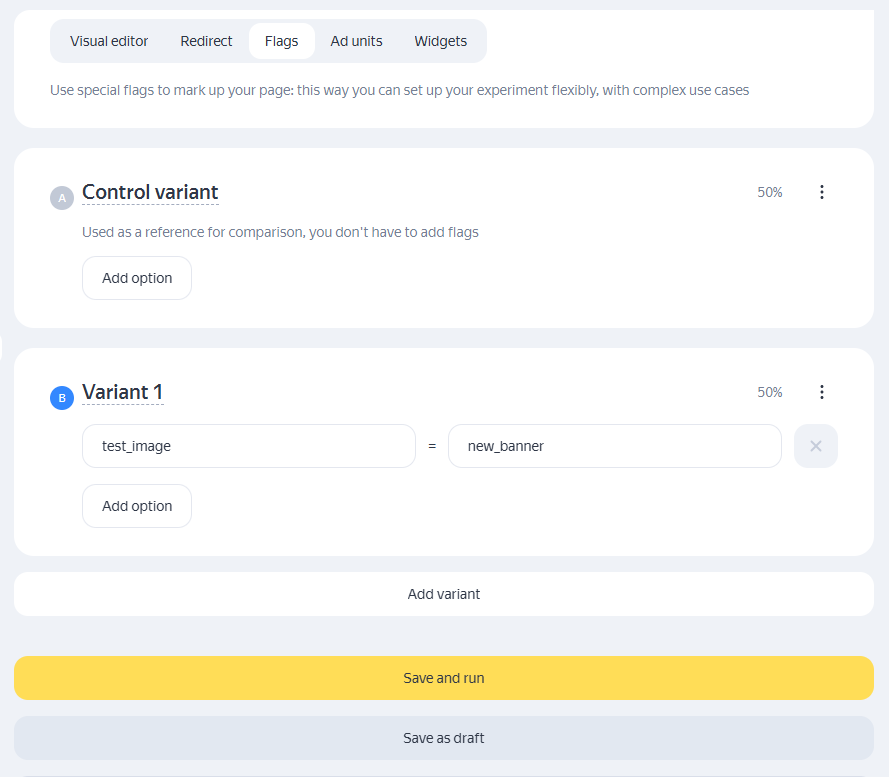
- Choose Flags as the experiment type.
-
Fill in the fields for the experiment's variant:
- Key:
test_image. - Value:
new_banner.
- Key:
-
Check if your experiment can achieve statistical significance with the selected duration and audience share using the Sample size calculator. Fine-tune your settings as needed. For details, see Sample size calculator.
-
When you're ready to start, click Save and run. The experiment will appear on the Experiments page and launch automatically on its scheduled start date.
If you want to test multiple experiment variants, click Add variant. This will add another variant for you to set up within your experiment. The variants will change during the experiment.
You don't need to specify flags for the control variant.
To add another flag to a variant, click Add option.
Check out integration examples and how to create flag-based experiments on GitHub:
FAQ and troubleshooting
I'm trying to create an experiment, but all the fields are locked.
What if I want to use conditions that are not available in the Varioqub interface?