如何手动启用 E-commerce
重要
使用 JavaScript API 需要了解 HTML 和 JavaScript。 如果您不了解这些语言,请联系您的网站开发人员或站长。
-
Select the tag that you want to enable E-commerce for.
-
在计数器设置中,启用 E-commerce 选项。 用于从
dataLayer收集数据的容器将默认添加到代码片段中。
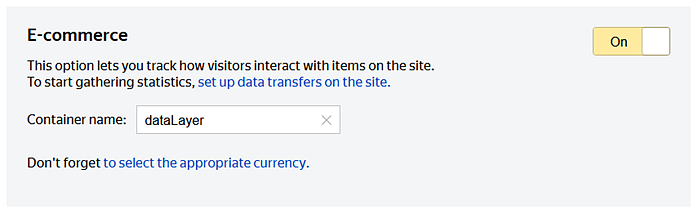
您还可以使用 ecommerce: true 参数初始化计数器。
-
在包含有关商品和订单的信息(商品详情、Add to basket 按钮等)的所有网站页面中安装(或更新)代码片段。
为此,请复制计数器代码。 确保网站上的代码片段包含以下行:ecommerce:"dataLayer"。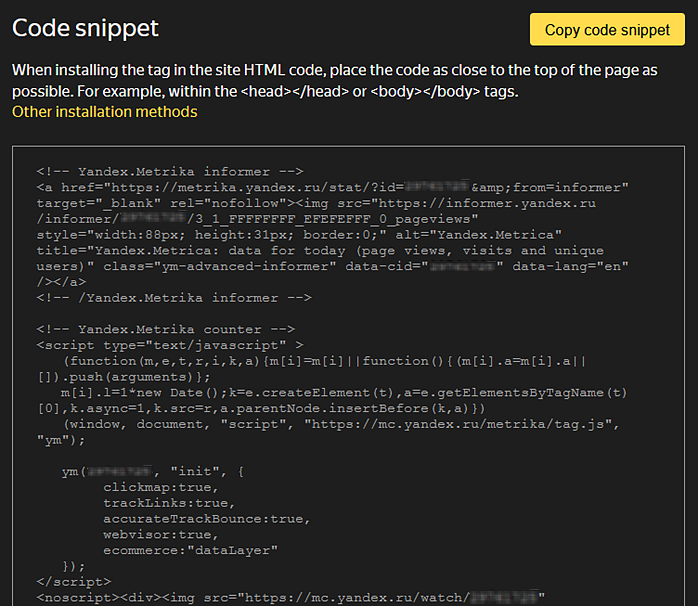
如果您的网站已设置 Google Analytics Enhanced Ecommerce 或 Ecommerce (GA4)(包括使用 Global Site Tag),则由于 Yandex Metrica 使用兼容的数据格式,因此无需额外设置,即可自动收集您网站的数据。 在这种情况下,请跳过第 5 步。
-
在您的网站上,通过 JavaScript API 配置数据传输(关于将商品加入购物篮、购物等)。 为了传输信息,您需要在网站上创建一个脚本,该脚本将负责指定格式的某个事件(例如,下订单)。 您可以配置传输所有事件以接收更全面的数据,或仅传输部分事件。
如果您没有设置 Google Analytics Enhanced Ecommerce,请按照此步骤操作。 对于每个活动,创建一个电子商务对象并将其放置在数据容器中(默认情况下 —dataLayer)。 -
检查 E-commerce 设置是否正确。
-
第一次数据传输后几个小时,数据就会出现在 Yandex Metrica 中。 要查看报表,请转至 Yandex Metrica 并打开 Reports → E-commerce。