3.3.2. Rules for adding attributes to road sections
- 3.3.2.1. class
- 3.3.2.2. Street
- 3.3.2.3. Accessible to
- 3.3.2.4. Direction of traffic
- 3.3.2.5. Level (A) and Level (B)
- 3.3.2.6. Type of structure
- 3.3.2.7. Design features
- 3.3.2.8. Speed limit
- 3.3.2.9. Pavement
- 3.3.2.10. Oncoming or with-flow public transport lane
- 3.3.2.11. Oncoming or with-flow taxi lane
- 3.3.2.12. Oncoming bicycle lane
- 3.3.2.13. Under construction
- 3.3.2.14. Toll (paid road sign)
- 3.3.2.15. Poor condition
- 3.3.2.16. Residential area
- 3.3.2.17. Elevator
- 3.3.2.1. Class
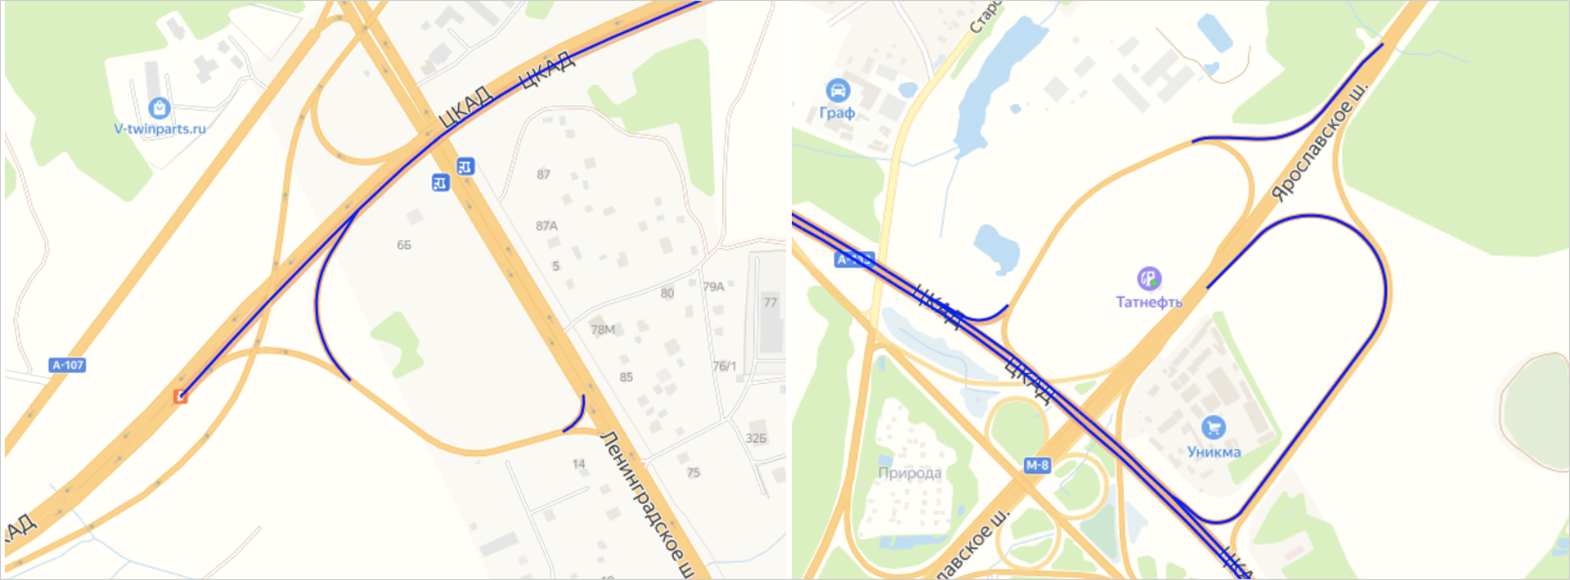
- 3.3.2.1.1. Freeways (class 1)
- 3.3.2.1.2. Public roads (class 2)
- 3.3.2.1.3. Inter-regional roads (class 3)
- 3.3.2.1.4. Regional roads (class 4)
- 3.3.2.1.5 District roads (Class 5)
- 3.3.2.1.6. Local roads (class 6)
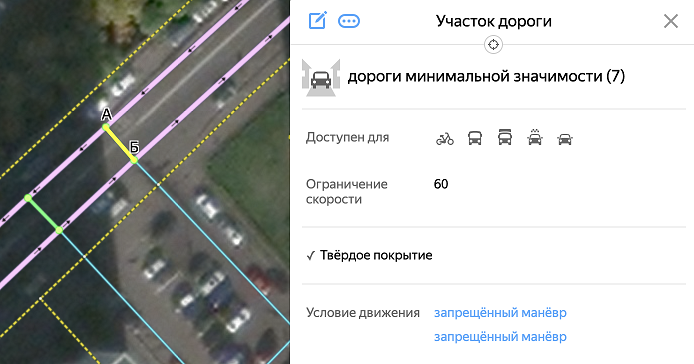
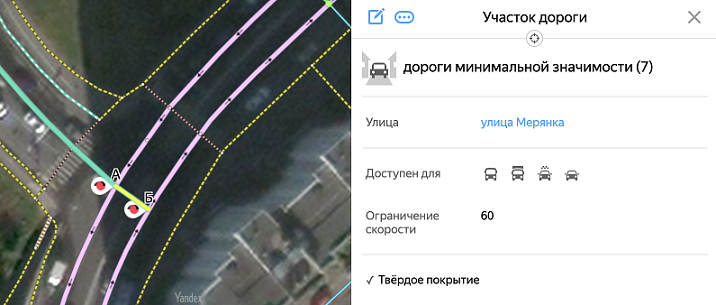
- 3.3.2.1.7. Road minimum significance (class 7)
- 3.3.2.1.8. Driveways (class 8)
- 3.3.2.1.9. Field and forest roads (class 9)
- 3.3.2.1.10. Pedestrian and Bicycle paths (class 10)
- 3.3.2.2. Street
- 3.3.2.3. Available for
- 3.3.2.4. Direction of movement
- 3.3.2.5. Level (A) and Level (B)
- 3.3.2.6. Type of structure
- 3.3.2.7. Design features
- 3.3.2.8. Speed limit
- 3.3.2.9. Hard surface
- 3.3.2.10. Oncoming or with-flow public transport lane
- 3.3.2.11. Oncoming or with-flow taxi lane
- 3.3.2.12. Oncoming bicycle lane
- 3.3.2.13. Under construction
- 3.3.2.14. Toll (paid road sign)
- 3.3.2.15. Poor condition
- 3.3.2.16. Residential area
- 3.3.2.17. Elevator
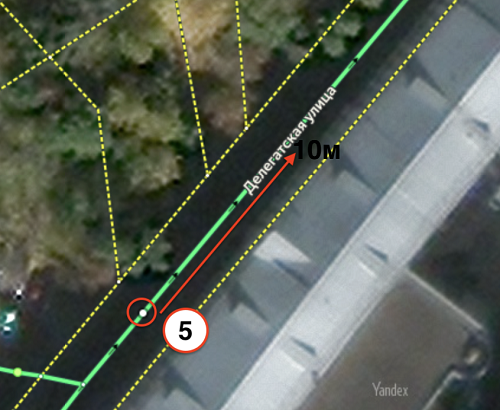
The attribute panel for a road section looks like this (shown partially in the drawing):

Techniques for adding attributes to road sections are similar to the techniques for adding attributes to all items on YME.
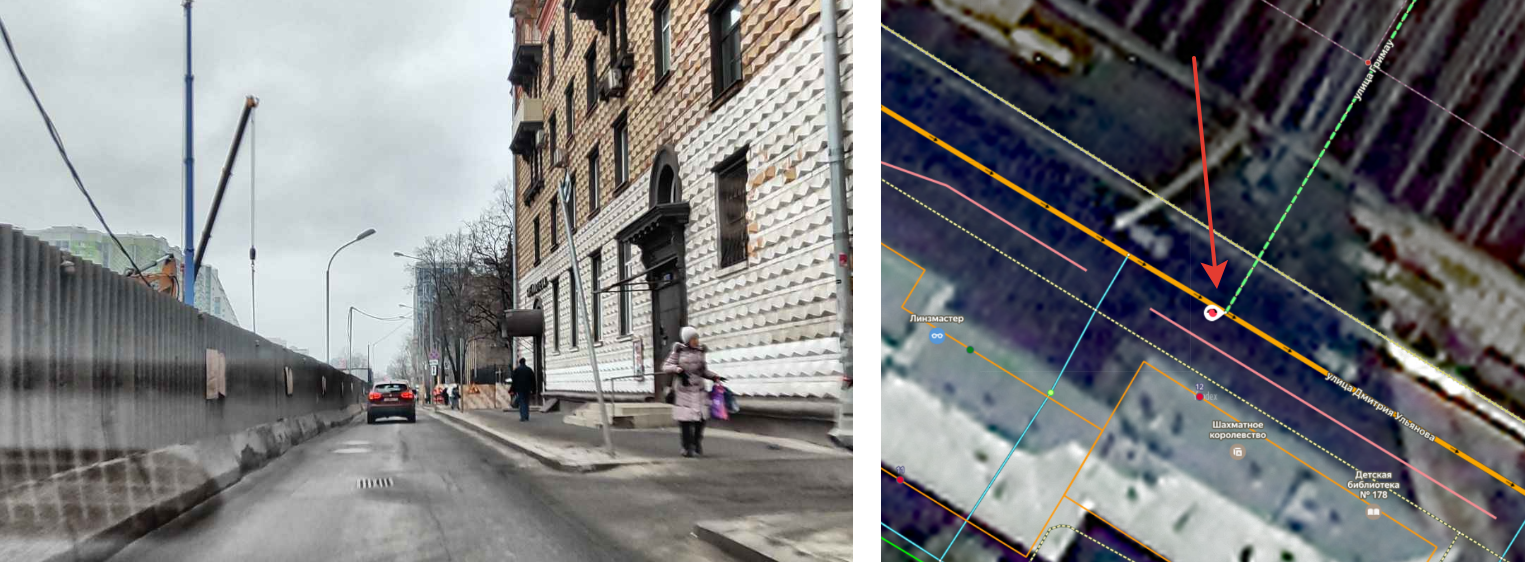
When you add attributes to roads, pay attention to how you assign attributes to road signs that are linked to intersections.
When you add attributes to road sections, follow the rules that apply specifically to them. The Road section item attributes and the rules for setting their values are listed below:
Alert
When attributing sections of a road as well as the road as a whole (see Section 3.3.3. Rules for attributing roads), you should maintain consistency in the values that you set.
For example, if you enter Tunnel
as the Type of structure for a section of road, then the Level A
and Level B
attributes should have negative values.
3.3.2.1. class
All roads on the national map are classified by their significance in the transportation system: each road element is assigned a specific attribute value Class.
The road class is determined by the types and sizes of localities (and other important features) it connects, as well as by its role in shaping the connectivity of the road network.
To a lesser extent, the road class defines its physical characteristics. However, the fact that a highway has an identification number does not affect its significance.
This means that a narrow single-lane road connecting two cities has a higher class than a two-lane divided road that connects districts within a city.
When you enter a road class, follow the descriptions of each road class given below, as well as these rules:
-
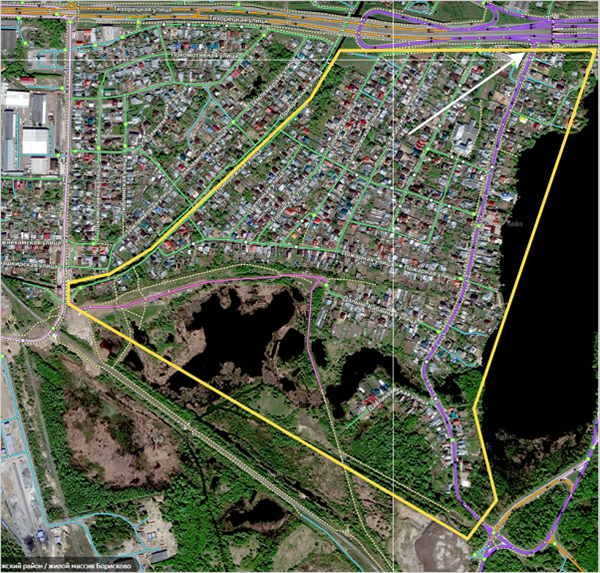
When selecting a road class, you must preserve how the road is connected to the network: each class of road should connect to roads of higher classes to form a united (connected) network. See section 3.3.1.1.1.
Alert
The rule of road connectivity is fundamental, and all edits to the road network should be made with this rule in mind.
In particular, keep this point in mind to avoid lowering a road's class in areas where it passes through localities (if there are no roads that circumvent those localities).
Additionally, roads of a particular class should not be connected to the remaining road network exclusively by roads of a lower class. The connection to the network should happen via roads of the same or a higher class.
Valid exceptions:
-
Areas isolated from the main road network
-
Ferry crossings, which can be connected to the remaining road network by class 7 (and higher) roads.
-
Roads on race tracks, motorcycle tracks, and so on.
-
Pedestrian paths (class 7), which you should not artificially extend to connect them to roads:
Correct
Incorrect

-
-
When there are several roads of the same significance, select the main ones and the ones that are preferable for transit traffic. Assign those ones a higher class. This is particularly necessary in order to avoid assigning the same class to too many roads in city centers.
-
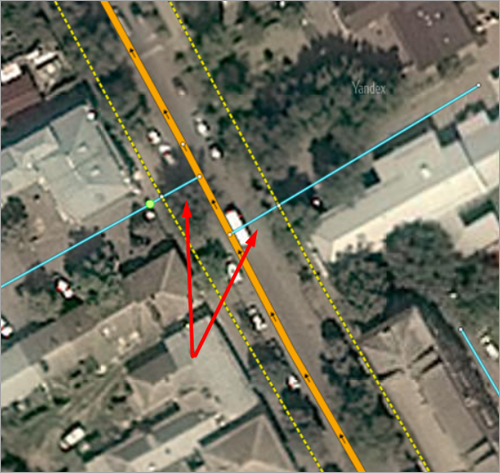
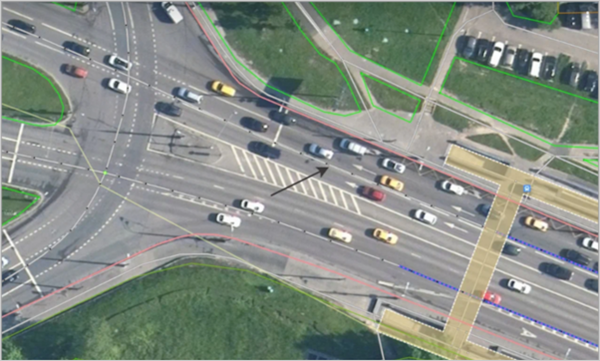
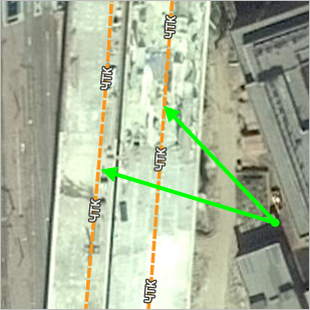
At intersections and interchanges, the roads and exits that connect roads of different classes are assigned the lowest class even if the exit can serve as a backup of the main highway, except for roads that are only accessible to public transport — such road sections inside intersections and interchanges are always assigned class 7:
- At the exit from a high-class highway to a low-class one, enter the functional class of the lowest class highway for the connecting road or exit. Start from the point where it branches off (i.e. from the beginning of the turn or exit).
- At the entrance from a low-class highway to a high-class one, enter the functional class of the lowest class highway for the connecting road or exit up to the point where they join (i.e. from the beginning of the turn or exit).
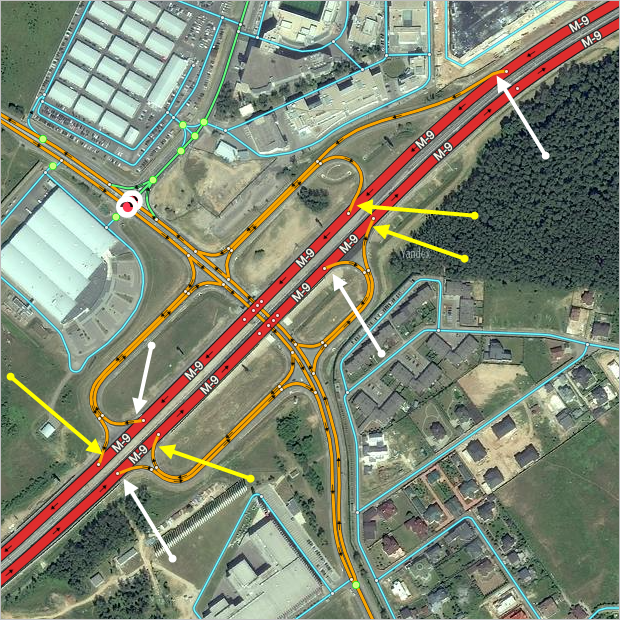
- At the same time, at junctions and intersections of roads of three or more classes, a situation may arise when there are exits that are on the formal the attribute must be assigned to the same class, actually belong to another-this is where they should be assigned when mapping.
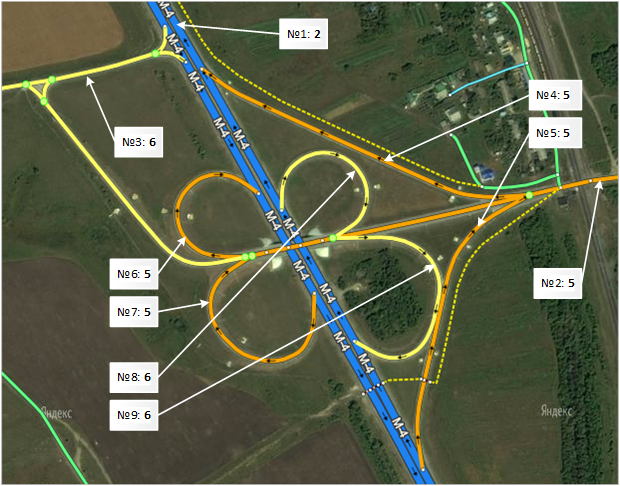
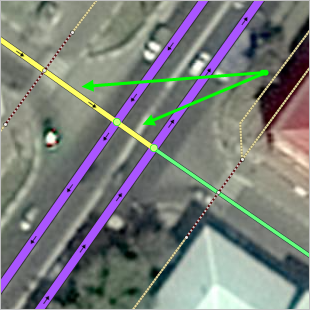
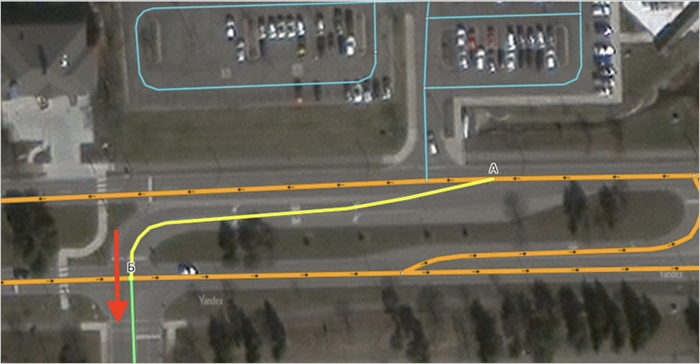
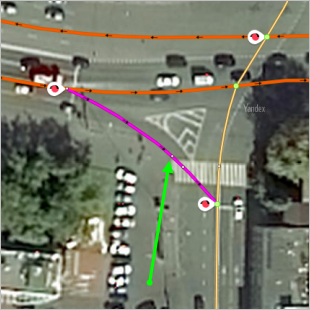
- Example 1. The intersection of road #1 (class 2), road #2 (class 5) and road #3 (class 6) is shown in the drawing.
- Exits #4, 5, 6 and 7 connect roads #1 and 2, so based on that formal characteristic and their position in the road network, the exits should be assigned the lowest class from among the classes of connecting roads — class 5.
- Within this same road interchange though, exits #8 and 9 actually connect roads #1 and 3, so the exits should be assigned class 6:
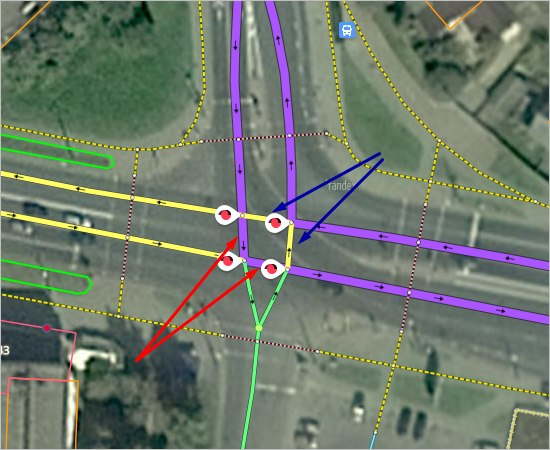
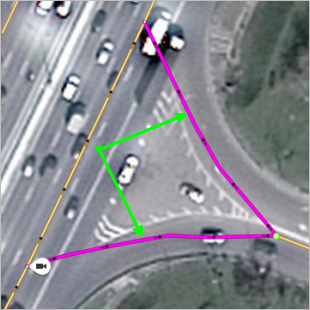
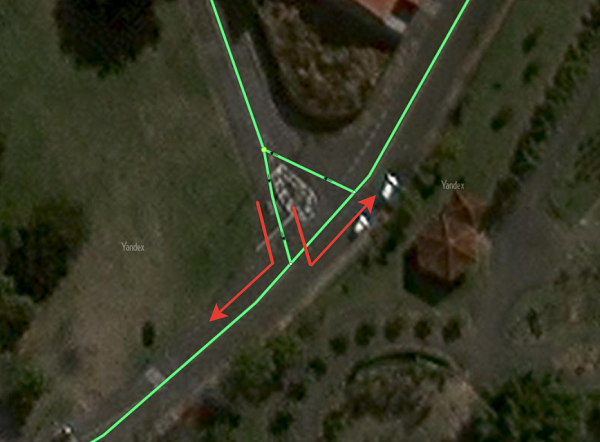
- Example 2. A class-4 road passes through an intersection (purple in the drawing); two other roads cross the intersection: a class-6 road (yellow) and a class-7 road (green).
- Furthermore, the following notes apply to the intersecting parts:
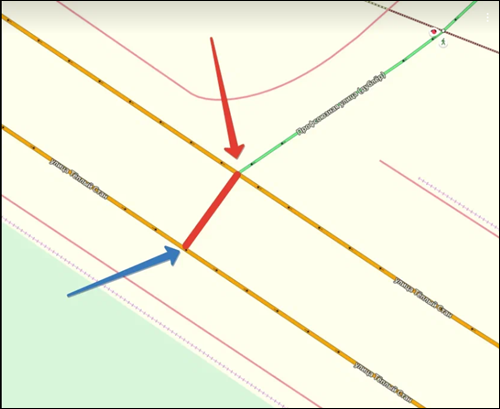
- a) Those marked with red arrows connect class-4 roads
- b) Those marked with blue arrows connect class-6 and class-4 roads (the upper part provides passage from the class-4 road on the left and onto the class-6 road, the right part provides passage from the class-6 road up and onto the class-4 road).
- Therefore, the classes of intersecting road sections should be assigned according to the following rules:
-
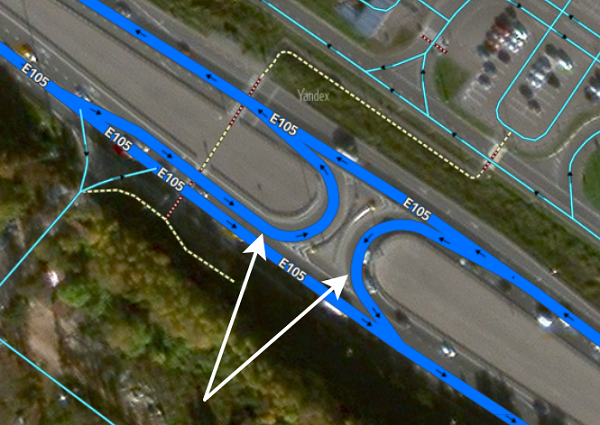
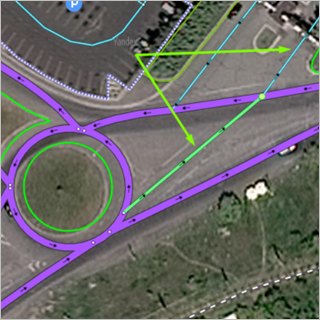
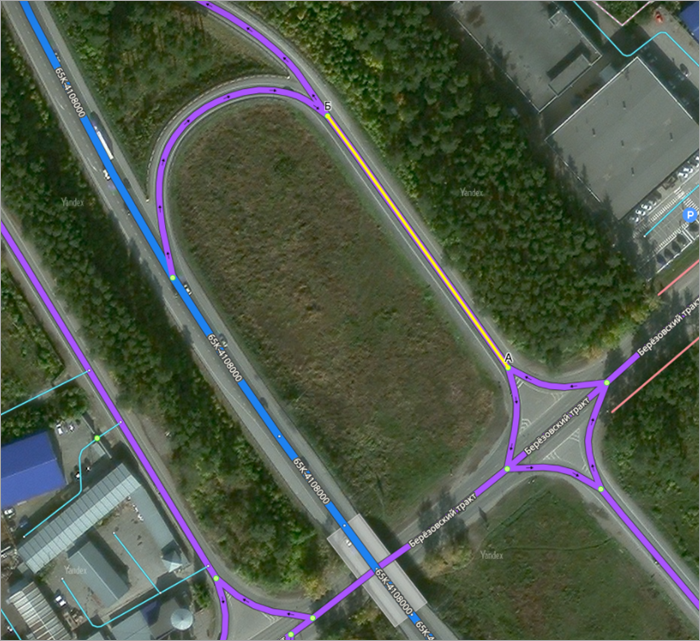
A circular road section will take the same class as the highest class road that intersects with it.
-
On a road drawn using two lines, any road sections used to make U-turns should have the same class as the road itself (except for service U-turns, which are assigned class 8):
If the intersection is a continuation of a side road (for example, at a T-junction) and is not a U-turn (see section 3.3.2.7.6), it's assigned the side road class (also see 3.3.3.4.3. Assigning road sections at intersections):
If the intersection or exit is a continuation of a side road of class 8 or class 9, then its class goes up to class 7:
If the intersection of the highest-class road does not change the direction and the U-bridge is a continuation of the adjacent roads of different classes, its class is set as the highest class of the adjacent roads:
Note
In addition to the road section class, roads in general are characterized by the type of road that is set in the road editing panel (see Section 3.3.3.2. Type of road.
Choose the road class from the list (only a partial list is shown in the drawing):
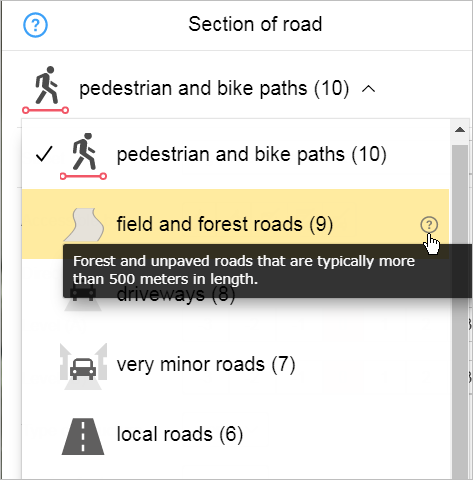
When you hold your cursor over an entry in the list, you'll see an icon appear on the right side  . Hold your cursor over that icon to see a tool tip (i.e. a short description of that road class):
A road element class is set according to the rules for selecting attribute values for specific roads:
- 3.3.2.1.1. Freeways
- 3.3.2.1.2. National highways
- 3.3.2.1.3. Interregional roads
- 3.3.2.1.4. Regional roads
- 3.3.2.1.5. District roads
- 3.3.2.1.6. Local roads
- 3.3.2.1.7. Roads of minimal significance
- 3.3.2.1.8. Driveways
- 3.3.2.1.9. Field and forest roads
- 3.3.2.1.10. Pedestrian and bike paths
3.3.2.1.1. Freeways (class 1)
National highways with the official Freeway
status as well as urban highways.
Note
Urban highways are roads in major cities with an increased speed limit (more than 90 km/h) and a large number of lanes, which allows drivers to quickly cover long distances without getting bogged down at intersections. They are basically the large "rings"
around major cities (MKAD, KAD).
Roads of class 1 and 2 complement one another and should form a connected network. For example, the section of highway E-30 in Poland in the area of mińsk Mazowiecki.
3.3.2.1.2. National motorways (class 2)
Motorways of national and international significance that form the main body of the road network in large and mid-size countries and are the main transit highways in small countries that connect the capitals (or major cities) of neighboring states form class 2.
In large countries, this road network connects the administrative centers of second-level administrative divisions.
In large countries, this type may also include major inter-regional roads that connect several centers of second-level administrative divisions.
Roads that are part of transcontinental international highway networks belong to this class.
3.3.2.1.3. Interregional Roads (class 3)
Roads of regional and interregional significance form class 3:
-
Secondary paved highways connecting neighboring countries
-
Roads leading to major cities from classes 1-2 of the road network
-
Highways linking neighboring second-level administrative divisions
In major cities and agglomerations, the most significant outbound roads also belong to this class.
In sparsely populated, widespread territories, this level also includes internal roads that are at least 150 km long.
3.3.2.1.4. Regional roads (class 4)
Key roads of intraregional significance within second-level administrative divisions form class 4:
-
Main roads that link to each other
-
Centers of third-level administrative divisions
-
The largest localities (for that country) that have district centers and either roads of class 1–3 or neighboring districts (if the road in question wasn't assigned a higher class)
-
-
In widespread and sparsely populated areas: roads at least 50 km in length that connect 5-10 rural localities along with roads of higher classes or lead to townships with populations of at least 5,000.
-
In localities with populations over 100,000, outbound highways that are intra-regional and main thoroughfares (other than those that belong to higher classes)
If a road of that class ends in a locality, then it should lead to a central square, vehicle station, or a central intersections.
Within localities, roads of this class may lead to popular transport, social, or cultural attractions of state significance.
Note
The roads are unpaved, leading to administrative centers third-level administrative units, belong to class 4 not follow.
3.3.2.1.5. District roads (class 5)
Key roads within third-level administrative divisions that were not assigned to a higher class form class 5.
This class includes roads that are not urban and run through several small localities (or lead to one major locality) and connect the latter to roads of class 1-4.
Within localities, roads of this type may lead to extremely popular transport, social, or cultural items of regional significance.
In cities with populations greater than 100,000, class 5 roads include large transit streets that link neighboring parts of a city, and outbound highways that continue past the city as local roads leading to rural localities.
In localities with populations of less than 100,000, class 5 include major transit roads through the city (when there are roads of class 1-4 that circumscribe the city).
If a road of that class ends in a locality, then it should lead to a central square, vehicle station, or a central intersections.
3.3.2.1.6. Local roads (class 6)
Main local roads
Outside of localities, this class includes roads that are not included in classes 1-5 and that lead to separate localities, rural settlements, and gardening partnerships (or groups of localities that are located in the same area). These roads are not connected to the main road network via roads of a higher class.
In major rural developments (including farmers co-ops and rural (dacha) settlements) this class includes highways and roads that lead to extremely popular transport, social and cultural items of regional significance.
In localities, class 6 roads include main streets that are set off from urban zones (districts, subdistricts or localities that are part of the city), secondary transit streets that are connected to neighboring areas of the city (such as exits from isolated city zones), and frontage roads with no less than three traffic lanes that run adjacent to highways of class 1-4 (see point 3.3.2.7.5).
In small localities, this class is used to represent the main transit road when a road of class 1-5 that circumvents the city is present.
If a road of that class ends in a locality, then it should lead to a central intersections.
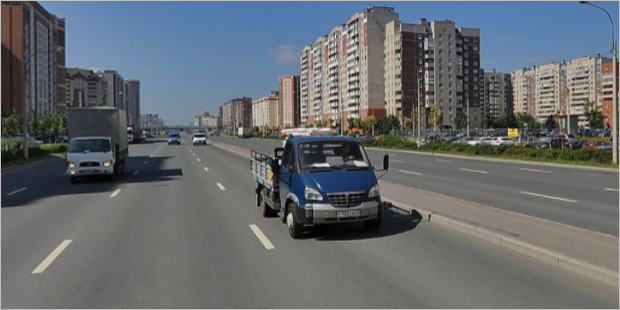
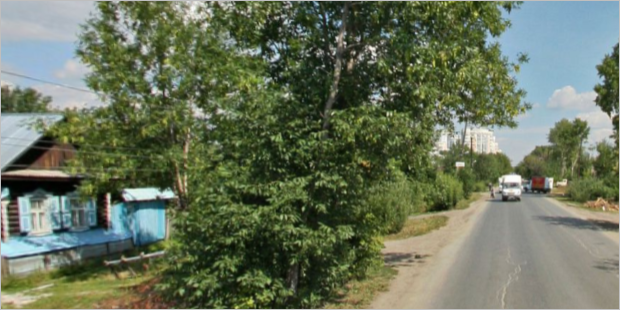
Keep in mind that the physical characteristics of roads of this class may notably differ from one another. For example, class 6 includes the the multi-lane Shuvalovsky Avenue in Saint Petersburg:
and Tatischeva Street in Yekaterinburg:
3.3.2.1.7. Roads of minimal significance (class 7)
This class includes all local roads that have proper names and do not belong to class 1–6 but are technically suitable for motor traffic (even if traffic is prohibited or the street is labeled a pedestrian zone). It also includes intersections
between two-line roads.
In rural localities and gardening partnerships with unnamed streets, class 7 includes the main road network that has houses located alongside it.
Exceptions to this rule are major roads used to enter, exit, or transit within multistory blocks that cover a large area (including unnamed streets), main roads on major cemetery grounds, and unnamed passageways where cars can move in two or more rows that handle the same traffic as connecting roads.
Class-7 streets are comprised of pedestrian streets (e.g. Arbat St. in Moscow, Bolshaya Pokrovskaya St. in Nizhniy Novgorod, Vana-Posti St. in Tallin). Usually, car entry is prohibited with signs such as No entry
, Pedestrian zone
, or Bicycle lane with shared pedestrian traffic
(shared lane markings
). These streets should have the accessible to pedestrians and cyclists only attribute.
Note
In rare cases, a No traffic
sign may be used if such streets are considered pedestrian (pedestrian zones) and only vehicles with special permits have access to them according to local regulations.
This class also includes central alleys and streets in large pedestrian zones (e.g. parks, cultural monuments, sports-related items, and other recreation areas) that make up the backbone of their corresponding road networks and connect the main entries to pedestrian areas. Such roads should be clearly distinguished from the larger pedestrian area network, and must be suitable for specialized vehicles to travel through. Enter the accessible to pedestrians and bicyclists attribute for these roads.
Outside of cities, class 7 roads include paved roads leading to small localities and gardening partnerships that are between 1–5 km in length, as well as re-enforced dirt, forest, or field roads (including those that run through shallow riverbeds), and winter roads that are the main or preferred route to a rural locality or a gardening partnership.
If a road leads to a locality, it must be at least class 7 regardless of its surface or condition.
Outside of localities, class 7 includes paved roads that lead to transport-related structures and agricultural items, recreational areas, camps for children, local attractions, and networks of technological paved roads within broad industrial areas or territories.
Additionally, this class includes tracks at major car-racing facilities (such as Formula 1 racing tracks).
Class 7 also includes all roads that are under construction or are not going to be put into commission (see section 3.3.2.3.9). The exception are Class 10 roads: pedestrian and bike paths as well as some frontage roads (see section 3.3.2.7.5).
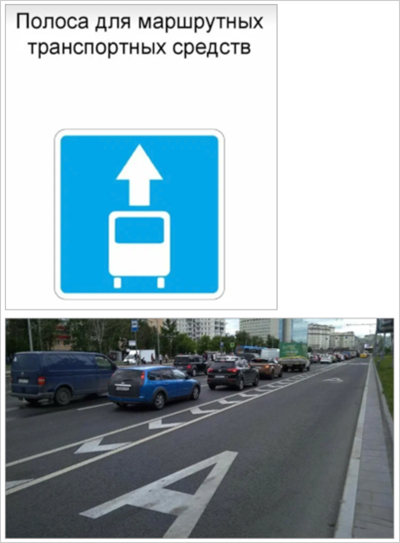
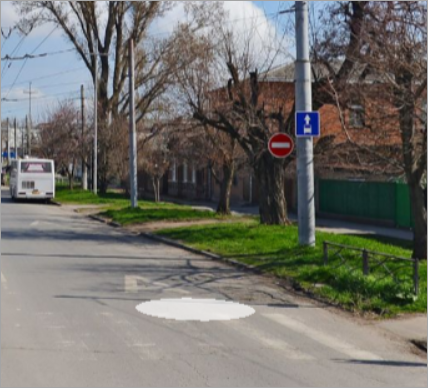
Roads of minimum significance also include dedicated public transport lanes separated from the main road by a physical divider.
3.3.2.1.8. Driveways (class 8)
Roads that are only used to get to one concrete place (the entrance of a building, a particular tourist attraction, etc.) and are not used to transit anywhere form class 8:
-
Un-named paths and dead ends on the territory of individual developments
-
Passageways within courtyards or blocks
-
Roads to small industrial zones and roads on closed territories within industrial zones, organizations and institutions such as hospitals, hotels, resorts, recreation and wellness centers, etc.
-
Exit ramps going from highways to gas stations or parking lots, roads on the territories of gas stations and parking lots
-
Branches from main unnamed passageways and roads in individual development areas (including gardening partnerships)
-
Internal passageways on the territories of garage complexes
-
Tracks at medium and small race car, go cart, and motorcycle racing complexes.
-
Service and technical U-turns and exits from major highways and freeways closed off with the
No traffic
sign (includingfree
entrances and exits from toll roads not intended for car transit):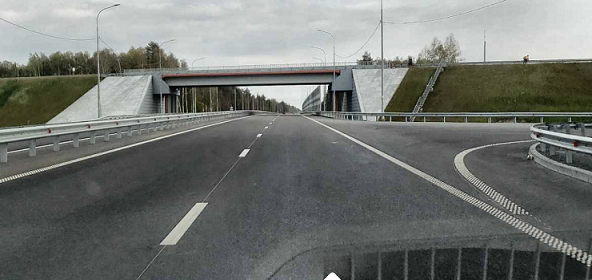
This class is typically found in localities. If they are found outside of localities, it is generally only in the cases described in points 3 and 4.
Roads of this class must have their availability parameter set for cars (except for race tracks that should have all their values disabled).
Note
Only unofficial streets can pass through sections of Class 8 roads. Assigning an unofficial name to a road is not sufficient reason to upgrade the class of its sections.
3.3.2.1.9. Field and forest roads (class 9)
Forest and field unpaved roads (not received a higher class).
In most cases, this class includes insignificant exits from the locality to another locality or to the depth of an unsettled area.
Roads in this class are not commonly found within the borders of localities (with the exception of areas that are not very developed, but are nevertheless parts of localities).
Roads that belong to this class do not have names and are not paved.
3.3.2.1.10. Pedestrian and bike paths (class 10)
This class comprises roads that physically can't support vehicles (or traffic laws restrict vehicle passage on them).
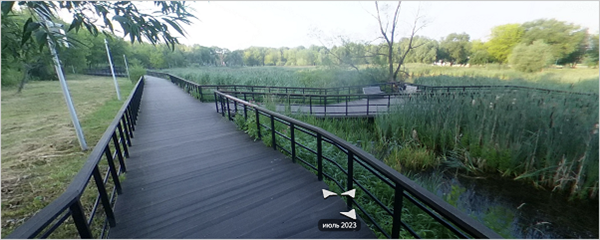
This includes sidewalks; pedestrian roads through parks or cemeteries, within building blocks (including paths to entrances from intra-block driveways), or over railways or motorways; staircases, pedestrian bridges and tunnels, and named streets that cannot be physically traversed by vehicle (if, for example, they are narrow paved or asphalt paths).
Additionally, this class includes trails at major ski reports, running tracks at stadiums and sports complexes, and equipped ski trails at ski and biathlon stadiums.
For this class of roads, always disable accessibility to cars and trucks.
Use the Pedestrian crosswalks
and Design features attributes for Pedestrian crosswalks.
Assign named streets where traffic is prohibited (such as Arbat Street in Moscow) to class 7 rather than class 10 (see Section 3.3.2.1.7).
Note
See also Color-coding by road type.
3.3.2.2. Street
The panel Street field is used to specify the name of the street (road), which includes the shaded area. The name shows what road the section belongs to.
Alert
For class 8 roads, only fill in this field if the street name is unofficial and confirmed by one of the following:
- A map or a resolution of the administration of the organization (allowed to be displayed on the map) that named the road.
- An address that belongs to this street and is allowed to be displayed on the map.
- A website of a pedestrian or bicycle route that has a name.
Don't fill in this field for class 9 roads.
When you enter the characters that make up the road (street) name in the field, a list of roads (streets) that are already drawn on the map and that have the characters entered in the name field is opened for selection:

When you fill in the field, keep in mind that streets often partially overlap with each other, so a specific section of road may simultaneously belong to several roads with different names. For example, Begovaya St. in Moscow is also part of the Third Transport Circle.
In these cases, you can add the appropriate number of attribute values after you enter the first value.

When you fill in the field:
-
If the street is already on the map, then select its name from the list of suggestions.
-
If the street is not on the map, you must fill in this field manually: enter a name for the new road and it will be created. When naming roads, follow the rules for naming roads (see Section 3.3.3.3. Name of road).
After the item is saved, its name will appear as a link in the attribute panel:
Clicking this link opens the panel for viewing and editing road attributes, including its composition (for more information, see 3.3.3. Rules for attributing roads).
3.3.2.3. Accessible to
In the field Available for
sets the accessibility of the road element for vehicles (vehicles) and pedestrians. The attribute value is determined by whether it is possible to travel on a road element on different types of vehicles (TS), or to walk on it. Whether a vehicle can be used to access the road or not is decided based on driving regulations and traffic signs rather than the vehicle's actual capacity. There are exceptions to this rule, such as: accessibility of public transit and bicycles as well as accessibility of isolated road networks in hard-to-reach settlements.
If there are obstacles on the road (checkpoints, gates, barriers, concrete blocks, road signs), this doesn't mean that some types of vehicles should be disabled on road sections (except in cases described in paragraphs 3.3.2.3.7 and 3.3.4.2.11).
Alert
Currently, the availability for cargo trucks and maneuvers that apply exclusively to trucks are created and edited only by employees.
The available values convey whether the road is accessible to pedestrians, bicyclists, public transport, taxis, trucks, and/or light vehicles.
Click the appropriate button to enter this attribute (click once to indicate that a given section of road is accessible to pedestrians, bicyclists, public transport, trucks, light vehicles, or taxi, and click again to indicate that it is inaccessible to that group). An icon shows whether the attribute is enabled or not. The button becomes semitransparent when the attribute is disabled:
 →
→
When entering attribute values:
3.3.2.3.1
Only use the Pedestrian
attribute for crossings (provided other options are not regulated by the traffic rules of the country where the crossing is located).
3.3.2.3.2
For roadways:
-
3.3.2.3.2.1
- You should enable the
Pedestrian
value if there's no sidewalk along the road, but pedestrians can still walk along the shoulder.
- You should enable the
-
3.3.2.3.2.2
-
For roads, we recommend disabling the
Pedestrian
value in the following cases:-
This is a class 1 road (a freeway).
-
A road section is a U-turn or an intersection of roads drawn as two lines:
Note
If sidewalks are drawn along both sides of a Class 2-7 road section, or a sidewalk is drawn on one side while there's no sidewalk or curb accessible to pedestrians on the other side, you can (but don't have to) disable the
Pedestrian
attribute on this section.If sidewalks are drawn along a class 8 road, don't disable pedestrian accessibility for that road.
-
-
-
3.3.2.3.2.3
-
Except for the cases listed in Section 3.3.2.3.2.2, it's preferred and more accurate (but not mandatory) to disable the
Pedestrian
attribute for the following road sections:-
The class 2–7 road isn't accessible for pedestrians because there aren't any sidewalks or road shoulders (a standard applied to areas under construction). At the same time, if in any type of area (for example, in a private sector) pedestrians can walk only on class 7 roads, then don't disable pedestrian accessibility on these roads.
-
The road is temporarily closed or the design features of the road network won't change if the road is closed.
-
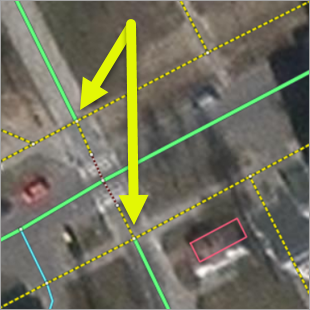
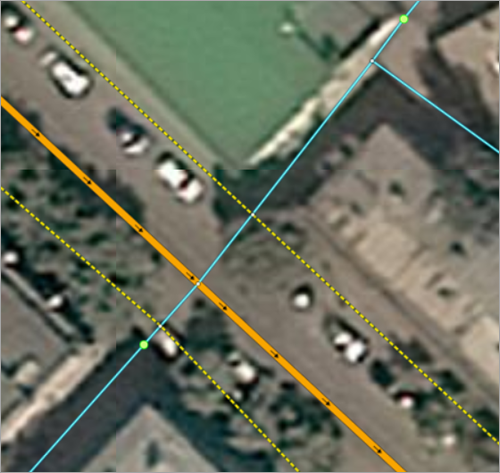
If the road (blue) along which the sidewalks aren't marked intersects with the road (brown) where the sidewalk is marked (yellow dotted line) with the
Pedestrian
value disabled, the best practice is to disable thePedestrian
value for the section of the blue road that runs between the brown road and the sidewalk (red arrow):
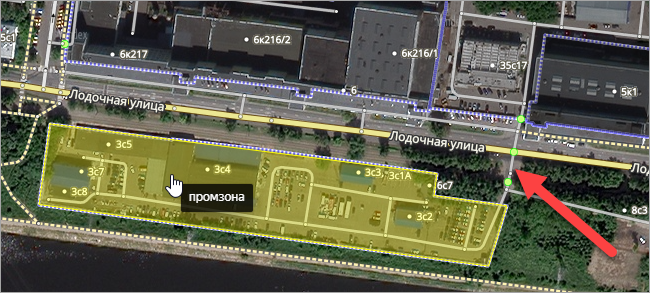
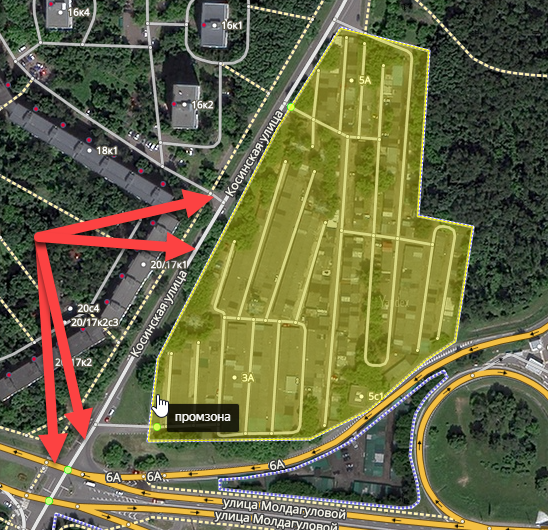
An exception to the rules listed in this Section applies to the cases when a disabled pedestrian access at the aforementioned sections leads to the creation of an isolated network of roads with pedestrian access. To ensure pedestrian connectivity, pedestrian access is set to the minimum number of road sections and links that connect isolated parts of the network with the rest of the road network in both directions of traffic.
-
-
-
Example 1.
-
There's an isolated network of driveways at the enterprise (in the industrial area), but there's no shoulder along Lodochnaya Street.
The shortest way to connect the road network of this area with the rest of the road network is to enable pedestrian access to the links marked with a red arrow:
-
-
Example 2.
-
There's an isolated road network through the garage cooperative (in the industrial area), but there's no shoulder along Kosinskaya Street.
The shortest way to connect the road network of this area with the rest of the road network is to enable pedestrian access to the roads marked with red arrows:
-
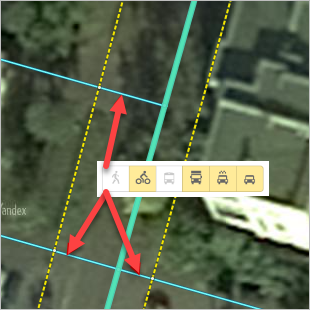
3.3.2.3.3
Road sections adult cyclists can drive through in accordance with traffic rules must have the Bicycle
value enabled.
As an exception, the Bicycle
value is enabled in situations where Signs 3.1 (Entry prohibited
) or 3.2 (No traffic
) are set to prohibit the passage of cars and trucks in both directions and do not actually prohibit the passage of cyclists. This is often the case in park driveways.
You should disable the Bicycle
value at T-junctions of road sections if they're located between a sidewalk and roads that are not accessible to cyclists.
- For example, in picture a) enable the
Bicycle
enable, and in picture b) it's preferable to enable: - a)
- b)
Whether road network sections located between the lines of a road drawn with two lines are accessible to bicycles:
- No, if the traffic regulations prohibit bicycles from using these sections.
- Yes, if the traffic regulations allow bicycles to use these sections.
Do not disable the Bicycle
value for sidewalks that run along an intra-block driveway.
However, disable the Bicycle
value for class 9 and 10 roads in cases where the route is impossible or very difficult to traverse on a bicycle.
Disable the Bicycle
value on road sections passing through railway platforms.
Also turn off the Bicycle
value for temporarily closed highway sections or if the design features of the road network won't change if the road is closed.
Sections of Class 10 roads connecting sidewalks and pedestrian crossings are considered sidewalks and attributed accordingly.
Alert
The rules for setting accessibility values for sections of road that bicyclists can use may differ by country (in accordance with local traffic laws).
-
3.3.2.3.3.1
-
For dedicated bike paths (see 3.3.1.6.5. Bike paths) only the
Bicycle
attribute value is used.The exception is the cases when the entire sidewalk along the road is a dedicated bike lane, and pedestrians don't have alternative routes nearby. In such cases, the bike path is marked as accessible to both bicycles and pedestrians.
You should also disable cyclist accessibility for roads and pedestrian paths that run parallel to such bike lanes.
Note
These rules apply:
- For one-way bike paths — to the nearest sidewalk and the edge of the strictly one-way road the bike path runs along.
- for two-way bike paths — to the nearest and opposite sidewalks as well as the nearest road (if it is a two-lane road, the rule applies to both lanes).
-
-
3.3.2.3.3.2
-
Enable the
Bicycle
value for underground or aboveground pedestrian crosswalks or stairs with a bike ramp.With that said, ramps not separated from the main road by a physical divider are not drawn as a separate track.
If the ramp is physically separated from the track or stairs, then drawing it is preferable but not required:
Note
If the stairs are part of a sidewalk without bike access, bike accessibility for stairs should also be disabled.
When drawing stairs divided by flights, the
Stairs
type is assigned only to the sections where they are actually located (but drawing without dividing into stairs and flights is also allowed):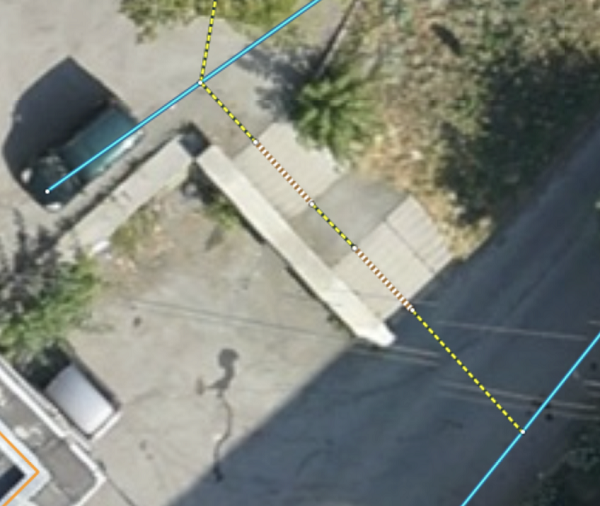
-
3.3.2.3.4
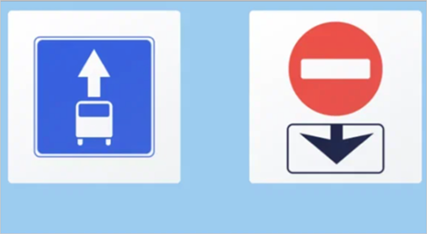
Use the Public transport
value for all roads of class 1─7.
Alert
Accessibility for public transport (FROM) on the roads of classes 1-7 can be removed in exceptional cases when this is necessary for the correct operation of the route threads from.
Only users who have permission to work in the Transport
layer can remove or edit PT accessibility (see 3.14.3. Rules for creating public transport route options and adding attributes to them).
Don't use the
Public transport ****value for any roads of class 8-10 except for sections that are used for public transport routes (such as traffic circles at ending stops).
Also don't use the Public transport
value for any of the roads indicated under 3.3.2.3.6.
3.3.2.3.5
If the only road leading inside an area is closed off with a No entry
sign and access is permitted only to emergency vehicles, this road should be marked as accessible only to pedestrians and bicycles.
When specifying attribute values for road sections with No traffic
or Do not enter
road signs, consult Section.3.3.4. Obstacles and road signs.
3.3.2.3.6
For ski trails, running paths, and similar items, use the Pedestrian
value exclusively.
For go-kart, motorbike, and other racing tracks, disable all attribute values.
3.3.2.3.7
Use the Taxi
value for all roads of class 1-9 where traffic laws allow taxi traffic.
If taxi entry to the territory is restricted by the administration (with no entry restriction sign installed), disable taxi accessibility from road network sections to all entrances to the territory and to all road sections located within it.
Note
When setting the accessibility attribute, keep in mind that taxis are not public transport moving along a permanent route.
3.3.2.3.8
If a road in a settlement is completely disconnected from the main road network, transport accessibility should be determined in the following way:
-
The general rules for transport accessibility apply if a car can be driven/taken to a settlement in one of the following ways:
-
by railway (a railway station where a car can be loaded and unloaded should be located near the settlement)
-
by water (one must draw a ferry crossing between the settlement and the locality connected to the road network, even if the ferry crossing doesn't have a regular schedule or it's unknown)
-
by air (the settlement must be located near an airport, airdrome, or a helicopter landing zone which can deliver vehicles to the location)
-
by ice crossing or winter road (one must draw an ice crossing or winter road between the settlement and the locality connected to the road network)
-
-
If a settlement can't be reached by any of these methods, then the settlement roads are only considered accessible for pedestrians and cyclists).
3.3.2.3.9
All constructed roads that are unaccessible and not put into service should receive the Class 7 status and all transport and pedestrian access to them must be disabled.
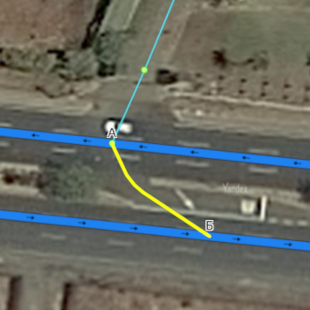
3.3.2.4. Direction of traffic
Click the button to enter the appropriate traffic direction in the Direction of traffic
field for each road section (pay attention to the rendering direction between the beginning A and ending B points):

-
А ⇆ Б — traffic goes in both directions (from А to B and B to A)
-
А → Б — traffic goes from A to B only
-
A ← B — traffic goes from B to A only
The Direction of traffic
attribute is set according to the traffic regulations.
For class-8 roads, one-way traffic can be set on the basis of both signs and the actual traffic on site. For example:
- A boom gate that allows only entrance to or exit from the territory.
- A 3.1
No entry
road sign on site (it is enough to set one-way traffic on the section between road intersections that this sign applies to).
If a two-way road is temporarily rearranged for one-way traffic due to construction or repairs, don't change the traffic in the affected road sections. Please use error reports to notify us if one of the traffic directions becomes inaccessible (specify the repair timeframe if possible).
Enter the Traffic allowed in both directions
value for pedestrian and bike paths.
You can indicate that traffic goes one-way on pedestrian paths in the following situations:
-
Athletic tracks where traffic is set to move permanently in one direction year-round (such as on ski paths, bike tracks, etc.).
-
Entrances and exits to the most popular cultural, social, and transport-related map items where the entrances and exits are clearly demarcated for traffic going in one direction, such as at the Moscow Kremlin.
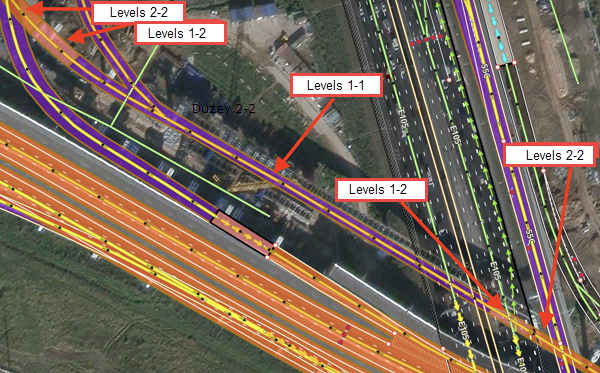
3.3.2.5. Level (A) and Level (B)
Enter the road level values in the Level A and Level B fields for the start (A) and end (B) points of the road section:
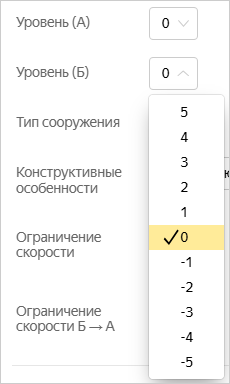
Available values for levels:
- 0 (ground level) — if sections of road that intersect are both on ground level. For example, at intersections or railway crossings.
- 1, 2, 3, 4, 5: Above ground level. For example, if one road at an intersection passes over another on a bridge or as part of an interchange and the second road or railway is at ground level.
- -1, -2, -3, -4, -5: Below ground level. For example, if one road at an intersection passes through a tunnel and the second road is at ground level.
Level A
and Level B
values must be filled in for each road section (for most road sections, these values are set to zero).
Every section of a road that consists of several sections should be logically connected using the Level A
and Level B
values (see Examples of setting road levels).
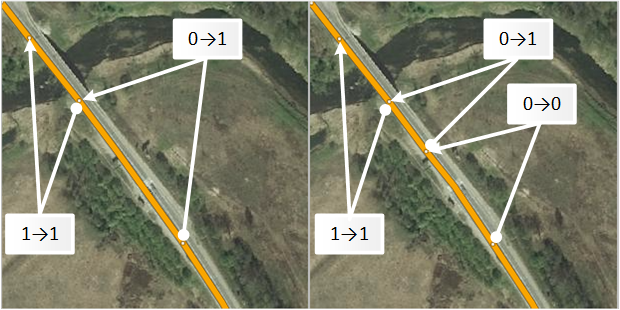
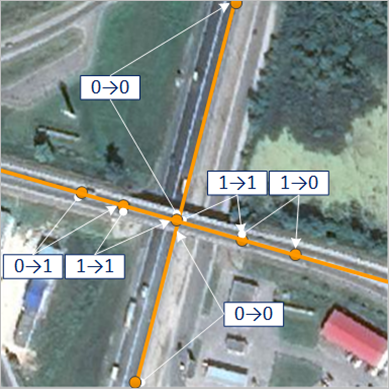
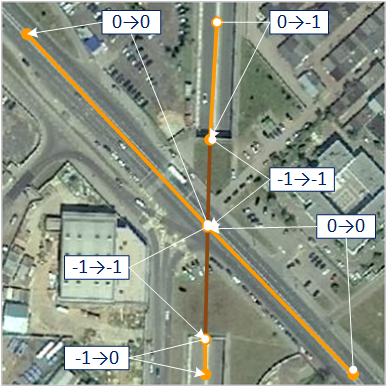
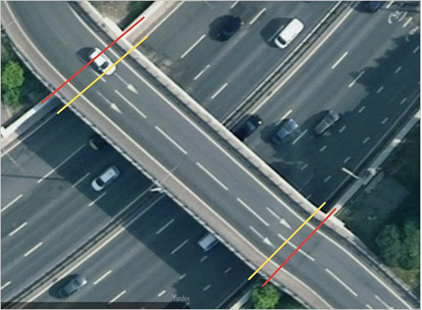
If the intersecting roads intersect on the same level, at the intersection point, the road elements must have the same level values. If roads intersect in the plan but are located at different heights, these road elements must have different levels at the intersection (in the plan).
If one road passing over a bridge is located above another road passing over another bridge (the roads are located at different levels, both above the ground), then the level change of the sections of the bridge located above should be as close as possible to the intersection of the projections of these bridges' roadbeds, but without their visible overlap on the satellite image.
|
Correct |
Incorrect |
|
|
|

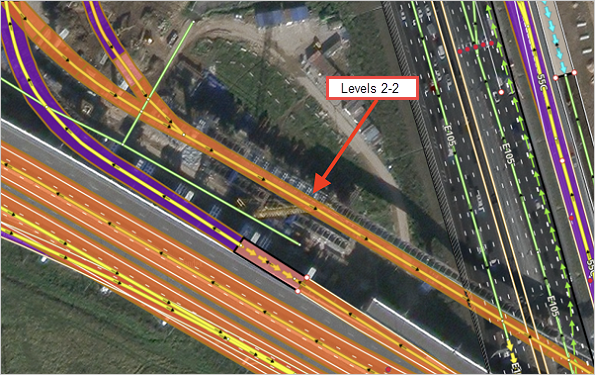
If a road that passes over a bridge is located directly above several other roads that also pass over bridges, then the level change due to the intersection of the roadbeds' projections is made once, and not for each of the intersections (the level on the graph's section passing over two or more bridges isn't lowered).
|
Correct |
Incorrect |
|
|
|
Use the same principles to align the road and railway levels.
3.3.2.5.1
You can only change the values of road levels (including pedestrian paths) if they pass through tunnels, underground parking structures, or over bridges (see point 3.3.1.1.7).
If the road follows a stylobate or the local terrain and rises along with a slope or falls along with a valley, this doesn't affect the value of the road level.
3.3.2.5.2
Road sections can not have values for Level A and Level B that differ by more than one. If there is a difference of 2 or more, there is an error in the allocation of the road element and it must be divided into two (or more) sections.
To make sure the road network is connected, set the level values that don't differ by more than 1 for pedestrian roads inside a building (as per drawing rules) joined by an elevator or a staircase.
3.3.2.5.3
Descents and ascents into and out of above/below ground pedestrian crosswalks are marked using levels (similarly to how different types of road sections are marked).
3.3.2.5.4
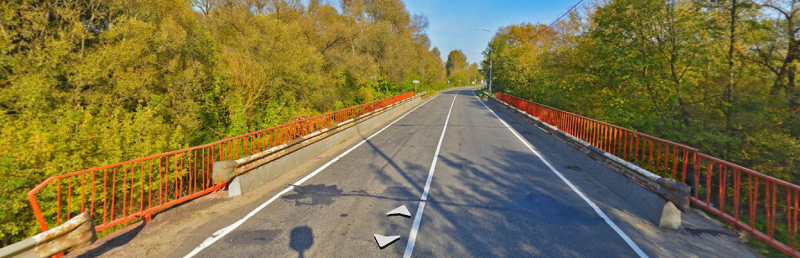
Sections of road that have the Bridge
attribute can not have values for the beginning and ending points of less than +1
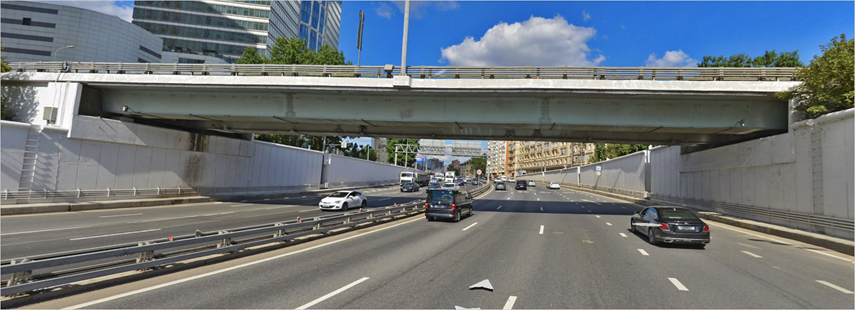
, even if there is no visible rise in the road level (for example, if the bridge passes over a small river):
3.3.2.5.5
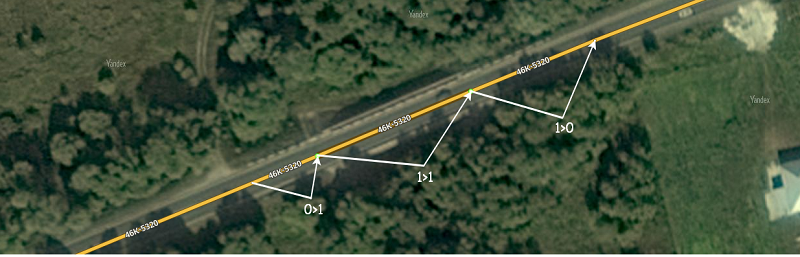
The sections of road that approach a bridge or tunnel and have non-zero values for levels A and B should not be longer than the length of the bridge or tunnel.
If a section of road that is the same length as the bridge or tunnel doesn't include a single intersection with other roads, then you must create an additional point on the road in order to lower its level.
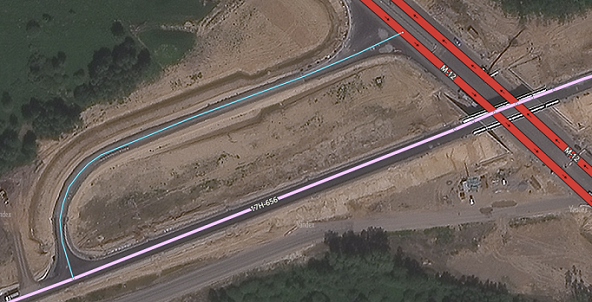
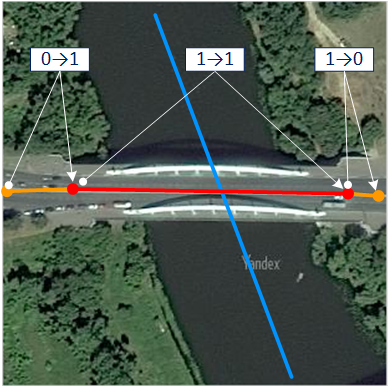
For example, in the drawing on the left, the approaching road section 0→1 is substantially longer than the bridge itself (1→1). Therefore, you should create an additional point on this level and split the section (into sections 0→0 and 0→1) so that the length of the approaching road (0→1) is the same as that of the bridge (1→1) in the drawing on the right:
3.3.2.5.6 Examples of setting levels
The drawings below are simple examples of how to set levels:
а) At intersections of a vehicle bridge passing over a river:
b) At intersections of a vehicle bridge passing over another motorway:
с) At intersections of motorways passing through a tunnel with another motorway:
d) See the Examples of setting road levels at interchanges section for more information.
Alert
You need to strictly observe the connectivity of the road network (see Connectivity): the values of the Level A
and Level B
attributes should be changed not only for sections of roads in a tunnel or on a bridge, but also for sections adjacent to them. Otherwise the road graph will be disconnected.
For logical breaks in the road graph (as a result of incorrectly set levels), it is not possible to construct a route that passes through the section of the gap.
3.3.2.6. Type of structure
The Type of structure
attribute doesn't characterize the road structure itself (that's what the Road infrastructure item category is for), but rather the section of a road (including pedestrian roads) that runs through that structure (things like bridges and tunnels):

The roads passing over bridges on the national map include the roads that are located on bridges (underpasses, overpasses) across rivers, roads, ravines, or other physical obstacles. For information on bridge boundaries, see point 3.8.1.1.3.
When you select the tunnel
type, you must pay attention to the tunnel features that lets you figure out if the situation you are mapping is a bridge over a road or a tunnel under a road
:
-
Roadbed:
- or routed through a natural or artificial elevation (rock formations or road embankment),
- Or (in developed areas and/or in interchanges) the road level continuously lowers in relation to the ground level until it reaches the entrance portal to a tunnel.
-
The presence of entrance or exit portals: these are considered to be the boundaries between the tunnel and the section of road with the
tunnel
attribute.
When entering attribute values:
3.3.2.6.1. Bridge, tunnel
Draw the part of road that runs through the structure as a separate section of road (regardless of whether the road is drawn using one or two lines).
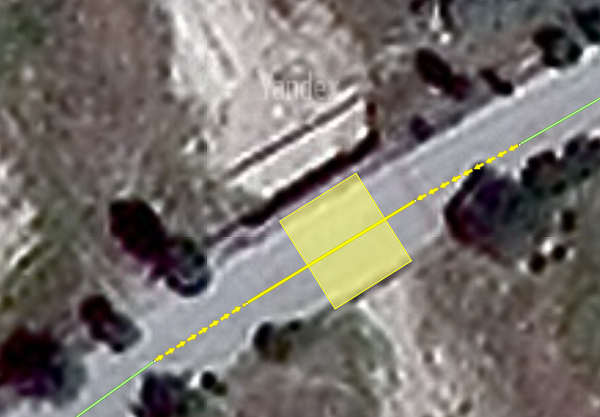
Enter the beginning and ending points for the road sections passing over bridges based on expansion joints, and when expansion joints are not visible on the panorama or image — in the points where the bridge connects to the ground (don't include the embankment part of the bridge).
In the image, expansion joints are not visible, the red lines indicate the correct bridge boundaries, and the yellow lines show them incorrectly:
If the relevant bridge or HD roadbed has already been drawn for the road section passing over the bridge, you can only align the road sections with these items when they are properly drawn, have attributes added according to the rules, and there are no or very few discrepancies between these items and the road section.
In the image below, the bridge is drawn incorrectly, so you should draw the road section with the Bridge
attribute based on the expansion joints rather than align it with the road structure.
Enter the beginning and ending points for the road sections that pass through tunnels in the points where the roadbed goes underground.
-
3.3.2.6.1.1
- Underground and aboveground pedestrian crosswalks are marked with attribute values.
-
3.3.2.6.1.2
-
You should not mark a value for the
Bridge
andTunnel
attributes (i.e.there aren't any
attribute values) for the following:-
Road structures that consist of pipes and dirt embankments that water flows through beneath the road.
-
Parts of the road that run under arches in residential buildings.
-
Sections of road that pass through underground parking lots.
-
Sections of pedestrian paths that run on
coverings
:
-
-
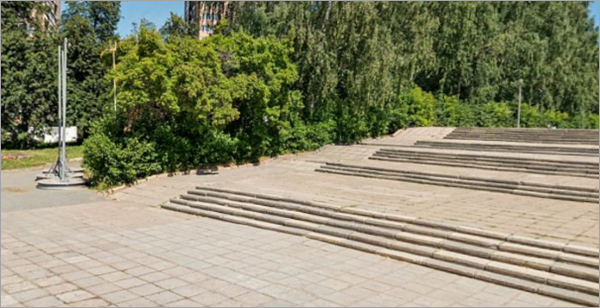
3.3.2.6.2. Stairs
Assign the Stairs
value to the attribute whenever the road section is stairs.
Note
Exceptions apply when the road section with stairs should not be drawn on the map as per the Rules. For example, if such a section of a road is a sidewalk along a driveway, and it is not drawn as a separate edge, the stairs are also not drawn.
-
3.3.2.6.2.1
-
Streets-stairs. For example, part of
Lanzheronovsky Descent
in Odessa: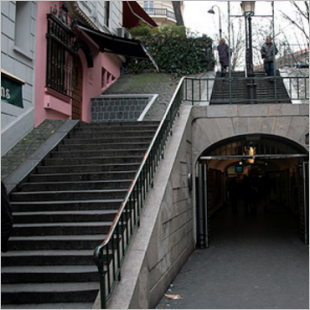
In this case, enter
Road of minimal significance
for the class. In general, despite the drop in height, levels A and B of the road section will stay at zero in these situations: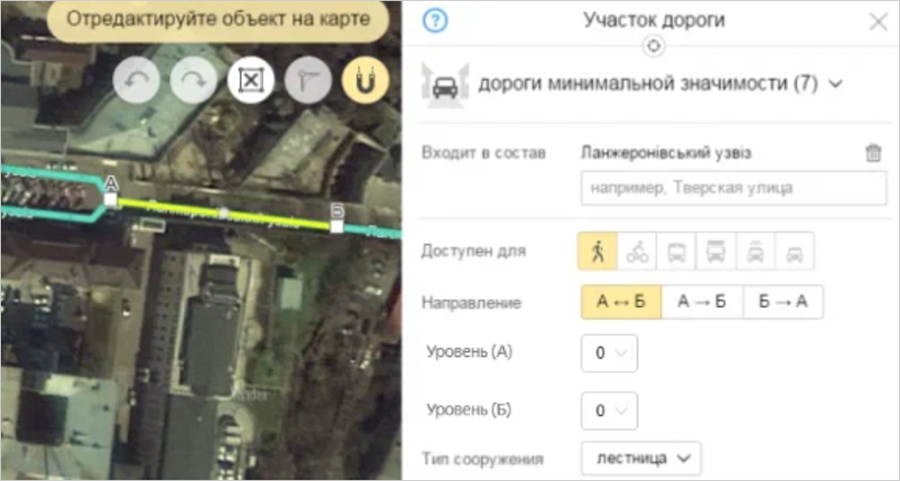
You can link address points to this type of road.
Note
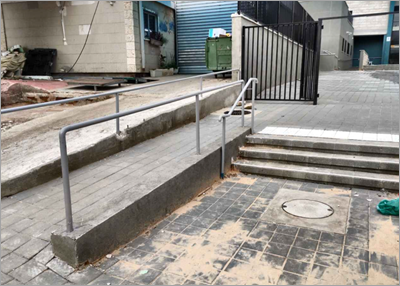
If the stairs have a ramp, set the road section access for cyclists (the ramp is not drawn as a separate track unless it is separated from the main road by a physical divider). For example:
-
-
3.3.2.6.2.2
-
Pedestrian stairs that lead to bridges (where the pedestrian ascent differs from the one for cars), stairs that go along slopes (into a ravine or onto a hill), escalators, descents and ascents of underground and aboveground crossings. For example, the stairway leading to the Brateyevskiy Bridge in Moscow:
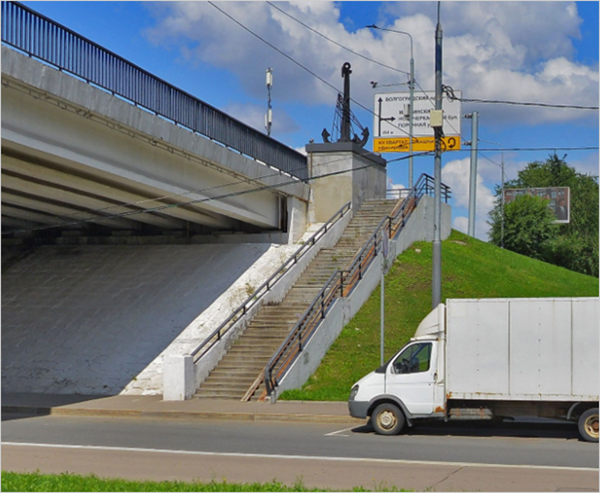
In these cases, Level A and B of the road section (i.e. the staircase) usually have zero values:
-
-
3.3.2.6.2.3
- Stairs for underground and above-ground crossings.
3.3.2.6.3. Ford
The Ford
value is assigned to an attribute on road elements that intersect a small area in a river or stream (which can be reached on foot or by car).
A road section's class must be the same as all the adjacent road sections. Disable the paved attribute and enable the disrepair attribute.
3.3.2.6.4. Ferry crossing
The "ferry crossing" value is assigned to the attribute on road sections where a ferry crossing is organized. This attribute is used only for crossings where the transportation of passenger cars is possible. For crossings that are exclusively for passengers, you can use the Public transport route options.
3.3.2.6.5. Ice crossing
The "ice crossing" value is assigned to the attribute on road sections where an ice crossing is organized. This attribute is used only for crossings where the passenger car traffic is possible.
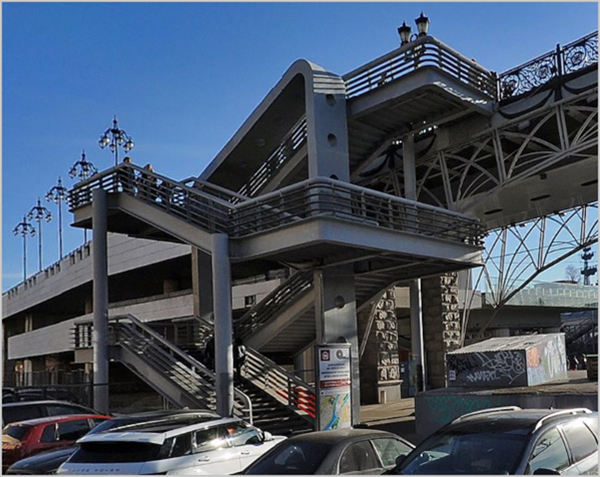
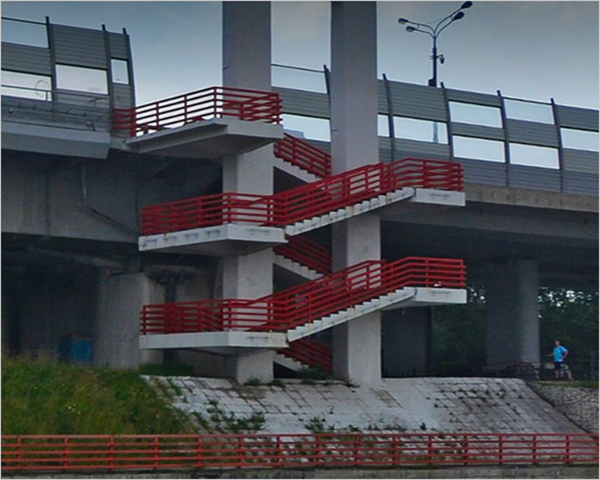
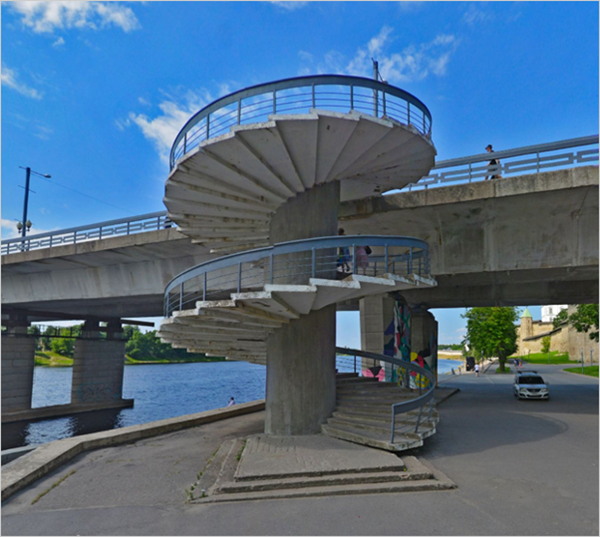
3.3.2.6.6. Spiral staircase
The "spiral staircase" value is assigned to stairways that have at least one flight passing over another.
Examples of spiral staircases
3.3.2.7. Design features
You can select an attribute value from the drop-down list. Possible values:
3.3.2.7.1. None
For road sections that don't have any of the design features listed below (i.e. they consist of one roadway, etc.) Default value.
3.3.2.7.2. Two roadways
For road sections that are drawn in two arcs in accordance with the rules, see 3.3.1.2. Rules for drawing roads in one/two arcs (one or two lines)).
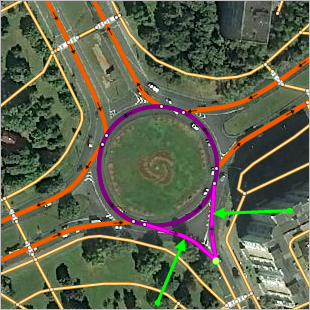
3.3.2.7.3. Circular traffic
Sections of roads combined into a roundabout (circles). This attribute is used when at least half of the entries to the roundabout have a Roundabout
road sign or sets of signs similar to the Roundabout
sign (depending on the country):
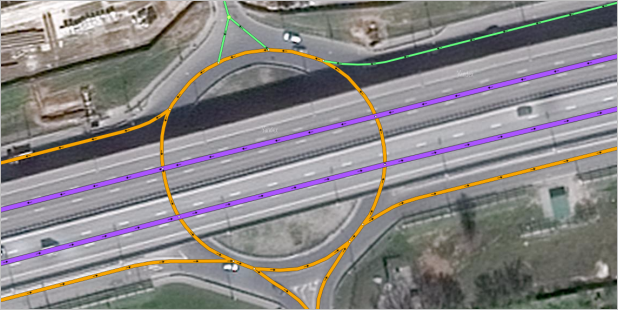
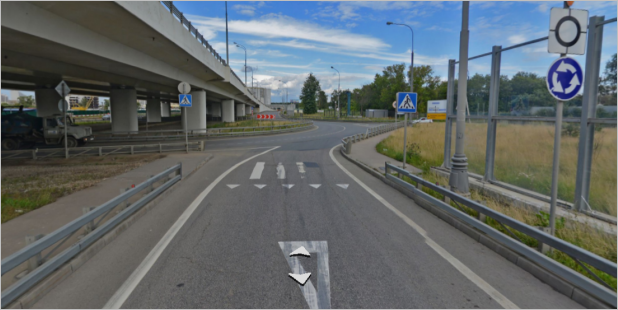
Note
In regions where there are no open sources or other data about the presence of a road sign or set of similar signs, assign the Roundabout
attribute to road sections with the corresponding specific geometry in the form of a circle (these sections should also have the attribute of one-way traffic).
There is a tool for drawing circular road sections.
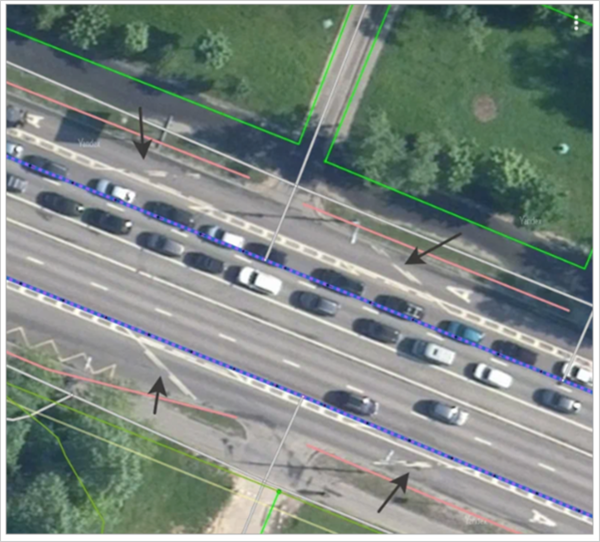
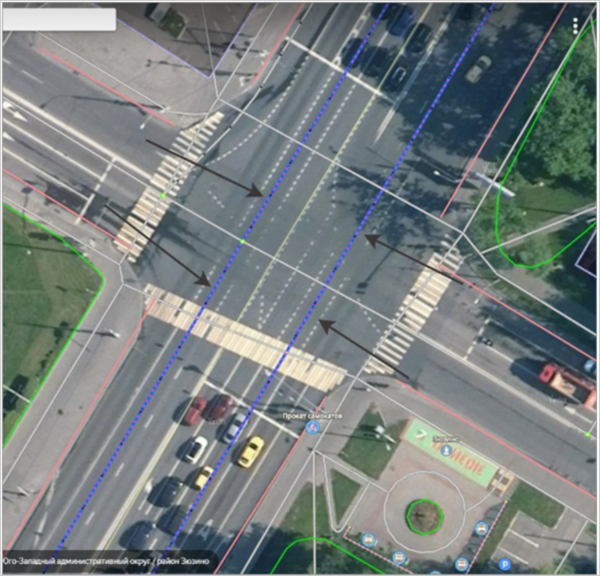
3.3.2.7.4. Exit
Road sections intended for unloading traffic flows and ensuring the connectivity of the road graph.
-
At single-level interchanges, assign the Exit attribute to one-way road sections that have no travel variations (traffic from that section only moves in one direction):
If a road section allows traffic in more than one direction, don't assign it the Exit attribute. In cases like the one shown in the example below, one-way road sections should be assigned the two-way road attribute.
-
At multi-level interchanges, assign the Exit attribute to road sections used primarily to exit a road of one level and enter a road of another level:
-
The exit attribute should also be assigned to road network sections that are parallel to the main road and separated from it by:
-
a dividing line:
-
a bus lane:

-
Note
Assign the Exit attribute to lanes used for parking cars or as driveways to yards provided they're marked as a "traffic island":
3.3.2.7.5. Frontage road
Roads designed to reduce the traffic flow on the main road and intersections with other road sections and driveways.
Examples

Frontage roads are roads that meet the following criteria:
-
Begins and ends on the same road.
-
Either runs parallel to the main road for at least a part of a block and up to several kilometers and is separated from this road by a physical obstacle, or continuously runs along a major street for several blocks.
-
Intersects with other road sections without creating any curves that the main road doesn't feature.
Note
-
Frontage roads can't have a higher class than the main road:
- Assign class 6 to frontage roads of class 1–4 roads with at least three lanes.
- Assign class 7 to frontage roads of other class 1–7 roads.
-
If the road that meets the listed criteria has a proper name in the format "Exit ...", it is attributed as an exit ramp, not as a frontage road.
3.3.2.7.6. U-turn
Only set this attribute for sections of roads if there are signs and markings that permit U-turns. For example:
 ─ U-turn allowed or
 ─ U-turn area,
Furthermore, that section of road should not be a continuation of a road of class 1-7.
Note
If the area doesn't have road signs of the U-turn allowed or U-turn area
types, the U-turn value of the Design features attribute is only assigned to road sections that are intended solely for turning and only allow traffic in the opposite direction.
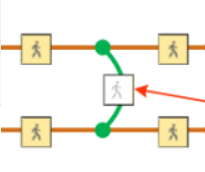
3.3.2.7.7. Pedestrian Crosswalk
Specially equipped road sections intended as road crossings for pedestrians (and cyclists, if permitted by traffic regulations) and marked with signs or markings: underground, ground-level, and aboveground crossings (including descents and ascents).
These areas are assigned a class value of 10. Pedestrian paths.
If a cyclist doesn't have to dismount when passing a bicycle crossing, then it doesn't need the pedestrian crossing
attribute.
3.3.2.7.8. Access overpass
This attribute should be set for road sections with the bridge
structure type when passengers board or exit at this section of the road to reach important locations, such as airports or shopping malls.
3.3.2.8. Speed limit
Enter the speed limit attribute for that section (in km/h or m/hr).
Note
If speed is measured in miles per hour in the country you are mapping, then enter that attribute value in miles per hour (not kilometers per hour).
You can enter typical speed limits by clicking on the appropriate value below the field (5, ..., 90). If the value you are looking for is not there, you can enter it using your keyboard.
Alert
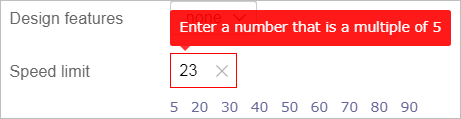
Speed limit values should be multiples of 5 (unless other speed limits apply in the country being mapped). If you try to enter an invalid speed limit, you will get an error warning. To save the road section, you must fix the error:
If a two-way road section has different speed limits for different directions, enter the speed limit for the direction A→B in the Speed limit field, and the speed limit for the direction B→A in the Speed limit B→A field:
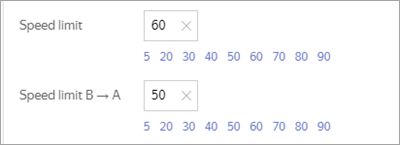
Do not enter a speed limit for the direction B→A:
- For one-way road sections.
- For two-way road sections where the speed limit is the same in both directions.
When you create a new road section, the attribute value is entered automatically. If a different speed limit applies to that road section, it's advisable to correct the default value, though you may leave it as is.
The default attribute values are listed in the table (Localities — locality, Class — attribute 3.3.2.1. Class) If a road section has already been assigned an attribute value according to the traffic regulations, changing this value to a value from the table is considered an error.
|
Country |
Class 1 |
Classes 2-7 (Localities) |
Classes 2-7 (Outside localities) |
Class 8 |
|
Russia |
110 |
60 |
90 |
20 |
|
Ukraine |
130 |
50 |
90 |
20 |
|
Belarus |
120 |
60 |
90 |
20 |
|
Kazakhstan |
140 |
60 |
100 |
20 |
|
Abkhazia |
110 |
60 |
90 |
20 |
|
Georgia |
110 |
60 |
90 |
20 |
|
South Ossetia |
110 |
60 |
90 |
20 |
|
Azerbaijan |
110 |
60 |
90 |
20 |
|
Moldova |
50 |
90 |
20 |
|
|
Turkmenistan |
110 |
60 |
90 |
20 |
|
Tajikistan |
110 |
60 |
90 |
20 |
|
Uzbekistan |
60 in cities 70 in other localities |
100 |
20 |
|
|
Kyrgyzstan |
110 |
60 |
90 |
10 |
|
Armenia |
110 |
60 |
90 |
20 |
|
Latvia |
50 |
90 |
20 |
|
|
Estonia |
50 |
90 |
20 |
|
|
France |
130 |
50 |
90 |
50 |
|
Turkey |
120 |
50 |
90 |
50 |
|
Lithuania |
130 |
50 |
90 |
50 |
|
Latvia |
110 from March 1 to December 1 90 from December 1 to March 1 |
50 |
90 |
20 |
|
Bolivia |
80 |
20 40* |
70 |
10 |
|
Colombia |
90–120 |
50 |
80 |
30 |
|
Guatemala |
80–100 |
40 60* |
40–60 |
30 |
|
Peru |
100 |
30 50* |
100 |
30 |
|
Venezuela |
50–70 |
40 |
||
|
Serbia |
100 |
50 |
80 |
- — restriction on roads with the street type "Avenida".
Note
See also Road color-coding by speed limit.
3.3.2.8.1
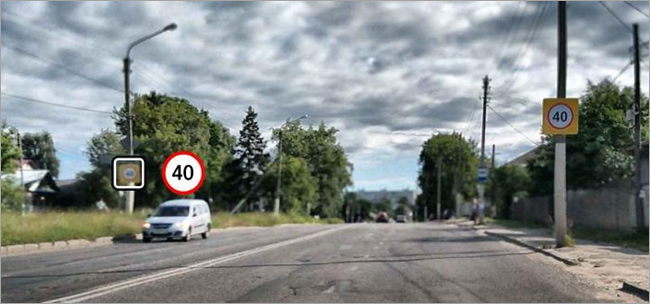
You can enter this attribute for any road section (other than field (class 9), pedestrian and bike (class 10) roads) for which a speed limit is set according to the traffic regulations of the country being mapped, with road signs and/or markings (such as speed limit signs, locality and residential area beginning and ending signs):
-
3.3.2.8.1.1
-
Locations of speed limit change points must coincide with the locations of locality signs marking the
entrance to
andexit from
a locality and not with its administrative borders.Example
-
-
3.3.2.8.1.2
-
The intersection cancels a speed limit sign places together with sign 8.2.1 that determines the area of the speed limit sign.
Example
If the images show that a speed limit sign has a zone of effect, but it can't be made out due to blurry images or being obscured by trees or other objects, then:
- In populated areas, the zone of effect of the speed limit restriction is set according to traffic regulations.
- Outside populated areas, don't set the speed limit based on the sign.
-
-
3.3.2.8.1.3
-
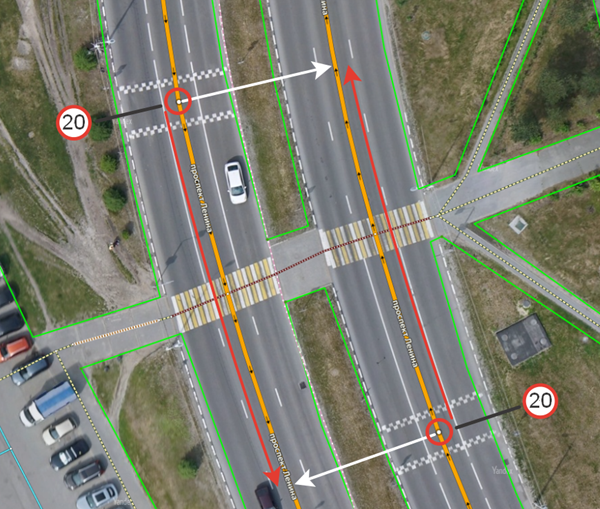
When a speed limit sign applies up to a point within the traffic intersection area, set the speed limit to end at the point of road intersection at the crossroads (the blue polygon shows intersection boundaries; the yellow arrow indicates where speed limit mapping ends).
Example
-
-
3.3.2.8.1.4
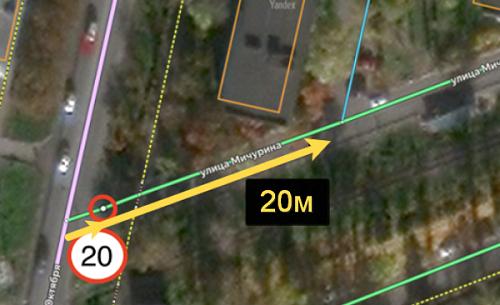
-
When a speed limit sign is placed beyond a traffic intersection area, apply the indicated speed limit starting from the intersection point at the crossroads only if nothing lies between the intersection and the sign (no driveways to courtyards or adjacent areas, transit stops, no-parking signs, or places where stopping is explicitly described as permitted in the traffic regulations).
Example
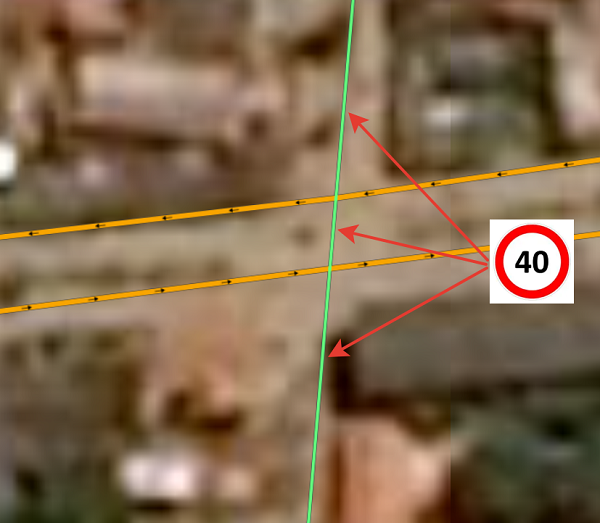
The yellow arrow in the image shows the location of the speed limit sign, and the red arrow shows the intersection from which the speed limit indicated on the sign is set.
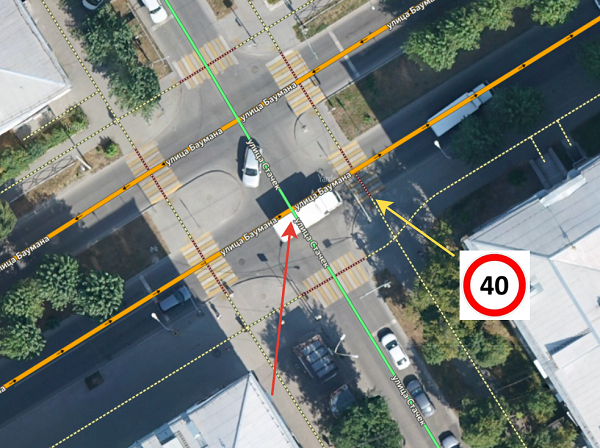
When there are driveways, transit stops, no-parking signs, or places where stopping is explicitly described as permitted in the traffic regulations between the intersection point at the crossroads and the speed limit sign, apply the speed limit starting from the sign's actual location.
Example
In the image, a red arrow indicates the location of the speed limit sign that applies to traffic moving from north to south. A white arrow shows the parking lot situated between the intersection and the speed limit sign. In this case, apply the 40 km/h speed limit for the north-to-south direction starting from the location where the sign is installed.
-
-
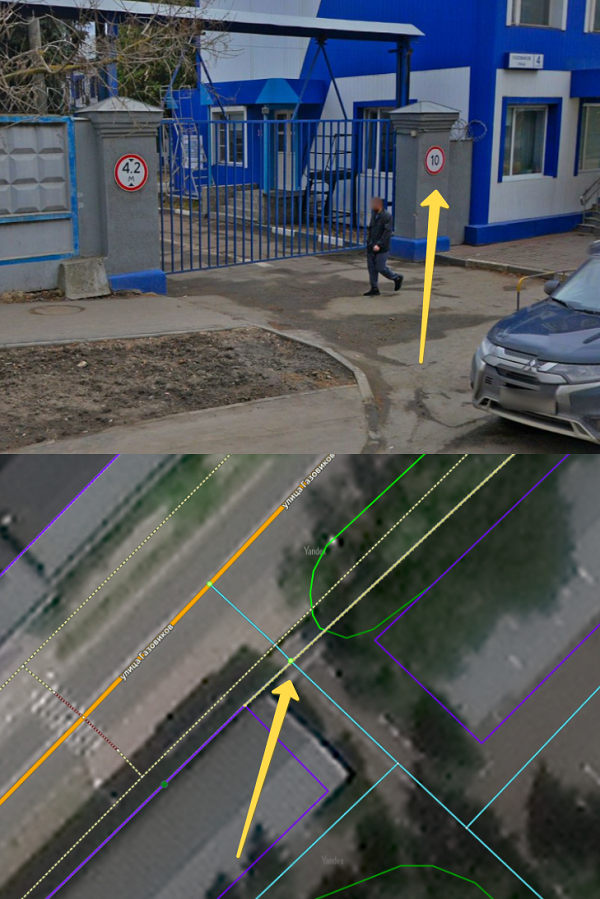
3.3.2.8.1.5
-
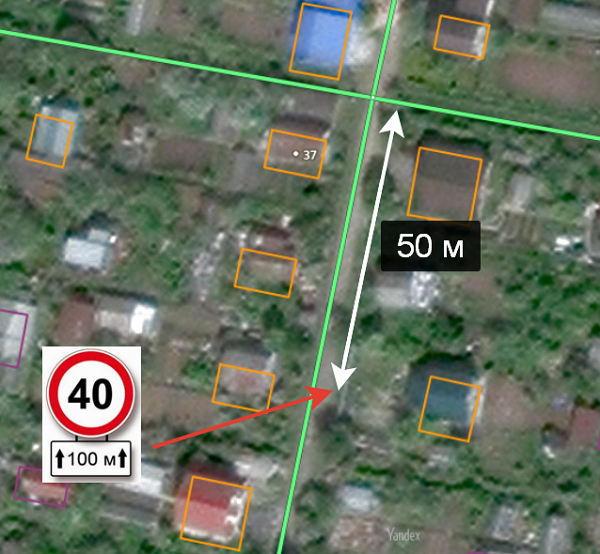
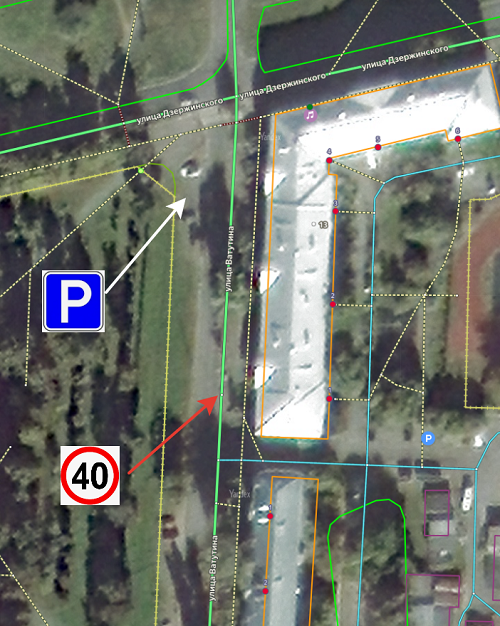
Set the speed limit on intra-block driveways (class 8) from the sign's location if the sign is placed at an entrance to a partially of fully restricted area.
Example
When the sign is placed on an intra-block driveway with unrestricted traffic, set the speed limit from the point where the intra-block driveway branches off.
Example
-
-
3.3.2.8.1.6
-
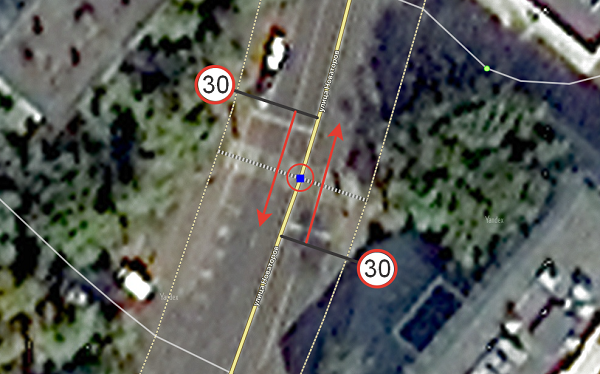
If the same speed limit applies to both sides of the intersection, it is not interrupted by the intersection.
Example
-
-
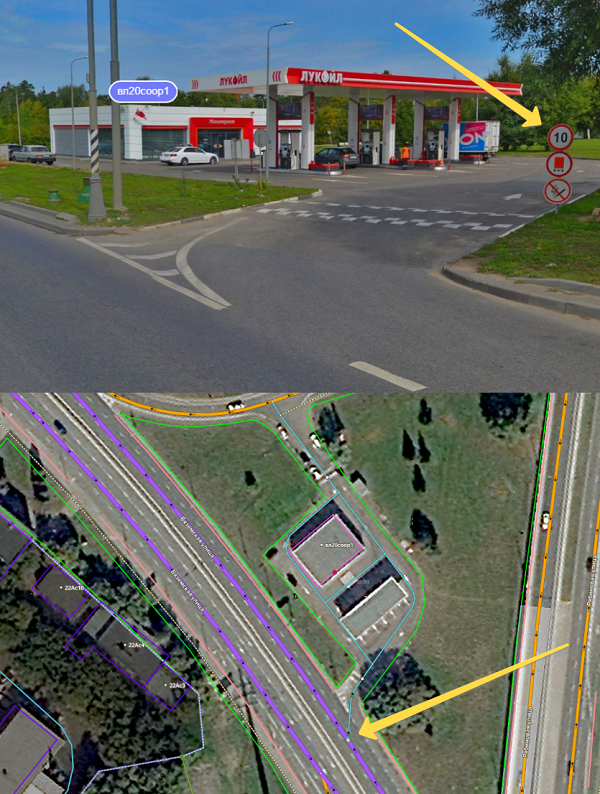
3.3.2.8.1.7
-
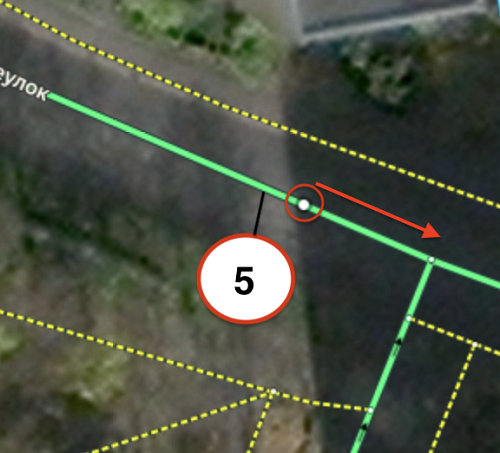
When class 8 roads connect to a two-lane road, assign the main road's speed limit to the connector between lanes.
Example

-
-
3.3.2.8.1.8
-
When roads with different speed limits connect to an intersection, set the connectors to the largest of these values.
Example
-
-
3.3.2.8.1.9
-
When a single-lane road (class 1-7) crosses one lane of a two-lane road, treat this location as an intersection for both lanes if there is no major pedestrian infrastructure (such as squares, parks, and others) between the lanes of the two-lane road.
To change the speed limit on the second lane at such intersections, cut that lane where the single-lane road would theoretically intersect it (if drawing rules permitted the connector between lanes).
Example
-
-
3.3.2.8.1.10
-
Intersection with a closed road and a road with the
Under construction
attribute does not cancel a speed limit sign.Example
-
-
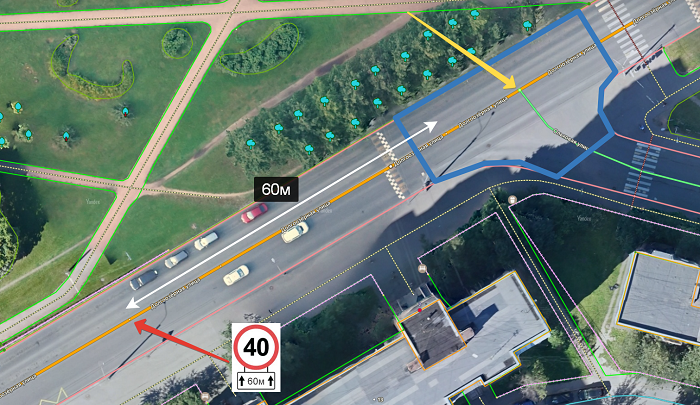
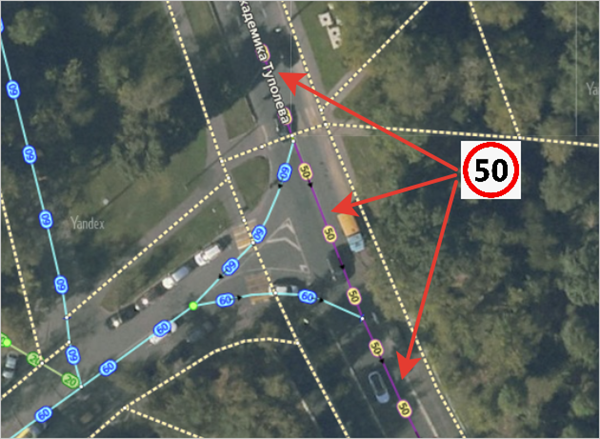
3.3.2.8.1.11. Mapping speed limits at complex intersections
-
At complex intersections (for example, with multiple exits or in locations where roads only intersect via exit ramps), start by determining whether there's a physical island at the intersection. If there's a physical island separating an exit or located between exits, the speed limit ends at the point where the exit branches off or where the exits diverge.
Example
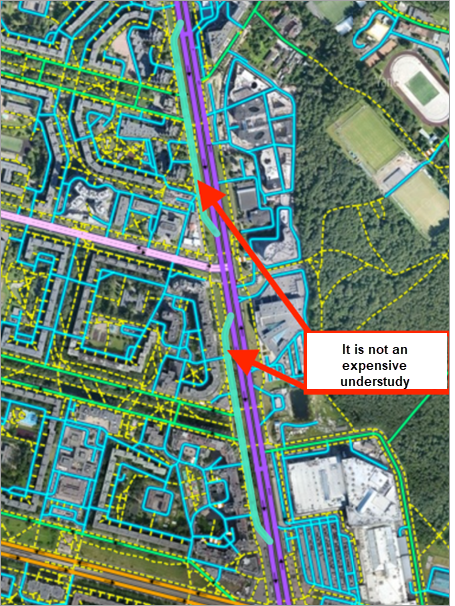
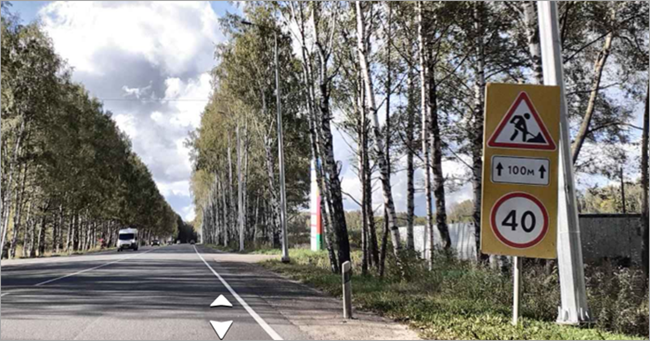
A speed limit of 40 km/h is posted on the northeastern edge of the Kanavinskiy Bridge. This road has an exit ramp separated from the main roadway by a physical divider (it's circled in yellow in the image). Since there is a physical divider between the exit ramp and the main road, the point where the exit branches off from the Kanavinskiy Bridge is considered an intersection. For this reason, the 40 km/h speed limit ceases to apply at that point (indicated by the red arrow).
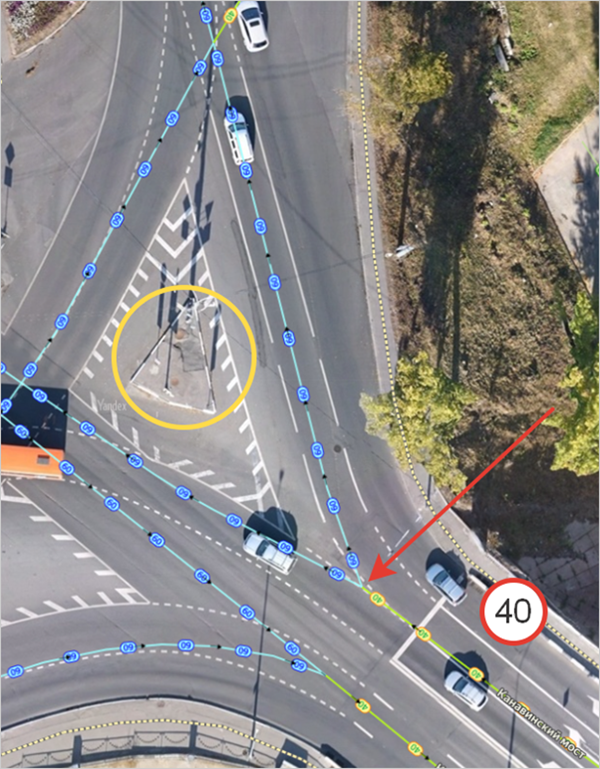
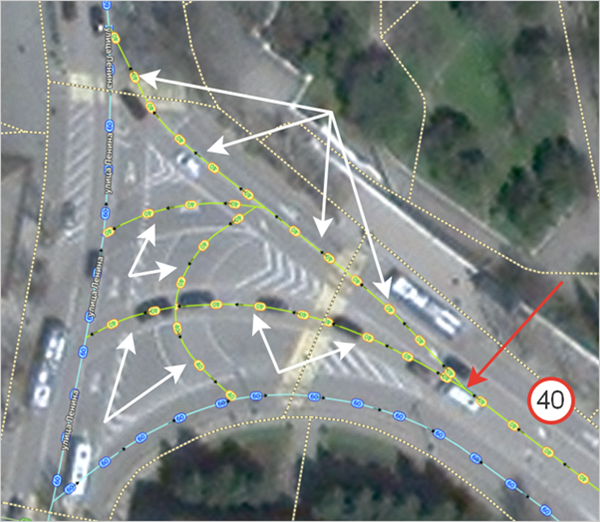
If there is no physical island, assign the speed limit to all exits from the road up to their intersection with the main road.
Example
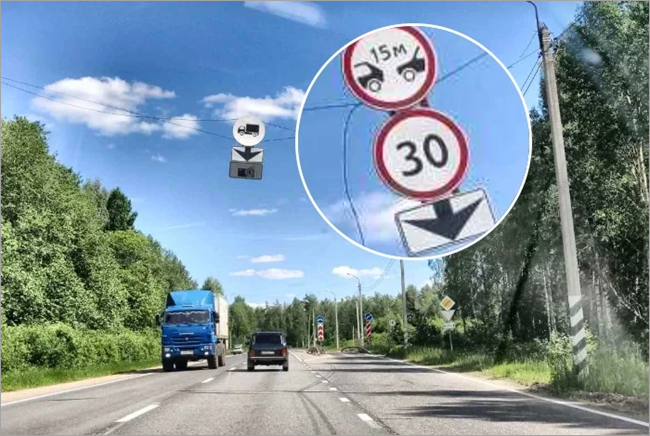
The northeastern edge of a two-lane road intersects with Lenin Street only via exit ramps (they start from the red arrow). A speed limit of 40 km/h is posted on this edge of the two-lane road. Since there is no physical island between the exit ramps of the two-lane road, the 40 km/h speed limit applies to all sections branching off from this edge of the road up to their intersection with Lenin Street or the southwest edge of the two-lane road (the sections are indicated by white arrows).
-
3.3.2.8.2. Temporary speed limit signs
Temporary speed limit signs have a yellow background inside the information contour of the sign (in contrast to the yellow reflective frame around the information contour in permanent signs):
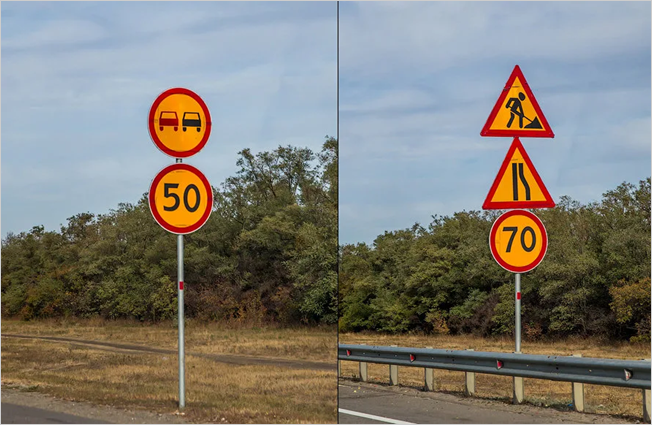
Speed limit signs that are accompanied by a sign about construction on this section of the road are also considered temporary signs:
Only set speed limit values for temporary signs if they've remained in place for more than six months.
3.3.2.8.3
If the speed limit for a road section differs by time of day, enter the daytime value for the attribute. If the speed limit is only in effect during nights, don't enter it.
If different maximum speed limit values are established for a road section on weekdays versus weekends and public holidays, the attribute is assigned the value that applies on weekdays.
3.3.2.8.4
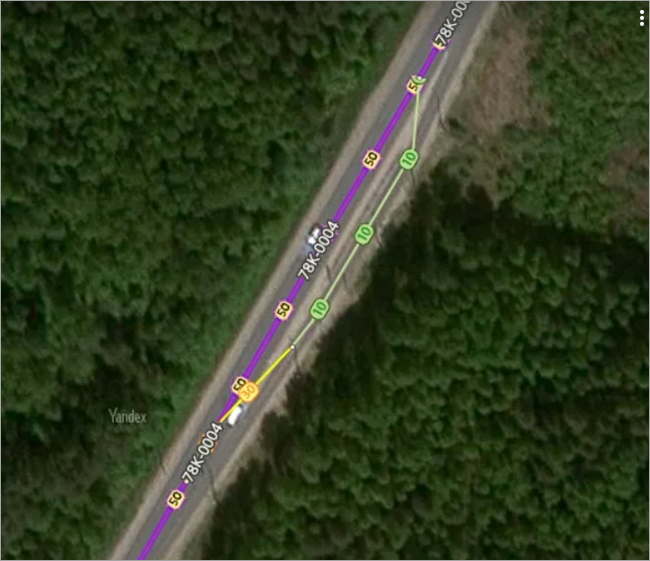
If a single-lane road section has different speed limits in different passing lanes, the attribute is set to a value that applies to more lanes. If the number of lanes with different speed limits is equal, the lowest restriction is set.
- Exception: when the restriction applies to a branch of the main road, but the sign is set before the actual turn.
- For example, if the sign is placed on the lane leading to an overpass:
- the restriction is placed directly at the turn:
If a road section has differing speed limits for different modes of transport, the attribute is set to a value that applies to passenger cars.
3.3.2.8.5. Speed limit zones
If a road has the "Maximum speed limit zone" sign, this sign applies until the "End of maximum speed limit zone" sign.
When all or some entrances to an area through class 1-7 roads are restricted by the "Maximum speed limit zone" signs, set the speed limit value specified on the sign for all class 1-7 roads inside that area.
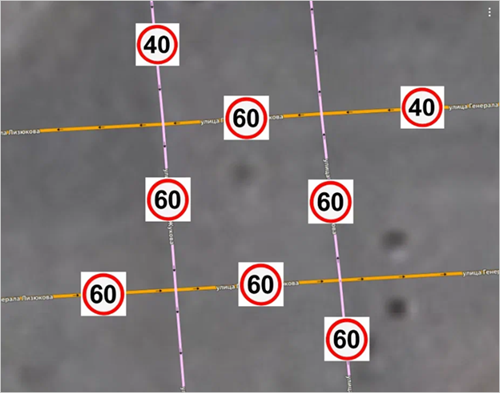
The white arrows in the image below show the locations of the "Maximum speed limit zone" and "End of maximum speed limit zone" signs indicating a 40 km/h limit. A yellow polygon outlines all roads affected by these signs. Although the zone covers a significant area, the placement of the signs logically restricts it, and all class 1–7 roads within this zone should be assigned a 40 km/h speed limit.
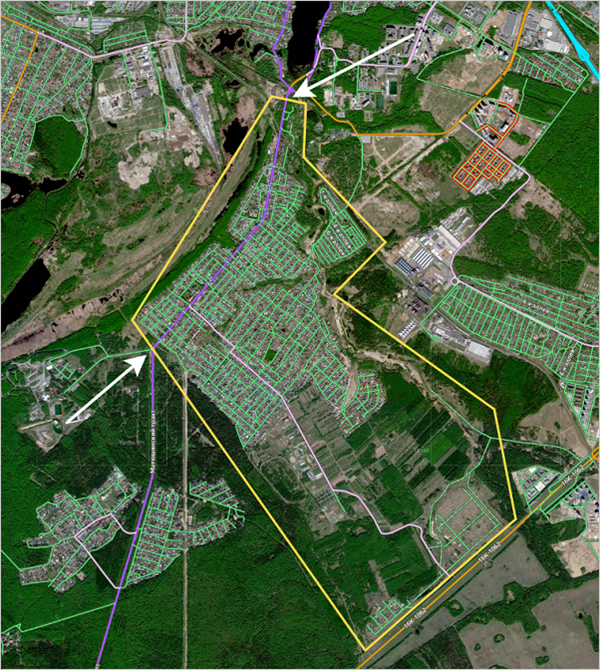
The white arrow in the image below shows placement of the "Maximum speed limit zone" sign indicating a 40 km/h limit. However, there are no "Maximum speed limit zone" and "End of maximum speed limit zone" signs on other roads. Although there are no signs on other roads, the area where the speed limit applies is logically clear, and all class 1–7 roads outlined by the yellow polygon should be assigned a 40 km/h speed limit.
When there is no "End of maximum speed limit zone" sign and you cannot determine exactly which zone is restricted by the "Maximum speed limit zone" sign, set the speed limit introduced by the sign for road sections up to the nearest intersection.
3.3.2.8.5.1
-
If at least one of the entrances to an area whose boundaries can be determined is restricted by a "Residential area" sign on class 1–7 roads:
- Assign all road sections within this area the speed limit value stipulated by traffic regulations for a residential area.
- All road sections classified as either class 6 or class 7 within this area should have their "Residential area" attribute set to "Yes" (see 3.3.2.16).
3.3.2.8.5.2
-
If the speed limit signs in an area have values different from the speed limit value for this area, mark the speed limits according to the placed signs.
For example, a 40 km/h speed limit sign is placed inside a residential area. In this case, set a 40 km/h speed limit for road sections affected by the
Speed limit
sign and a 20 km/h speed limit for other road sections within the residential area.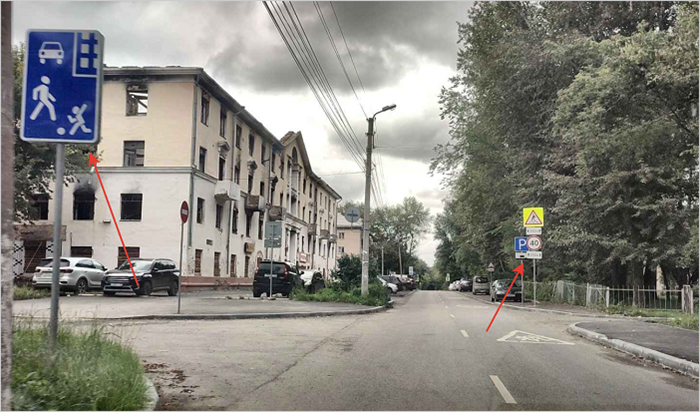
3.3.2.8.6. Speed limits on artificial bumps
For speed limit signs showing 30 km/h or lower that are placed before one or more artificial bumps (speed bumps
), where the coverage area isn't marked and no cancellation sign appears after the bumps (such as sign 3.25 End of maximum speed limit zone
, 3.31 End of restricted zone
, or another speed limit sign with a different value), establish the speed limit as follows:
-
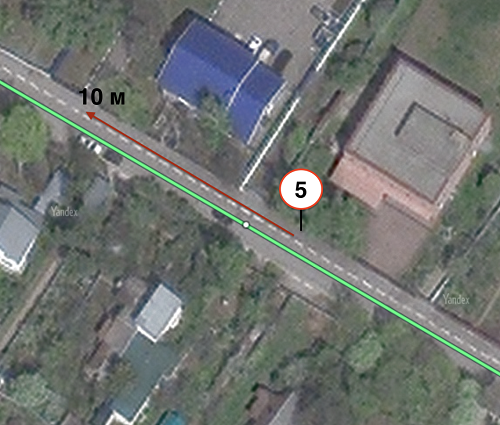
For one artificial bump located in the middle of a block: starting from the sign and 10 meters past it.
-
For two artificial bumps restricting a pedestrian crossing: in accordance with the sign, from the sign in front of the first bump to the sign posted in front of the second bump in the opposite direction (if there are no other signs restricting the speed between the bumps).
-
For two artificial bumps restricting a pedestrian crossing on a two-lane road: in accordance with the sign, from the sign in front of the first bump to the point that corresponds to the sign placed in front of the second bump in the opposite direction (if there are no other signs restricting the speed between the bumps).
-
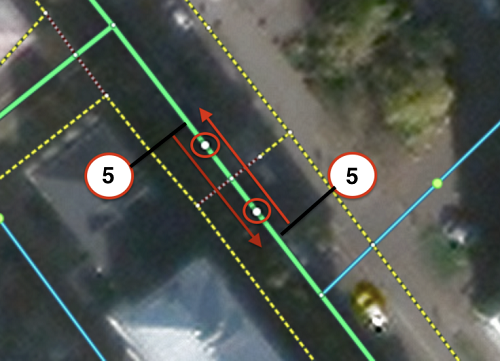
For artificial bumps combined with pedestrian crossings: apply the speed limit from the sign located before the pedestrian crossing to the corresponding sign before the crossing in the opposite direction (if there are no other signs restricting the speed between the bumps).
-
For artificial bumps located directly in front of an intersection on a two-way road: from the sign to the intersection in the direction of the intersection.
-
For artificial bumps positioned immediately after an intersection on two-way roads — apply the speed limit from the intersection to the sign, then extend it 20 meters beyond the sign in the direction away from the intersection.
-
For an artificial bump on a one-way road at the very beginning or in the middle of the block (and if there is no sign negating the restriction): starting from the sign and 10 meters past it.
3.3.2.9. Pavement
Flip the Paved
switch on if a road section is paved using asphalt, concrete or paving stones (such as on Barrikadnaya St. in Moscow).
This attribute is automatically enabled when creating a section of the road network (except for class 9 sections) and should be disabled if there's information from open sources that the section has no pavement (including indirect information, such as the presence of a clearly defined rut):
Example
If it's not clear from open sources whether there's pavement on the road section or not, the attribute of pavement is not disabled:
Example
Wooden covering, gravel, or crushed stone coating on roads accessible to cars are not considered types of pavement.
For pedestrian paths, any surface other than dirt is considered paved. If the pedestrian path pavement is partially destroyed, we recommend setting the "paved" attribute to Yes
. However, you can also disable it.
Example
For paved roads, set the value to Yes
(check the box): For all other types of road, set the value to No
(don't check the box):
It's permissible not to change the attribute value on road sections located between the intersection and the beginning of the developed territory.
Example

For ferry crossings, the attribute's value should be set to Yes
(checkbox selected).
You can remove the Paved
attribute for sections of roads undergoing scheduled repairs or re-pavement, provided the pavement is removed for a period of more than two months.
Also set the No
attribute value for polluted road sections where it's impossible to determine whether they are paved. However, don't set the Poor condition
attribute for them.
Example
3.3.2.10. Oncoming or with-flow public transport lane
These attributes are set for road sections with oncoming or with-flow public transport lanes.
Set the value to Yes
(check the box) for road sections that are parts of these type of roads. For all other road sections, you can set the value to No
(don't check the box):
The Oncoming lane for public transport
attribute indicates that there's a traffic lane specifically allocated for public transport going in the opposite direction (on one-way streets).
You can only set the value to Yes
for one-way road sections (see 3.3.2.4. Direction of traffic) without lane markers.
The With-flow bus lane
attribute indicates that there is a traffic lane specifically allocated for public transport going in the same direction (only for one-way road sections).
Public transport lanes are marked with road signs and markings:
If a public transport lane ends immediately before the intersection and continues immediately after it, set the attribute without any gaps in the network (this also applies to intersections with intra-block driveways).
Examples:
Although the public transport lane breaks at the entrance to the yard, the attribute is set without breaks:
The public transport lane ends at the stop line and continues immediately after the intersection, so you do not need to exclude the selected sections:
In this case, do not set the attribute for this section, as the public transport lane ends before the intersection, but continues after the roundabout:
3.3.2.11. Oncoming or with-flow taxi lane
The Oncoming lane for taxi
attribute indicates that taxi can drive through a traffic lane specifically allocated for public transport going in the opposite direction (on one-way streets), if there is such a lane.
Only set this attribute for one-way road sections (see 3.3.2.4. Direction of traffic) without lane markers.
Note
If the public transport lane on a road section is closed by the No entry
sign, do not check the box, since only public transport is allowed under this sign. For example:
The With-flow taxi lane
attribute indicates that taxis can drive through a traffic lane specifically allocated for public transport going in the same direction (on one-way streets) if there is such a lane.
Taxis can drive on traffic lanes specifically allocated for public transport at all times except when the sign for lanes specifically allocated for public transport is accompanied by a 3.1 No entry
sign:
Alert
Set the value of the corresponding attribute to Yes
for road sections that have oncoming or with-flow taxi lanes (choose the option).
For all other road sections, set the value to No
(don't choose the option).
3.3.2.12. Oncoming bicycle lane
The Oncoming bicycle lane
switch enables bicyclists:
- To travel along traffic lanes allocated for public transport going in the opposite direction (on one-way roads) where there is such a lane
- To travel against traffic on one-way roads following road signs and traffic regulations even in the absence of a dedicated lane
Set the value to Yes
(check the box) for road sections that are parts of these type of roads. For all other road sections, you can set the value to No
(don't check the box):
You can only set the value to Yes
for one-way road sections (see 3.3.2.4. Direction of movement).
3.3.2.13. Under construction
The Under construction
switch lets you show that a road section is under construction.
For paved roads, set the value to Yes
(check the box). For all other road sections, you can set the value to No
(don't check the box):
When setting the value to Yes
for this attribute, you should also set it to Unavailable
for all modes of transport (see the description of attribute 3.3.2.3. Available for
Roads undergoing construction and repairs should have the Under construction
attribute in the following cases:
- For pedestrian roads — if traffic is being restricted for more than two months.
- For car roads — if road construction takes more than three months and results in changed design features (for example, a road with no design features will become a
two-way road
).
Note
If a road section temporarily allows two-way traffic (for example, when one lane of a two-lane is closed for reconstruction), you need to change the value of the Direction of traffic
attribute to Traffic allowed in both directions
.
Please use error reports to notify us if one of the traffic directions becomes inaccessible or if pedestrian traffic gets restricted for a short while (specify the road repair timeframe if possible).
Note
If a highway is closed for a short time or the design features of the road network won't change if the road is closed, create an error message notifying that the road is closed and remove accessibility to pedestrians and cyclists on its closed sections.
You can draw under construction
sections of the road when the following steps are being made in preparing the site for construction: engineering and geological research, clearing and excavation, demolition, transmission line transposition, materials and equipment dispatch.
Note
From the moment the preparation works begin on the territory, you can draw all the future sections (based on the current documentation) of suburban highways and large long roads within localities that are used for high-speed transit and don't have single-level intersections with other roads (such as the North-Eastern Chord in Moscow). The exception is that you can't draw the sections that cross currently existing buildings and areas, such as cemeteries, industrial zones, and so on.
In rare cases, Yandex may revoke the "Under construction" status beforehand if a road section is having its official opening soon.
If a planned street already has addresses even though there are no buildings on it or sections that are under construction, you can draw the planned location of the road sections that are under construction
.
When drawing roads under construction, follow the rules for connecting the road network. If a class 6 road (or higher) is undergoing construction or repairs, you must raise the class of the roads used as a detour so that no breaks in the network of high-class roads occur. Lower the class of roads that temporarily become less significant due to construction or repairs.
If assigning the Under construction
attribute to road sections isolates adjacent sections from the road network, you need to:
- Assign the
Under construction
attribute to dead-end road sections of class 8 or higher and set their class to 7. - Disable accessibility for vehicles for road sections of class 9 or 10.
Roads under construction display using dotted lines on the map:
All roads under construction (except for class 10 roads) are class 7. Class 10 roads under construction (pedestrian) will still be class 10 (see also point 3.3.2.1.7).
The rules for naming roads that are under construction are similar to the naming rules for all roads (see section 3.3.3.1. Rules for naming roads).
3.3.2.14. Toll (paid road sign)
The Toll
attribute marks sections of road that you must pay to use.
The Yes
attribute value (check the box) is assigned to toll road sections (such as toll roads, toll ferry and ice crossings). For all other road sections, you can set the attribute value to No
(don't check the box).
Set
the attribute to Yes for all road sections subject to toll collection according to the official documents (such as the M-3 road sections between km 124 and km 173) as well as road sections that only exit onto these toll road sections (separate isolated sections are not included in the toll road).
If there's no information about toll sections in the official documents, map such sections using (in descending order of priority):
-
News sources and websites of the toll road in question, or websites of the owners of these toll roads.
-
Road signs in the area.
-
Other information found (that would be an approximate mapping).
You do not need to enter the Yes
value:
-
For u-turns on paid sections or roads of class 8
-
For road sections that function as entrances to paid territories (such as paid parking lots, including at airports).
-
For road sections that are disconnected from the toll road network and create gaps in it:
3.3.2.15. Poor condition
Set the Poor condition
attribute for class 1–9 road sections in poor condition, as well as for road sections of any classes with the specified ford crossing
structure type.
For paved roads, set the value to Yes
(check the box). For all other road sections, you can set the value to No
(don't check the box):
Only enter this value in accordance with these rules:
- If the
No
value is set for a road section to indicate that it's not paved, then only set theYes
value for thePoor condition
option in cases where it's not possible to drive through that section in a passenger car in dry weather. - If the
Yes
value is set for a road section to indicate that it's paved, then only set theYes
value for thePoor condition
option if there are potholes that you can't drive around. If a road is made of concrete slabs, then set this value if large openings have formed between the blocks or if the blocks themselves have been destroyed, potholes have formed, and the reinforcement bars are exposed.
You can only change the attribute value when the poor/good condition of the road surface changes:
- On a section of class 1-7 or 9 road no less than 200 meters or one block in length
- On a section of a class 8 road that is either bordered on both sides by intersections with at least 3 motorway sections accessible to cars or bordered on one side by a similar intersection and by a dead-end intersection on the other side (attribute change doesn't mean creating new intersections of road network sections)
Note
Don't create additional road sections within localities in order to assign attributes to them (i.e. don't break up road sections).
Example 1:
-
The arrows in the picture indicate road sections in disrepair. Areas with blue arrows can have their
Poor condition
attribute value set toYes
, while those with red arrows can't.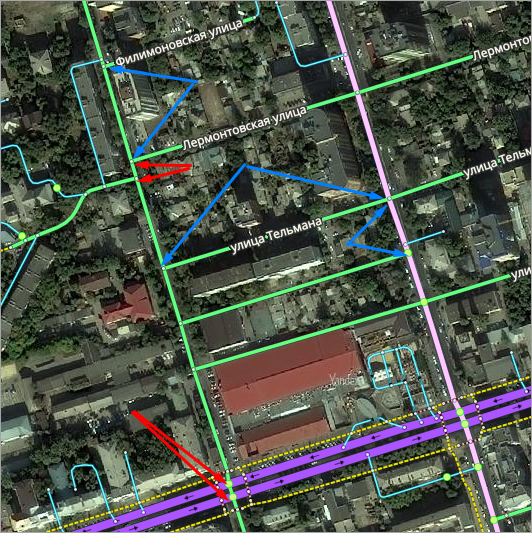
Example 2
-
The pictures show sections of class 8 roads that are in poor enough condition that they can have their
Poor condition
attribute value set toYes
.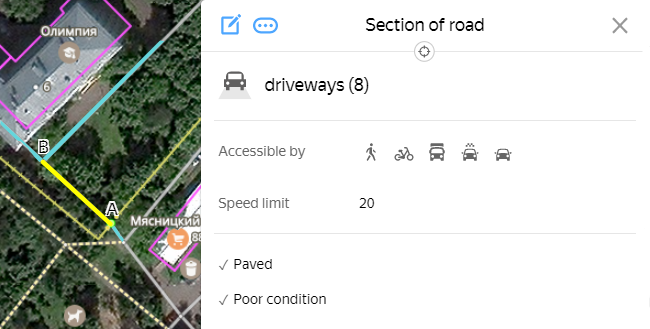
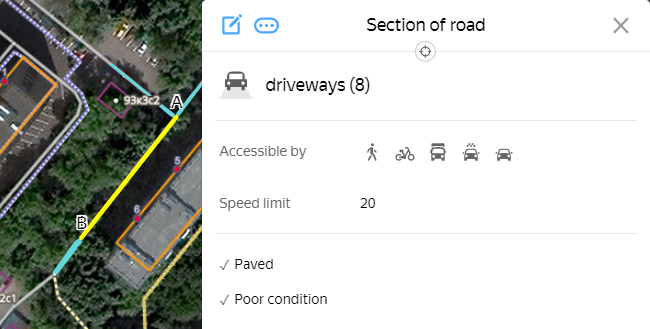
Below are images of roads marked with the Poor condition
attribute in Yandex Map Editor.
-
Road in poor condition made of cement slabs:
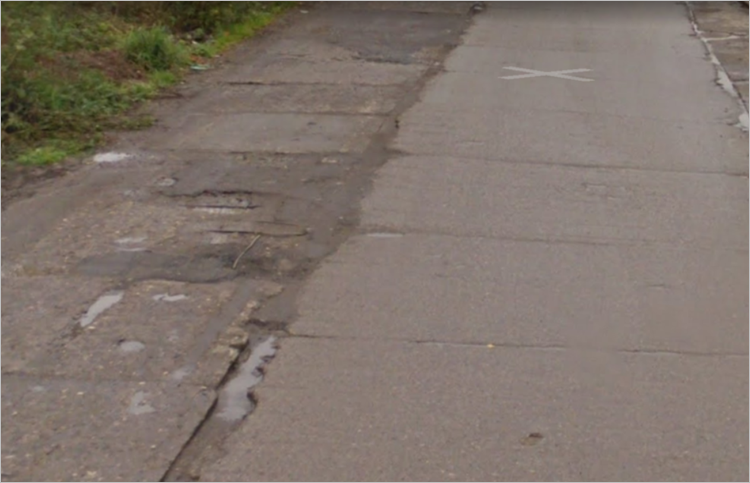
-
Road in poor condition made of cement slabs:
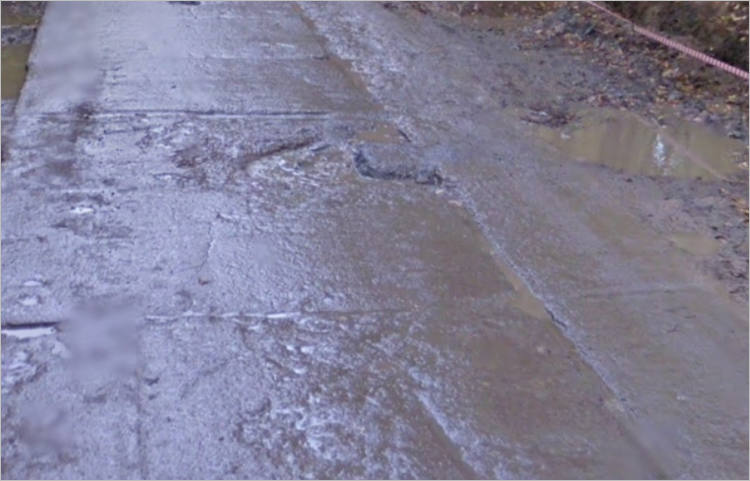
-
Paved road in poor condition:
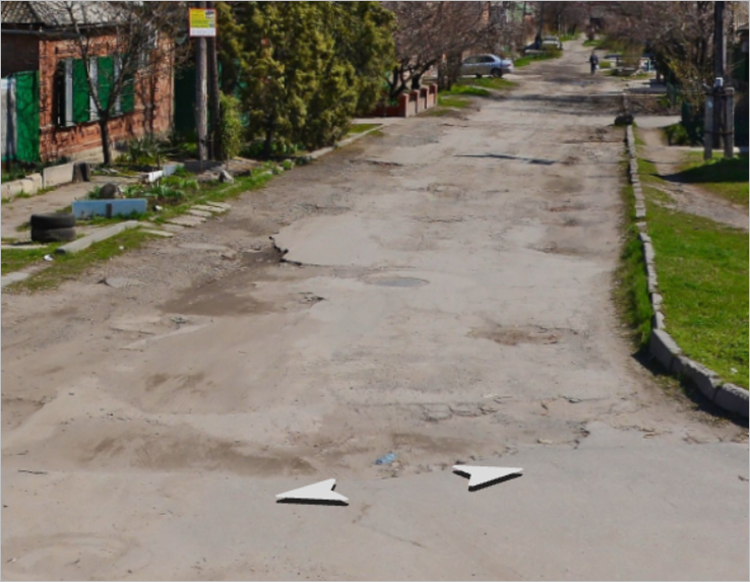
-
Paved road in poor condition:
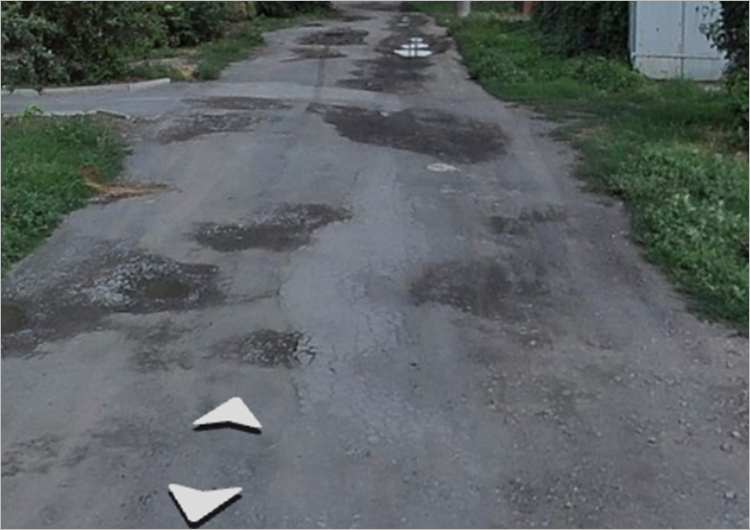
-
Paved road in poor condition:
-
Unpaved road in poor condition:
-
Unpaved road in poor condition:
3.3.2.16. Residential area
The Residential area
toggle sets a limit for traffic in given a road section.
Alert
The markers of a residential area are determined by the traffic regulations of the country being mapped.
Its value should be set to Yes
(the toggle is on) for road sections of class 6 and class 7 when the traffic is restricted by a No traffic
, No motor transport
, or Residential area
sign, as well as for road sections in areas restricted by a No entry
sign with an extra description indicating that the road is intended for private access:
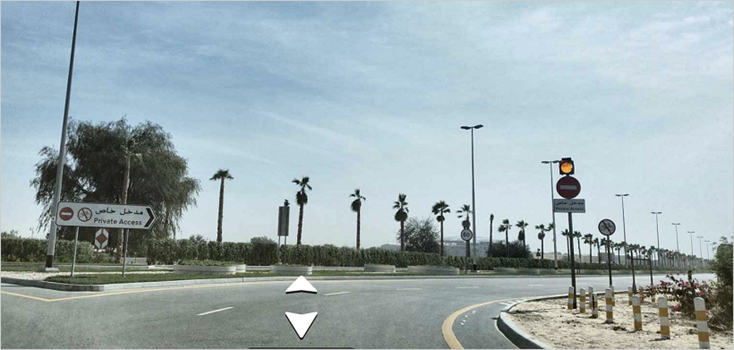
Additionally:
-
If all or some entrances through class 1-7 roads are restricted by signs (
No traffic
,No motor transport
orResidential area
) or any combinations of those signs with boom barriers, then the value of all class 6 and 7 roads inside the area should be set toYes
.For instance, if some entrances to a real estate area (indicated by red arrows) are restricted by
Residential area
signs, then the attribute value for all class 6 and 7 road sections inside the area (indicated by an outline) should be set toYes
:
-
If a class 6 or class 7 road:
- Has a
Residential area
sign installed, mark it with theResidential area
attribute up to theEnd of residential area
sign. - Has
No traffic
orNo motor vehicles
signs on both sides of the block, mark it with theResidential area
attribute within this block.
Exception: if access to a class 6-7 public road (which has no
Residential area
attribute because of other signs) is restricted with aNo traffic
orNo motor vehicles
sign in one lane while the other lane is open, don't set theResidential area
attribute. Instead, place a restricted entry sign before the sign at the nearest intersection. Also see Section 3.3.4. Road signsFor example, if part of the road is blocked off with
Residential area
signs (indicated by red arrows), then all class 7 road areas receive theYes
value to its attribute: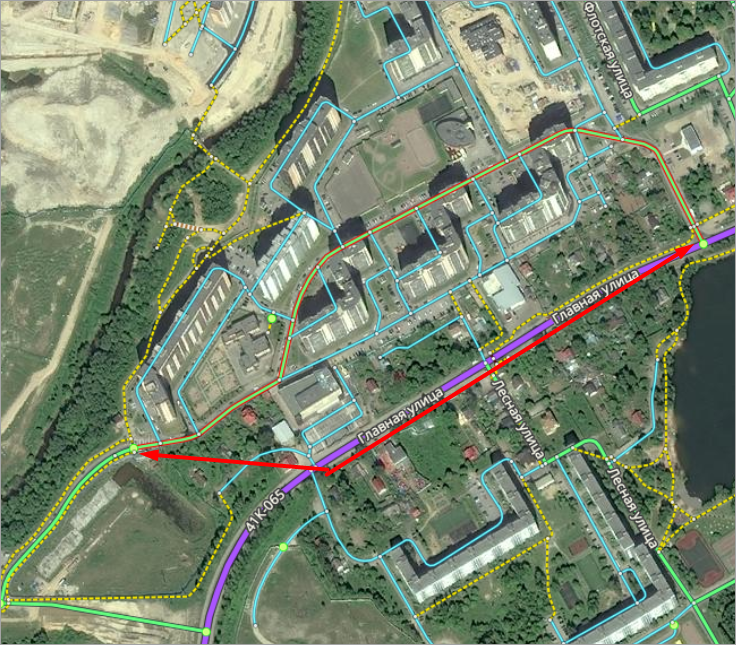
- Has a
-
If a class 6 or class 7 road has a
Residential area
sign installed, but noEnd of residential area
sign and it's also impossible to determine which area the sign relates to, don't assign theYes
value to its attribute.For example, if a sign is installed in an area indicated by the arrow, and there are no more
Residential area
orEnd of residential area
signs, don't set the attribute value toYes
: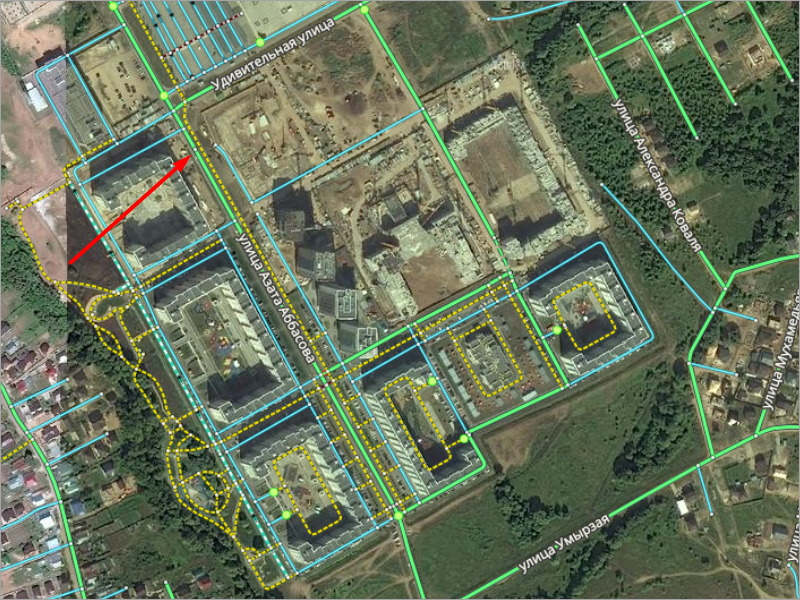
3.3.2.16.1
When a "Residential area", "No traffic", "No motor vehicles", or "No entry" sign with an extra description indicating that the road is intended for private access is:
-
Placed at the entrance to a partially or fully restricted area, set the "Yes" attribute value starting from the location of the restriction.

-
Placed beyond an intersection, set the "Yes" attribute value from the intersection point at the crossroads only if nothing lies between the intersection and the sign (no driveways to courtyards or adjacent areas, transit stops, no-parking signs, or places where stopping is explicitly described as permitted in the traffic regulations).
The yellow arrow in the image shows the location of the "Residential area" sign, and the red arrow shows the intersection from which the "Yes" attribute value is set.
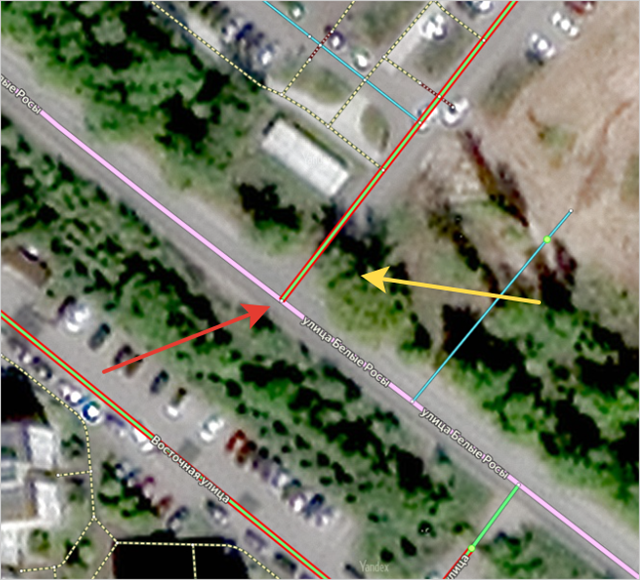
-
Placed in an area that has something between the sign and the intersection point at the crossroads (driveways to courtyards or adjacent areas, transit stops, no-parking signs, or places where stopping is explicitly described as permitted in the traffic regulations), set the "Yes" attribute value from the sign's actual location.
The red arrow in the image shows placement of the "Residential area" sign, and the white arrow indicates a driveway to the adjacent area located between the intersection (yellow arrow) and the "Residential area" sign. In this case, set the "Yes" attribute value starting from the sign's location.
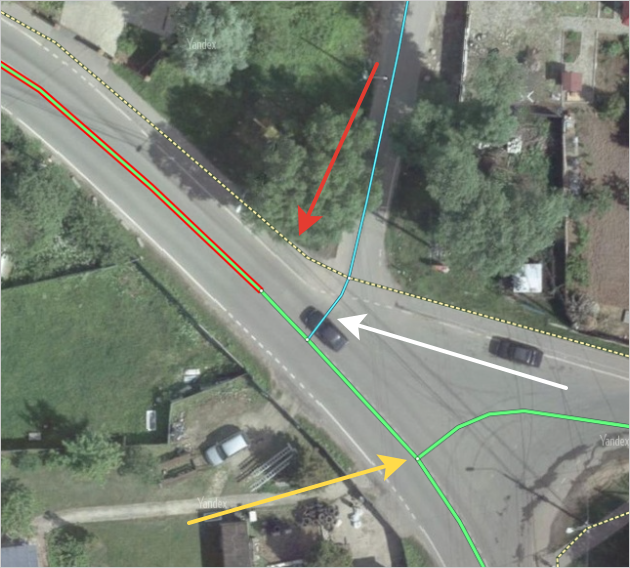
3.3.2.16.2
Set the speed limit specified in traffic regulations for a residential area for road sections marked with the "Residential area" attribute if at least one of driveways to the area is marked with the "Residential area" sign.
If you set the "Residential area" attribute exclusively based on "No traffic" and "No motor vehicles" signs, don't change the speed limit value on roads in this area to the value specified in traffic regulations for a residential area.
3.3.2.17. Elevator
The "Elevator" attribute indicates the existence of an elevator in the road network, that links pedestrian roads on different levels.
If there's an elevator that allows bypassing stairs to move from a pedestrian road of one level to a pedestrian road of another level, draw a section of a class 10 road at the location of the elevator, connecting these pedestrian roads. Set the "Elevator" attribute for that connecting section.
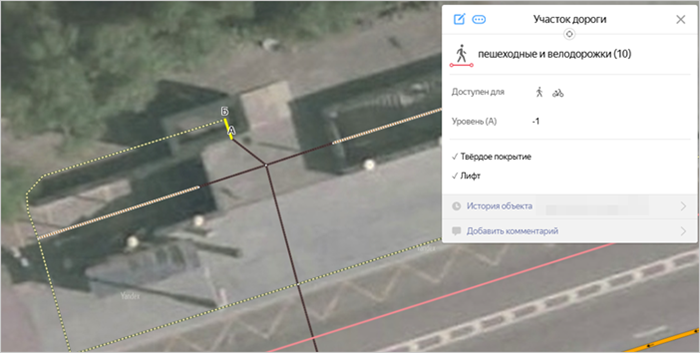
Elevators can connect ground-level, aboveground, and underground sections of bridges, overpasses, and the road network (primarily in multi-level underground crossings).
Because road sections with the "Elevator" attribute connect roads located at different levels, the values of the "Level A" and "Level B" attributes for these sections should correspond to the level values of the connected roads.
The values of "Level A" and "Level B" for each road section can't differ by more than 1.
If an elevator connects three or more levels, draw a section for each pair of levels. For example, if the elevator connects roads at levels 0 and 2, then draw two road sections with level values [0; 1] and [1; 2].
Alert
DON'T draw elevators leading to roads not marked in the road network (for example, elevators to metro stations).