3.4.3. Building entrances: rules for drawing and adding attributes
3.4.3.1. Items that belong to the "Building entrance" category
3.4.3.1.1. Entrances to residential buildings
- Draw entrances to apartment buildings, including service entrances and fire escapes, leading to residential apartments and their hallways.
- Draw all entrances to small houses and cottages (including service entrances and fire escapes) leading to one or more apartments so long as two or more of those apartments have the same address.
- Draw entrances to organizations located in apartment buildings.
3.4.3.1.2. Entrances to commercial, industrial, and public buildings
Draw all entrances to commercial, industrial, and public buildings.
3.4.3.1.3.
Do not draw entrances for demolished buildings. If an operational building changes its status to demolished, make sure to delete its entrance.
3.4.3.2. Methods of drawing building entrances
You can access the entrance drawing tool one of the following ways:
-
In the extended attribute panel for buildings (see point 3.4.2.8)
-
In the quick search line for categories
-
In the shortcut panel after you finish drawing a building
Techniques for drawing and editing entrances to buildings are similar to the techniques for drawing and editing all places on the YME. See:
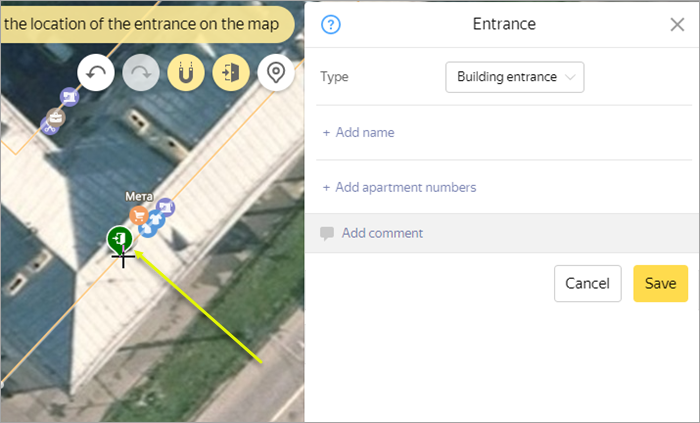
Additionally, you can turn snapping mode on or off when drawing building entrances. If you clicked the  button (Snap to other map items mode), then the entrance placemark will snap to the building polygon, which ensures that you place it directly on the polygon outline:
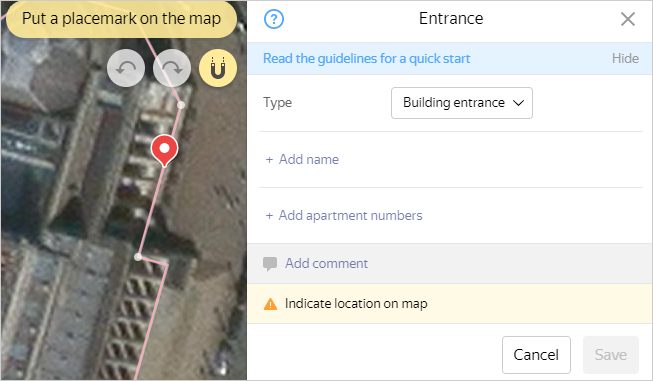
Building entrances are represented using points on the map:
3.4.3.3. Rules for drawing building entrances
Follow these rules for mapping building entrance points:
-
Building entrance points correspond to building entrances. Do not draw entrances into territories as items of the Building entrance type. Doors used only as exits from a building can also be mapped as entrances.
-
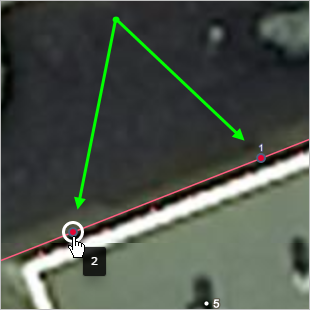
Draw the entrance point on the building's polygon (for exceptions, see section 3).
-
Place entrance points inside a building polygon if the building entrance is located in one of the following locations:
-
In arches and any other specific building elements (recesses, indentations, and so on) where the entrance and pathway are located beneath the polygon of the building's roof but do not pass through the interior spaces.
-
In an underpass or other underground construction.
If this entrance is physically located outside the building polygon at ground level, then put the entrance point at the location on the polygon that is closest to its actual location.
-
-
When drawing entrances and exits for railway stations and airports, only use the Building entrance parameter if they lead in and out of
the city
.Don't draw gates and entrances to restricted areas and platforms.
-
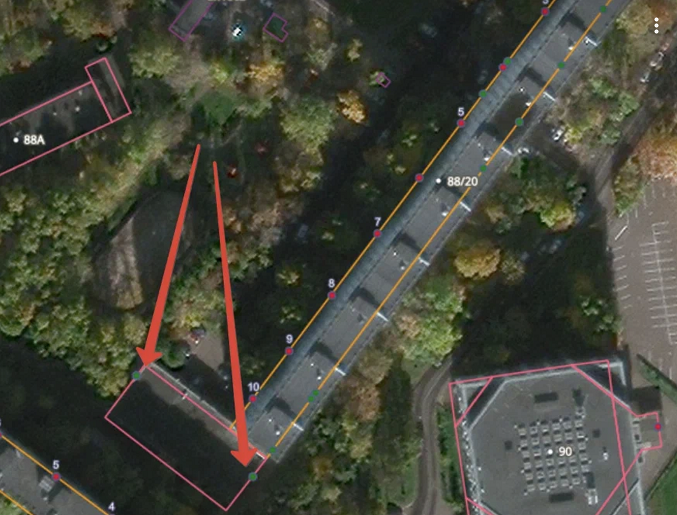
If multiple entrances are right next to each other and lead into the same space (for example, the main doors of a shopping center), mark them on the map as a single entrance.
If an entrance group can be accessed using multiple entrances from different sides, mark each entrance as a separate item.
3.4.3.4. Rules for adding attributes to building entrances
Rules for adding attributes:
3.4.3.4.1. Name
-
If you're drawing numbered entrances to residential and public buildings, only specify their number without including the item type. For example, 1.
-
For numbered entrances to train stations and airports, the rules are as follows:
- If a door is used as an entrance or both entrance and exit, its name should follow the format of [Entrance (space) No. (space) entrance number].
- If a door is only used as an exit, its name should follow the format of [Exit (space) No. (space) entrance number].
For example: Entrance No. 0 or Entrance No. 1a in Domodedovo.
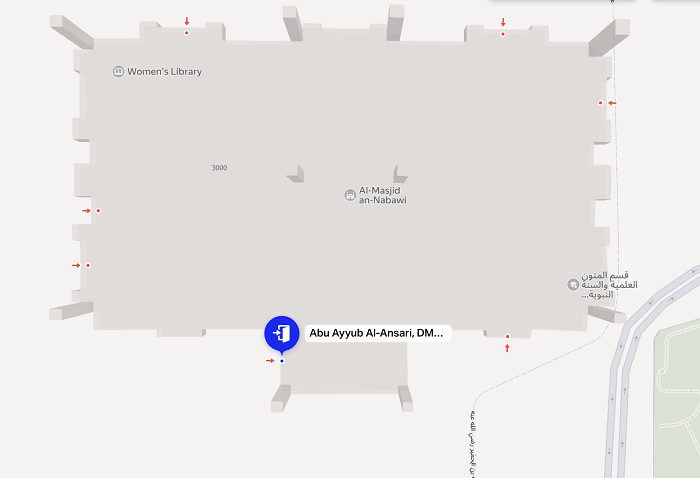
-
For named entrances: if the proper name reflects the type of item (in accordance with the language norms), then enter the proper name and item type. For example, North Entrance, Abu Ayyub Al-Ansari, DMAG3000, Abubakr Siddik Gate.
-
For named entrances: if the proper name doesn't reflect the type of item (in accordance with the language norms), then only enter the proper name without the item type. For example, North.
-
For entrances to specialized medical units located in buildings and departments of hospitals and other medical institutions that cannot be displayed as separate items of the
Places
category, enter the name of the unit the entrance leads to.For example: Scheduled Hospitalization, Emergency Room.
If a division can be marked on the
Locations
layer, map it as an organization without naming the entrance. -
For organizations that have multiple entrances for different types of visitors (couriers, drivers, customers, and so on), you can name the entrances provided they do not have a proper name. For example: Driver Entrance.
If the entrance has a proper name, you can add the name with the entrance type as a synonym.
-
If an entrance to a building leads to a number of other different entrances, draw only one entrance. Those entrances' names are specified in the building's official name in the format specified on the building's plate. If the plate doesn't clarify the entrance naming format, the entrance numbers are specified instead. Each number is added to the official name as a separate
Also known as
name and separated by a comma. For example: official name 1,2, also known as 1, also known as 2. -
Do not use organization names, apartment numbers, or the entrance purpose (such as service entrance or fire escape) as names of building entrances.
-
Do not attribute numbers to individual entrances in residential buildings if each entrance has its own address. For example:
3.4.3.4.2. Type of entrance
The type of entrance is selected from this list:
-
Main (entrance to the building) is usually the entrance that leads to any elevators there are, and it may be monitored by a guard or concierge. Intercoms are also usually installed at the main entrance.
The Building entrance attribute is also assigned to the main entrance of public buildings.
If the building has entrances from both a closed courtyard and a public area, the latter is considered the main entrance.
If there are two entrances with an intercom, the one that has a plate with the range of apartment numbers is considered the main entrance.
Note
Don't assign the
Main
type to entrances to extensions that have the same address as the main building and are located wall to wall with it. -
Service —
-
in residential buildings, service entrances are all entrances leading to apartments except for the main entrance as well as entrances to organizations inaccessible for visitors.
-
while in other types of buildings they include service, fire, and other entrances used in emergency situations. Additionally, they include entrances to organizations located in restricted areas accessible only to staff so long as the organizations also have public entrances.
Note
For organizations without a visitor entrance (for example, kiosks or transformer substations), mark staff entrances using the
Service
type.
-
-
Entrance to an organization —
-
Added to entrances to organizations located exclusively in residential buildings and their extensions that have the same address as the main building and are located wall to wall with it.
-
or to a separate organization in another building type. For more information, see Section 3.4.3.5. Adding an entrance to a building and then linking it to an organization.
-
3.4.3.4.3. Apartment numbers
Apartment numbers can only be specified for entrances to residential apartment buildings and buildings that host both offices and residential apartments. You can only assign apartment numbers to residential apartments. Don't assign apartment numbers to service entrances.
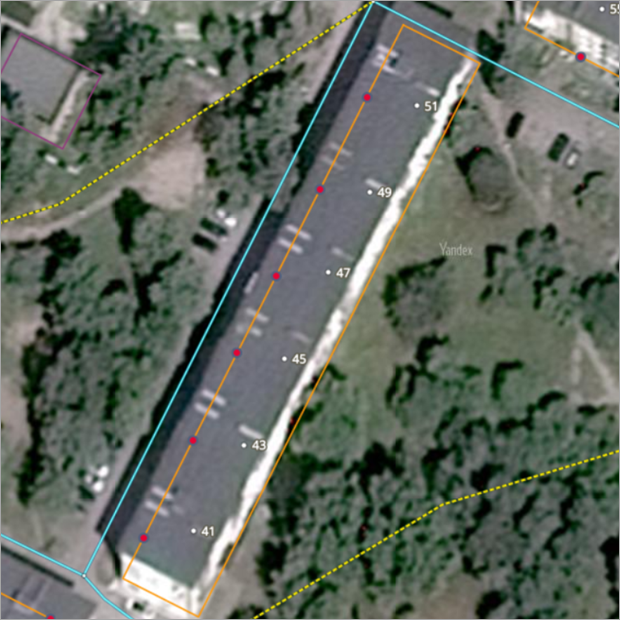
Indicate which apartments can be accessed through the given building entrance in the Apartment numbers fields. To enter apartment numbers, use apartment ranges.
A range shows the apartments that share an entrance in a row, if they are located on the same floor or on several floors with the same number of apartments on each floor. If the apartments or floors are not numbered in sequence, a separate range is created for each floor.
Click Add apartment numbers on the attribute panel for the building entrance. The Apartment numbers field block appears:
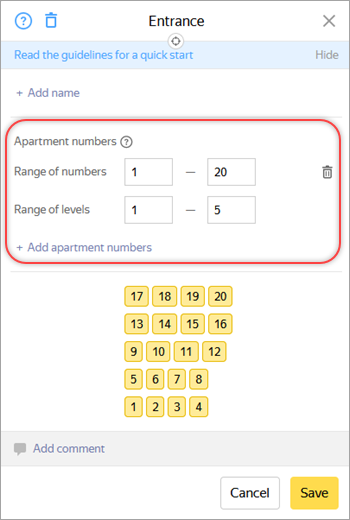
Apartment numbers are set through pairs of ranges, that are combinations of the range of apartment numbers and the range of floors. Each range is defined by specifying start and end values separated by a hyphen (keep in mind that the start value must be less or equal to the end value):
- To set the range of apartment numbers, specify the first and the last of the consecutive apartment numbers of the entrance, provided that they are numbered sequentially (without omissions) and are located on the same floor or on several floors in a row with an equal number of apartments on each floor.
- To set the range of floors, specify the first and the last of the consecutive floor numbers, provided that each floor has an equal number of apartments and they are numbered sequentially.
At the bottom of the Apartment numbers section, you can see how apartment numbers are assigned by floor. The apartment numbers are displayed in editing mode. This means the number ranges change in real time, and you don't have to save the item:
If the sequential numbering condition is not met (the sequence of apartment numbers is broken or the number of apartments is different on different floors), set several combinations of apartment number and floor ranges so that this condition is met for each range. To add a second and subsequent range combinations, click Add apartment numbers again:
For multi-floor apartments, the apartment number in the floor range should be indicated at the entrance floor. If you don't know the entrance floor, enter the number at the lowest of the floors occupied by the apartment.
Note
If a floor number contains a letter in addition to a number, set its number using a separate range (see Example 5).
If an apartment number contains a letter in addition to a number, it's set in the following way:
- As a separate range that only consists of an apartment that uses a letter if this letter complements the standard numbering (see Example 6).
- Separated by a comma from the rest of the range if an apartment with a letter interrupts the standard numbering (see Example 7). If the range of apartment numbers includes a comma-separated number, the corresponding floor range can consist of only one floor.
Letters are always written in capital (uppercase) letters.
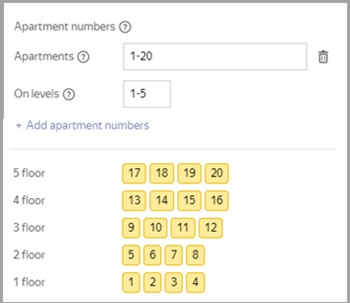
Example 1
The apartments and floors sharing the entrance are numbered sequentially, and all floors have an equal number of apartments (for example, apartments 1–20 on floors 1–5 of a five-storey building). Apartment numbers are set using one pair of ranges:
Example 2
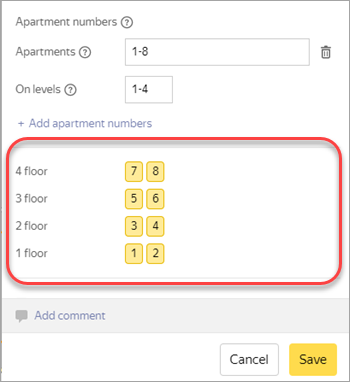
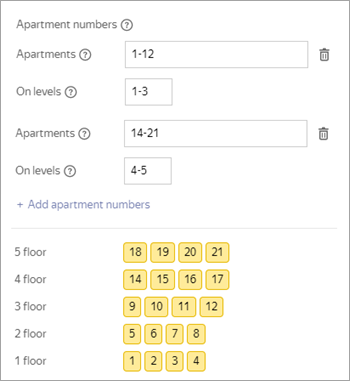
The apartments sharing the entrance are numbered sequentially, but there are different numbers of apartments on different floors. For example, there is a five-storey building with 16 apartments. Floors 1–3 have 4 apartments each and floors 4–5 only 2 on each floor.
Apartment numbers should be set separately for each group of consecutive floors with the same number of apartments using several pairs of ranges (in this case, two pairs):

Example 3
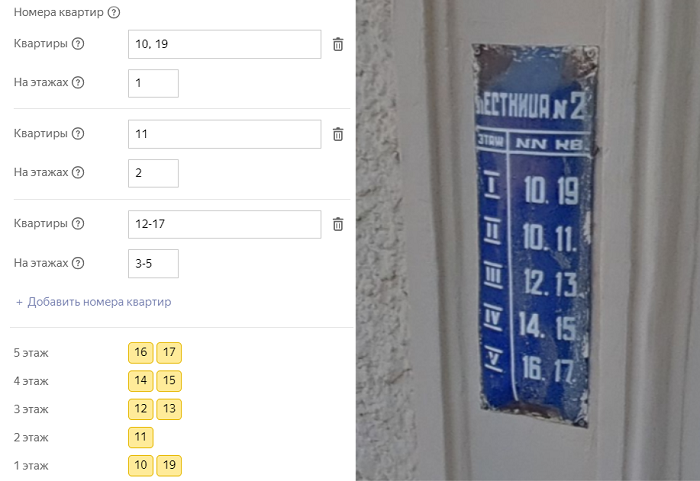
The apartments sharing the entrance are numbered sequentially, but one number is missing. For example, a five-storey building with 20 apartments sharing the entrance. There are 4 apartments on each floor, but apartment 13 is missing.
Apartment numbers are set using two pairs of ranges created for each group of sequentially numbered apartments:
If the floor number is missing when numbering the floors in a sequence, apartment numbers are also divided into two pairs of ranges (within each range, the floors are numbered strictly sequentially).
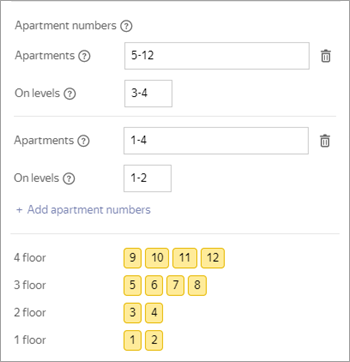
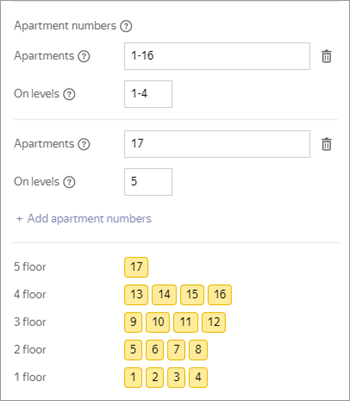
Example 4
The apartments sharing the entrance are numbered sequentially, but there's only one apartment on one of the floors. For example, a five-storey building with 17 apartments sharing the entrance. There're 4 apartments on floors 1–4 and only apartment 17 occupying floor 5.
The apartment numbers are set using two pairs of ranges (for the only apartment on a floor, the same value is set in the start and end fields of the apartment and floor ranges):
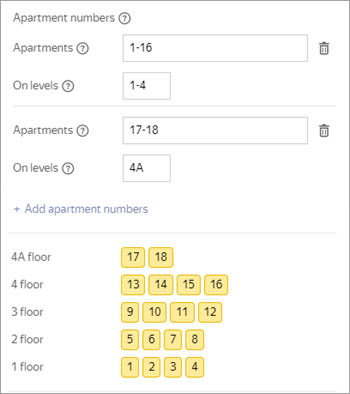
Example 5
If a floor number contains a letter in addition to a number, it is set using a separate range. Letters are always capitalized (written in uppercase):
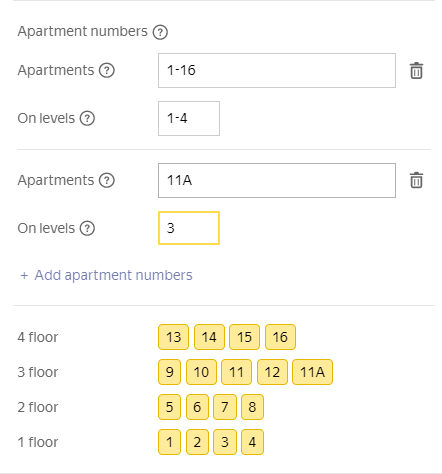
Example 6
If an apartment number contains both numbers and letters, it's set as a separate range that only contains an apartment with a letter if it complements the standard numbering:
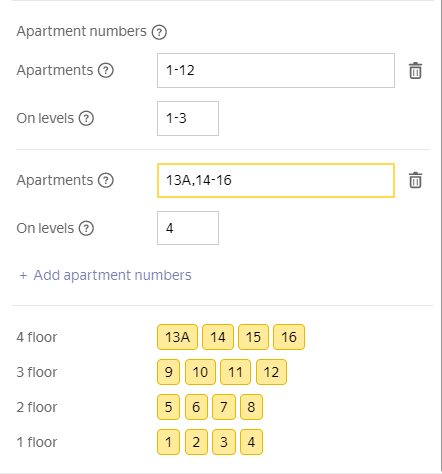
Example 7
If an apartment number contains a letter in addition to a number, it's set by separating it by a comma from the rest of the range if this apartment's number interrupts the standard numbering.
3.4.3.5. Adding an entrance to a building and linking it to an organization
There are two ways to add an entrance to an organization:
-
Using the interface for editing entrances in the organization card (see 3.6.3. Entrances to organizations outside Indoor maps).
-
By adding an entrance to the building and then linking it to the organization or linking an existing entrance.
To do this:
-
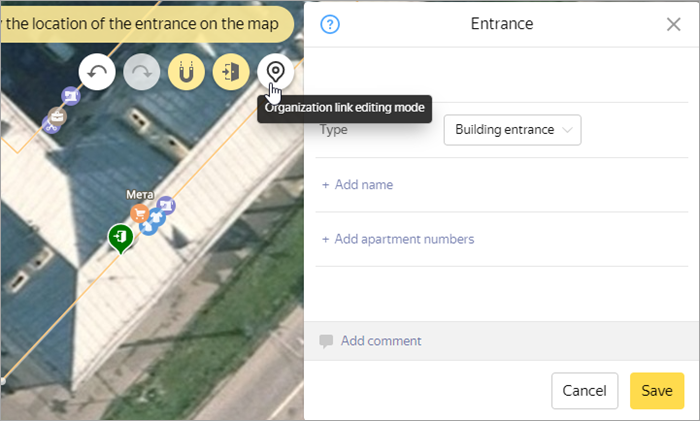
Create a new entrance (or select an existing entrance and switch to editing mode):
-
Click Organization link editing mode:
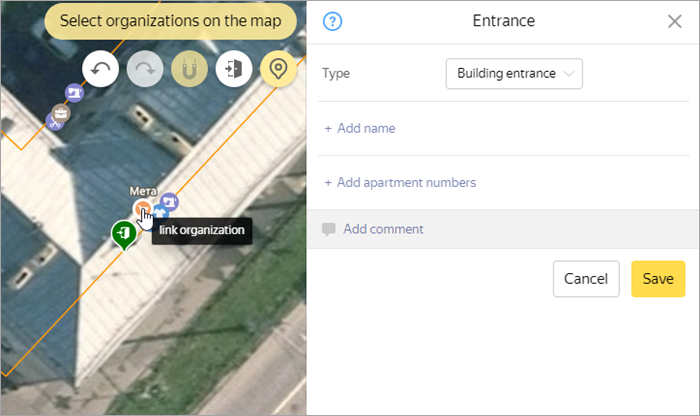
-
Select the required organizations:
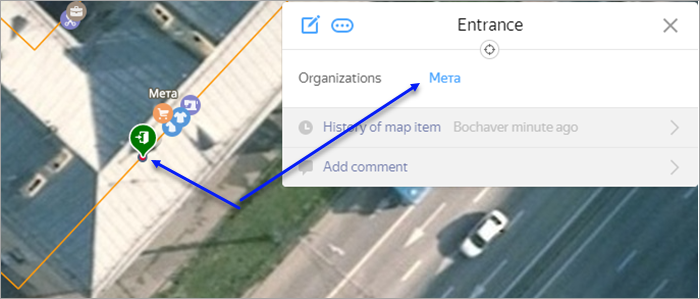
-
Tap Save. The linked organizations will be displayed in the entrance card:
-
-
For organizations on indoor maps, using the Enable entrances to buildings switch and the interface for editing entrances (see ). 3.18.3. Entrances to organizations on Indoor maps.