Setting up on Keenetic routers
![]()
Yandex DNS is built into Keenetic routers. It can be configured for individual devices or for all devices at once.
KeeneticOS 3.8 and above
Note
If auto-update is enabled, KeeneticOS automatically updates to the latest version.
-
Register your devices on your home network.
-
Open Management → General settings. Click Change component set.
-
In the list of components, select Use cloud services for content filtering and ad blocking.
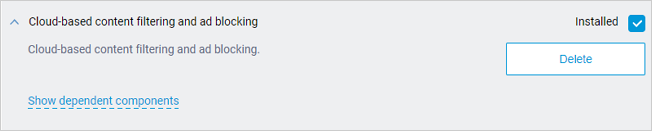
Then click Install update at the bottom and wait for the installation to complete.
-
On the Internet filters page, in the Filtering mode field, select Public DNS resolvers.
-
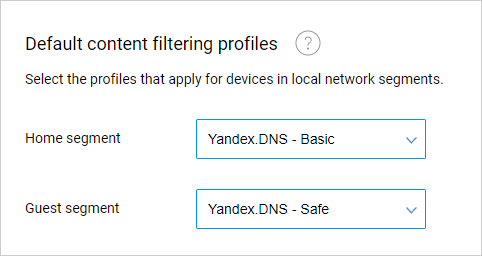
Under Default content filtering profiles, choose Yandex DNS modes for the home and guest network. The modes will be applied by default for all devices on the network, including unregistered ones.
-
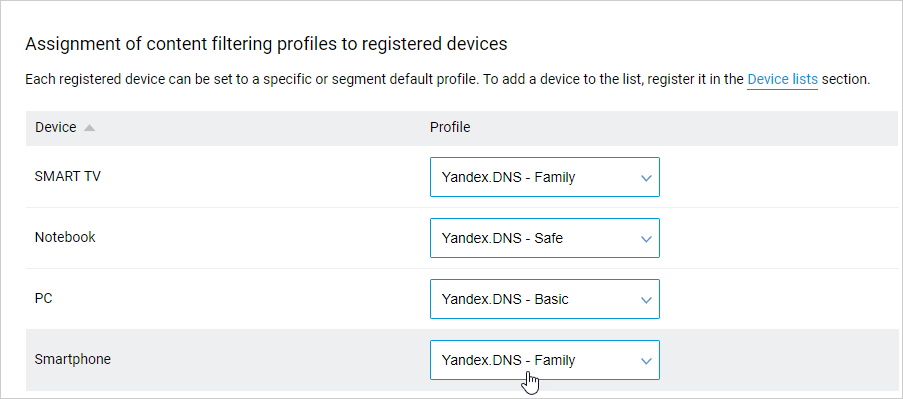
You can set your own Yandex DNS modes for specific devices, such as for your child's computer.
-
Under Content filtering profiles for registered devices, find the device.
-
If the device is not there, register it on your home network.
-
Select Yandex DNS mode next to the device name.
-
KeeneticOS below 3.8
-
Register your devices on your home network.
-
On the Internet filter page, in the Filter field, select Yandex.DNS.

-
Select the filter profile:
- The default profile is used for all devices on the network, including unregistered ones.
- You can assign a separate profile to individual devices, such as your child's desktop. To do this, select it from the list to the right of the name.

DNS over TLS / HTTPS
Alert
DoT and DoH are supported on all Keenetic routers version 3.00 and higher.
Increase connection security with DNS over TLS or DNS over HTTP encryption.
To enable the desired protocol:
- In the web interface, click Management → General Settings.
- Go to Updates and Components.
- Click Component options and select the protocol you want to install.
- After selecting the desired protocols, click Install the update.
For further configuration, open the Internet filter page of the web configurator and go to Setting up DNS.
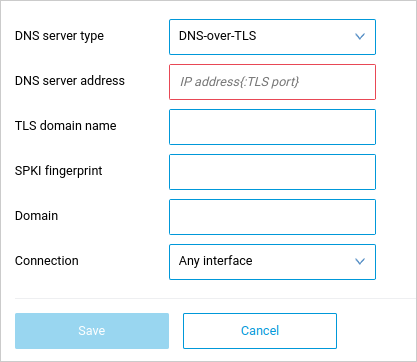
- In DNS Profiles, click Add a server.
- In the Type of DNS server field, choose DNS-over-TLS.
- In the DNS server address field, specify the IP address of the server with the desired mode and the port:
- basic:
77.88.8.8:853 - safe:
77.88.8.88:853 - family:
77.88.8.7:853
- basic:
- In the TLS Domain Name field, enter the name of the server with the desired mode:
- basic:
common.dot.dns.yandex.net - safe:
safe.dot.dns.yandex.net - family:
family.dot.dns.yandex.net
- basic:
- If necessary, in the Connection field, specify the connection interface (default value: Any interface).
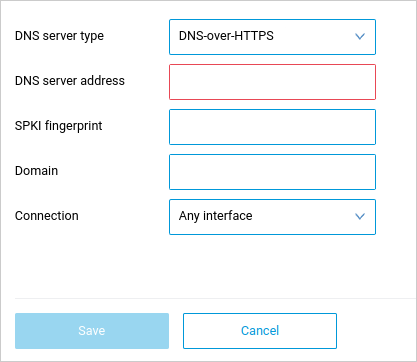
- In DNS Profiles, click Add a server.
- In the Type of DNS server field, choose DNS-over-HTTPS.
- In the DNS server URL field, specify the server address with the desired mode:
- basic:
https://common.dot.dns.yandex.net - safe:
https://safe.dot.dns.yandex.net - family:
https://family.dot.dns.yandex.net
- basic:
- If necessary, in the Connection field, specify the connection interface (default value: Any interface).
Now, the sites with inappropriate content will be blocked on the devices which you have enabled the filtering profile for.