Prepare a secret in Microsoft 365 (English interface)
A secret file is a file with an access key. Yandex 360 for Business uses it to connect to Microsoft 365. To prepare it, you need to register an application in Microsoft Azure, then create a new secret and save it to a file.
Step 1. Register an application in Microsoft Azure and create secrets
-
Open the application registration page in the MS Azure portal (you need to log in as an admin):
https://portal.azure.com/#blade/Microsoft_AAD_RegisteredApps/ApplicationsListBlade. -
Click New registration.
-
Enter the following information:
-
In the Name field, enter the name of the application, such as migration.
-
In Supported account types, select Accounts in this organizational directory only (
) .
-
-
Click Register.
-
Go to the Overview tab. Copy the value of Application (client) ID and save it in a text file. You will need this ID in the next steps.
Example ID:
abcd1234-a1b2-1111-123a-absdfe -
Go to the Certificates & secrets tab and create a new secret for the migration application:
-
Select Client secrets and click New client secret.
-
Fill in the description field in the panel that appears (for example: migration-secret).
-
Click Add.
-
Copy the value of Value and save it in a text file. You will need this secret in the next steps.
Example of secret value:
ABCD2XYZ032-xyzXYZ032
-
-
Go to the API permissions tab and add permissions:
-
Click Add a permission.
-
Make sure that the Microsoft APIs tab is selected in the panel that appears. Click Microsoft Graph.
-
Select Application permissions.
-
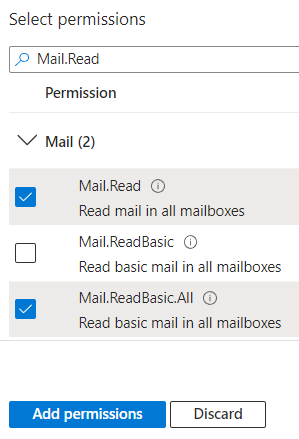
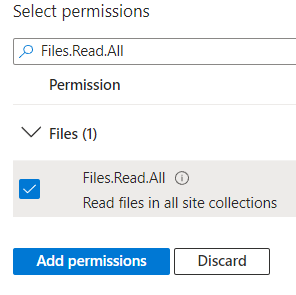
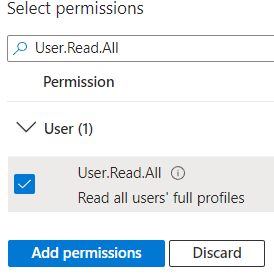
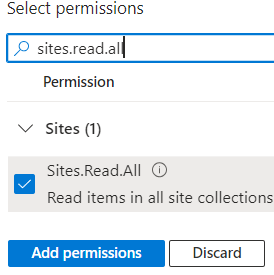
Find the following permissions using the search, select them, and click Add permissions for each section:
Mail: Mail.Read and Mail.ReadBasic.All (for email migration)
Files: Files.Read.All (for searching and downloading files)
User.Read.All (for reading the list of users)
Sites.Read.All (for searching and downloading files from SharePoint Online document libraries)
Alert
Select all the sections listed above. We recommend creating a single secret for emails and files. If you only add permissions for emails (
Mail.ReadandMail.ReadBasic.All), you won't be able to start file migration with this secret. -
Click Add permissions.
Permissions will be added but not confirmed:
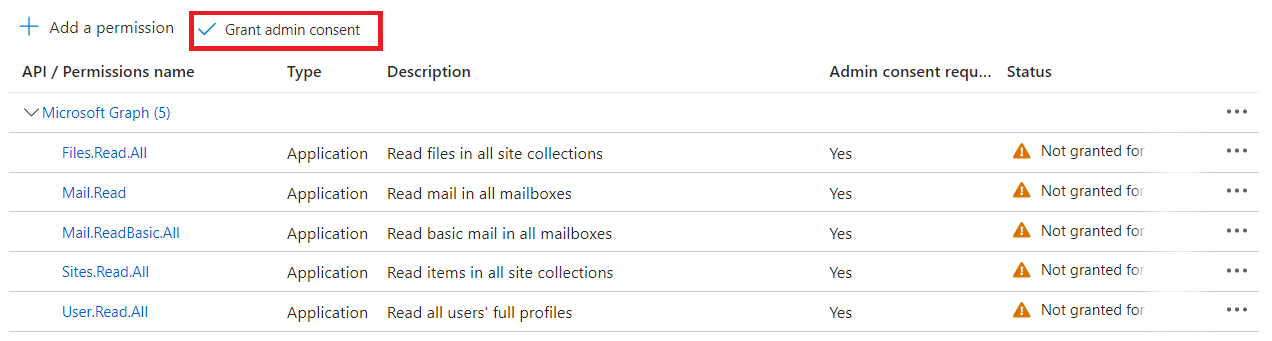
Click Grant/revoke admin consent for
to confirm application access. In the window that opens, click Yes. The  icon should appear in the Status column next to each permission.
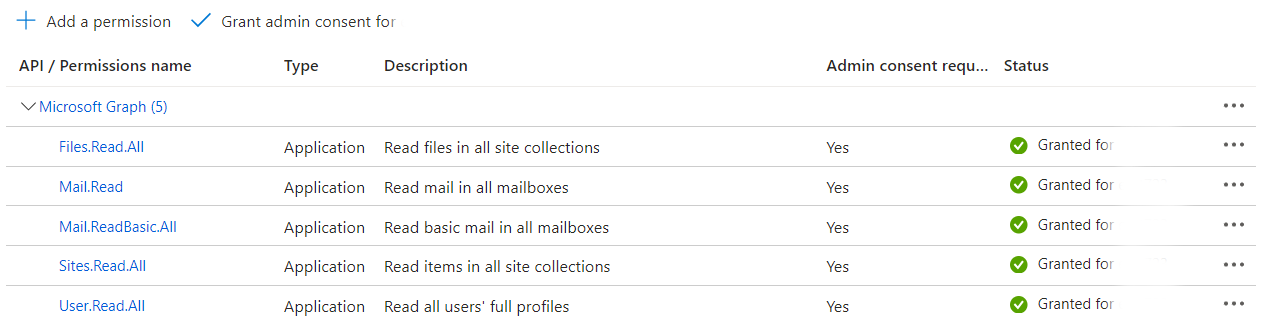
-
Step 2. Create a secret file
-
Create a
secret.jsonfile in any text editor (for example, Notepad) and paste the template there:{ "client_id": "<client id>", "secret": "<secret>" } -
Replace
<client id>with the Application (client) ID value that you copied and saved in Part 5 of Step 1. Replace<secret>with the Value that you copied and saved in Part 6.4 of Step 1.This is what the result should look like:
{ "client_id": "abcd1234-a1b2-1111-123a-absdfe", "secret": "ABCD2~XYZ032-xyzXYZ032" } -
Save the file with the secret. Now you can start migrating emails and files.